What's new
Pinball info

Register a free account today to become a member! Once signed in, you'll be able to participate on this site by adding your own topics and posts, as well as connect with other members through your own private inbox!

Complete STTNG the next one for the shop job!

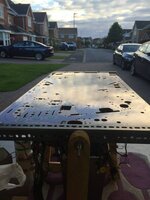
I'm sure "Diamond" is mentioned somewhere on my PARAGON but my VECTOR states "TUFF-COAT". Either way whatever the coating actually is it's sh*t. For a start it's water-soluble, hence the warning not to clean with water or soap solutions and why so many old Bally playfields suffer from extreme planking - any contact with water and the "clear-coat" literally washes off.

Sorry if this is a bit off-topic - I realise these are older machines from a different era.
 
Just a couple of strips Pete, right loop, inbetween pops and mission start shot - so I guess probs better taking it off ? Manual does say it is hardcoated, but doesn't mention diamond coat anywhere in manual or on playfield ?

Cheers Kev
Aye, it'll be clear coated. Personally I would leave those little strips alone and just buff over them. I did that on my T3 and BF and the strips were shiny enough, and bubble free, so got left alone.

Diamond plate was just Williams funky name for clearcoating. I think after the early 90s they stopped marking playfields as having it.

All games should be CC'd after early 90's but I think they just stopped advertising it. Was a kind of marketing gimmick at first.

What media do you use? The one in my borrowed tumbler has gone all dusty now so sticks to all the parts.

Not sure about everyone else but I'm buying "Ground Walnut Grit" off Amazon, and squirt a bit of Autosol in it when tumbling. Just make sure to get the "Grit" version and not "Sand".
 
Absolutely 100% certain it will be clearcoated. What with all the more difficult things you do with your restorations I think you'll be surprised how easy removing mylar is when you go it a go.

There's of a risk losing art on early playfields before clearcoat but I think you'd have to really careless to do so on your STTNG. The text on inserts is most vulnerable.

If you use freeze spray once the glue is frozen then it literally just lifts up as if it isn't glued at all. If it doesn't then the glue isn't frozen properly and you need to aim at it from a different angle. The hardest bit is getting a start, once you have a corner up just shoot the spray underneath while gently lifting the corner. As soon as the glue freezes it will lift a chunk and you can spray deeper and deeper until the while mylar is off.
 
ok freeze spray it is then guys an mylar off !!! any got a link to the spray they use ?

Cheers Kev
 
I used a can of this stuff from Maplin which worked well. http://www.maplin.co.uk/p/maplin-freezer-spray-400ml-n68an

You can probably buy something cheaper elsewhere but I didn't really look. A can should be more than enough to do everything on the playfield, I used it on a STTNG too. I believe theres 2 little pieces on the ball drops, a big chunk by the pops, the strip up the middle leading to the start mission hole and maybe another bit on the right orbit?
spot on mate thats exactly where all the mylar is. Did you put new on once you rtook it off or just seriously polish it up?
 
My playfield restore is still in progress but getting there. Other stuff keeps getting in the way unfortunately and all of the inserts in mine were knackered. Ultimately though I do intend to replace the mylar in the high wear areas: ball drops, pop bumpers and the orbit where the ball is launched. I don't think I'll bother with the strip up the middle as I can't see that area will get any more wear then the rest of the playfield and it looks a bit pants in the middle of all the art. (The ball doesn't kick out of the start mission hole, only falls in to it.)
 
Last edited:
Do you plan to clearcoat the playfield or just polish it? If your're just polishing it then its probably not worth removing unless its bubbled up underneath. Mylars supposed to be really hard to polish but it can be done with cutting compound and power tools. The only reason I removed mine is cause I needed to remove inserts underneath and I've clearcoated.
 
Do you plan to clearcoat the playfield or just polish it? If your're just polishing it then its probably not worth removing unless its bubbled up underneath. Mylars supposed to be really hard to polish but it can be done with cutting compound and power tools. The only reason I removed mine is cause I needed to remove inserts underneath and I've clearcoated.
dunno - I have bought all the polishes so was going to try and polish rather than clearcoat but there are a few bubbles underneath it, so think it should come off anyway. Them I may polish and see how it goes and if not good clearcoate it anyaway!!
 
So I followed @PeteB polishing method and got to say so far I'm very pleased - however I cant get the ball tracks out totally - guess its just wear I have to live with.

A few pics to show progress - this is so far G3 and G10 and super resin polish - no wax yet as it hasnt arrived

Before .....
P9140351.JPG
After !!!!
IMG_0642.JPG
IMG_0644.JPG

Cant wait to get the wax on it !!!!!

Cheers Kev
 

Attachments

  • IMG_0643.JPG
    IMG_0643.JPG
    85.6 KB · Views: 9
OK guys progress slow as been rebuilding the pops Arrrgh!!! I hate doing these bad boys but after 4 hours on them starting to look good

rings and solenoids done

IMG_0680.JPG

Switches before hand

IMG_0677.JPG

And after each one stripped and polished(do you think I might get free Autosol for the advertising!!)

IMG_0679.JPG

and playfield in natural light shows off shine nicely, with pop tops on and all the posts - the re-build has begun!!!

IMG_0681.JPG

Cheers Kev
 

Attachments

  • IMG_0679.JPG
    IMG_0679.JPG
    108.5 KB · Views: 8
  • IMG_0679.JPG
    IMG_0679.JPG
    108.5 KB · Views: 8
Ooh I do like a nice shiny ring :p Nice work Kev. Nice to see another giving things like pop switches some attention. Some might say what does it matter? You don't ever see them, but you know it's a job well done and that there won't be any unknown gremlins lurking underneath! Result!
 
Ooh I do like a nice shiny ring :p Nice work Kev. Nice to see another giving things like pop switches some attention. Some might say what does it matter? You don't ever see them, but you know it's a job well done and that there won't be any unknown gremlins lurking underneath! Result!
Cheers bud !!! wasn't going to strip the underneath of playfield, but once I cleaned one bit ........;)
 
Lovely stuff. Have you tried throwing the switches in the tumbler? Saves a lot of work ;)
 
I Have pete but they have come out all bent before when they get tangled with each other so not so keen on it
 
Flipper mechs all done and catapult assembly and a few more bits of shiny metal added on the underside. Also added the cliffys to neutral zone and catapult. LEDs in boards next job

IMG_0719.JPG
IMG_0718.JPG
IMG_0717.JPG

CHeers Kev
 
Back
Top Bottom