What's new
Pinball info

Register a free account today to become a member! Once signed in, you'll be able to participate on this site by adding your own topics and posts, as well as connect with other members through your own private inbox!

In Progress The Shadow

COIN DOOR BUTTONS ARE WORKING! Have no idea what I did or didn’t do but turning it on today they’re fully working.

For J112 @Jay Walker it does loop to connect to pin 3 but is the top meant to be cut?
 
That wire isn't heading anywhere else, so after reaching the second of those pins it would stop. So long as a bit of insulation remains on the cut end, it should be alright.

I'm wondering if your door switch was/is jammed in. At work, I once prevented a landlord, who had a key for the coin door, from tampering with the settings by rigging up a second door switch, behind the backbox insert panel.
 
Switch in the door probably became unstuck. So next step is to go into switch test and see if the mechanical switches are working (e.g. outlane). If they do, test an opto, eg. ball through. Report and we'll work from there.
Also, let us know what other issues it reports in self test.
 
Not sure where there are other optos on Shadow for testing - the error message you're seeing is caused by all the through optos being interrupted, may well be that another plug is off there.
 
Been a while but I’m back! Thankfully I now have a test report which is as follows:
Check Switch 51 Wall Target Down
Check Switch 55 Battle Drop Down
Time and Date not set
ERR. Mini PFF BAD Check switches / MTR
ERR. Magnet opto is not working
ERR. Battle kicker opto not working
ERR Wall TGT Bad check switch / coil
ERR Drop bank bad check switch / coil
ERR Bat drop bad check switch / coil

Some of these are an easy fix and others I’m not sure where to start! If anyone has any comments or tips, let me know.
 
Go into switch test, see if any opto works. Probably not, j116 should have a yellow-grey cable to the playfield. That is the 12V power for the optos. If that’s disconnected somewhere the optos won’t work. The wall down switch may be an actual issue. So find the yellow-gray into the playfield harness and follow it to the first opto and then onward and see if there’s a break.
 
Been a while but I’m back! Thankfully I now have a test report which is as follows:
Check Switch 51 Wall Target Down
Check Switch 55 Battle Drop Down
Time and Date not set
ERR. Mini PFF BAD Check switches / MTR
ERR. Magnet opto is not working
ERR. Battle kicker opto not working
ERR Wall TGT Bad check switch / coil
ERR Drop bank bad check switch / coil
ERR Bat drop bad check switch / coil

Some of these are an easy fix and others I’m not sure where to start! If anyone has any comments or tips, let me know.

I had your wall errors it was down to the switch arm on the microswitch.

Sorry I have been so busy with mine that I haven't had time to do a photo dump. Will do one in the morning.

Mines all working now so you'll have something to base it off.
 
To add to my earlier post: the playfield connector could also be on J117 or J118, they are all keyed the same and carry 5 and 12V. Therefore important to identify the right cable/plug.
 
Remove sanctum and battlefield drop target mechanisms from playfield. Disassemble and clean. Replace any broken or missing parts. Reassemble per pics in the manual. Ensure targets drop and slide up as they should. Potentially there could be a few things stopping these targets sliding up and down which triggers the errors. Vids guide is great for troubleshooting the sanctum wall.
 
Thanks for the help everyone - going to be having a look at some of the easier things today and have a look at removing mechs later this week.
 
Fixed it yet? :D
Sadly I’m away until June-ish so work has to stop! However once I get back I’ve got a while with no pressing plans so I should make some good headway and hopefully have it playing soon enough…
 
I’m back! I’ve been busier than I thought I’d be and as such Shadow has been on the backburner. However I’ve started again today and I could do with some help.

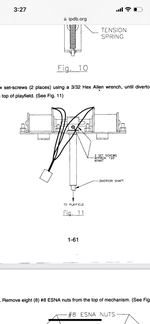
Firstly - anyone who’s torn one of these down before, can I just yank the diverter out? Trying to remove it but it seems relatively stuck - then again I’m not pulling too hard.

Secondly, I’ve found a few loose connectors and cut wires particularly from the upper play field. What’s the best way of looking through the manual and finding where there’s are meant to go / plug in?

Any help appreciated!
Do you mean the dagger diverters?

They have a small allen key hole around the shaft, just loosen this, they may be also a C clip holding it in. I'll have a dig through my photo's.

As before I would consider consulting my photo's so you can have a thorough check of the setup.


Cheers,

Scott
 
Do you mean the dagger diverters?

They have a small allen key hole around the shaft, just loosen this, they may be also a C clip holding it in. I'll have a dig through my photo's.

As before I would consider consulting my photo's so you can have a thorough check of the setup.


Cheers,

Scott
Thanks so much for that photo dump it has come in VERY handy. Im still struggling on the diverter - is the Allen key hole play field side or on the underside?
 
Thanks so much for that photo dump it has come in VERY handy. Im still struggling on the diverter - is the Allen key hole play field side or on the underside?
No worries,

Underside on the shaft you should see it.

Can you take a picture?
 
Diagram shows the set screws. These are two grub screws that need to be loosened off. Then you should be able to pull the diverted out from above the playfield.
When you reassemble, file that area of the shaft smooth, replace grub screws with cap screws so you can get more torque to tighten the screw and less slop on the diverters.
 
After 4 months... an update!

Finally back with Shadow now, and: Finished stripping the playfield, gave it a good clean and replaced the GI with LEDs (which looks great!). But what's to come?

Well before I have to leave again, I think I can do the some / most of the following:
- I've sourced another upper playfield with a PCB - going to transplant the PCB and drop targets to my current one and replace some of the broken plastics, which should mean I have a very nice upper P.F and a bunch of spare parts - result!
- Get the new set of plastics that can be put on without ramp or wire-form installation on the game
- LED the inserts
- Disassemble the pistol handle (Got very lucky finding this) and remove the mechanism ready for it to be chromed
- Get the wire-forms and pistol chromed
- Get the ramps, lockdown bar and other metal parts polished
- Clean the lamp board in the backbox and replace them with LEDs

So quite a few bits to do, which should mean that all the parts will be ready to be put back on the game the next time I'm with it. This'll mean I should be able to start troubleshooting properly, and (touch wood) have a working Shadow...
Then to install the XL DMD and a bunch of extras!
 
Looking forward to seeing what it looks like with the XL DMD.

Just polished up the ramps on mine, but its a long old process, if you have someone local who will do it for a reasonable price defo better going that way.
 
Looking forward to seeing what it looks like with the XL DMD.

Just polished up the ramps on mine, but its a long old process, if you have someone local who will do it for a reasonable price defo better going that way.
Luckily the same place that can plate some of the parts can polish the others! Will definitely be getting it done there.
 
Looking forward to seeing all your hard work come to fruition, when you find a plater let us know as I've got a couple of dm handles to do 😁
 
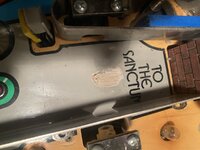
Been working on TS for the past week or so and think Sanctum repair is next on the list - going to use this filler https://www.diy.com/departments/polycell-white-ready-mixed-filler-0-33kg/189928_BQ.prd as it came recommended from someone for this repair. Anyone whos done this before got any tips?
If it’s a high wear area as Scott says, I’d use resin if the damage is deep enough imo.
If not resin, it would be a 2 part filler like either Ronseal or a car body filler. They are a lot harder when dry that Polycell.

I wouldn’t recommend using Polycell on anything other than a wall. It was used on my TAF in an old repair and it just crumbles away
 
Last edited:
Thats a high wear area.

Whats the damage of the existing area?

Personally I'd of gone wood filler or resin
If it’s a high wear area as Scott says, I’d use resin if the damage is deep enough imo.
If not resin, it would be a 2 part filler like either Ronseal or a car body filler. They are a lot harder when dry that Polycell.

I wouldn’t recommend using Polycell on anything other than a wall. It was used on my TAF in an old repair and it just crumbles away
8A6293EE-17C2-487F-A6FA-9EF2CCAE8F56.jpeg
This is the damage currently - would something like this work better? https://www.toolstation.com/ronseal...&ranSiteID=pfxNKSnglIM-SRgAf9x3FS4MqPQiDRiTMg
 
Back
Top Bottom