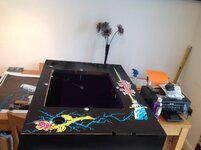
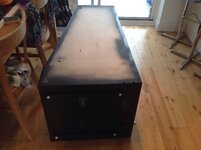
Thnx for the tips SteveDry is best IMO, fool-proof too as long as you get the positioning right. A good tip is to leave the decals laying out in a warm room for a few days prior to using them to make sure they are completely flat.
Buy yourself some of these:
http://www.ebay.co.uk/itm/Pair-Irwi...t=UK_Hand_Tools_Equipment&hash=item2ecdd20744
and stick some felt on each jaw so they don't mark the decals.
Pinball info
You are using an out of date browser. It may not display this or other websites correctly.
You should upgrade or use an alternative browser.
You should upgrade or use an alternative browser.
Complete TAF, fullish rebuild
- Thread starter Lee ellison
- Start date
Dry is best IMO, fool-proof too as long as you get the positioning right. A good tip is to leave the decals laying out in a warm room for a few days prior to using them to make sure they are completely flat.
Buy yourself some of these:
http://www.ebay.co.uk/itm/Pair-Irwi...t=UK_Hand_Tools_Equipment&hash=item2ecdd20744
and stick some felt on each jaw so they don't mark the decals.
Couldnt bring myself to do that on mine.... Two plastic xmas celebration sweetie tins filled with 2p's did mine lol. Or maybe if you have them, a couple of 10Kg weights from the barbels under the bed that never get used
I've seen clips where they have taped the far end down then start with small sections at the other end of the tape , once you have the first bit down , you can remove the tape and carry on removing the backing in small sections , till your at the other end ? Is this a good way or is there a better way ?
Thanks lee
Thanks lee
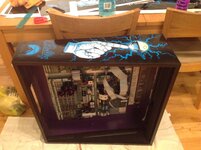
I had my doubts about spraying the inside purple but boy does that look good!
Thanks CarlI had my doubts about spraying the inside purple but boy does that look good!
I've seen clips where they have taped the far end down then start with small sections at the other end of the tape , once you have the first bit down , you can remove the tape and carry on removing the backing in small sections , till your at the other end ? Is this a good way or is there a better way ?
Thanks lee
the hinge idea is OK, but there's a chance it could move. Here's what I do:
1. lay the decal roughly on the cabinet and place a weight on a towel in the middle of the panel to prevent it moving about. (Paul's sweet tin idea is perfect, or I use a 6-pack of beers)
2. Adjust the decal so that it has the same amount of room on all 4 sides. (Press down with your finger to crease the decal so that you can see the edge)
3. When you're 100% happy that the decal is in the right place, use the clamps along the open edge at 12" intervals to hold it in place so it cannot move
4. Using sharp scissors, fold back the decal at one end, peel the backing paper down and cut a 6" strip off
5. Hold the decal up away from the wood, and using a good felt-edged squeegee start to smooth down the decal, starting from the middle and working out towards the edge.
6. Remove the clamps and fold back the decal over the fixed section and peel back approx. 12" of the backing paper
7. Lay the decal back over the cabinet, hold the backing paper with one hand and start to smooth the decal down with your squeegee, removing more backing paper as you go.
8. Once the decal is in place, go over it with a soft terry towel, ensuring no bubbles/air pockets. (Use a pin to take care of bubbles later)
9. Using a BRAND NEW scalpel, trim the edges using the cabinet as a guide, then using a long straight edge, trim approx. 1/16" off each side to prevent the decal lifting up during moving etc.
10. use a black paint Sharpie and go along all the edges with a steady hand to give a neat factory finish
11. using your scalpel, trim the decal from any bolt holes, flipper button holes etc.
I always do the front first in case you need to match artwork up on the sides, and I always use a compressed air can to make sure there's no dust on the panel just before I start.
Good luck!
....or I use a 6-pack of beers
Good man!! I'm guessing after doing a couple of sides, 2 cans won't be heavy enough though.....
Great advice Steve , not so sure about the six pack , might make mine 12 , so after this is all over I can make my way to bed like a buckled wheel !  Seriously. Though , thanks for the advice . Just been around the cab with a fine tooth comb and spotted a few marks , so will have to sort them first , back box looks ok so might make a start on that tonight , fingers crossed

Thinking ahead and what one of the other guys said previously , I've got a couple of questions , at the moment I've got the small leg mounting plates in the cab , someone suggested putting the larger type brackets in place as they stop leg movement , is that the case , and also I've got some of the felt leg protectors are they good enough at stopping the legs digging into the cabinet or I was looking at the stern metal corner protectors , that screw to the cabinet and yr legs sit on top of them , r they any good and do they fit BW machines - same bolt centre , etc . Any advice would be appreciated
The stern protectors are better that hold the leg off the cabinet for newly decalled machines.
+1
They do fit B//W machines and are much better than felt.
They do fit B//W machines and are much better than felt.
Thanks guys , looks like I,ll be buying some of the stern corner protectors
ThanksTrue. In the absence of those tho, Use Felt protectors in the meantime. Oh and as @replicas advised me, dont put it's legs on after re-decalling for at least 48/72 hours - the longer the better
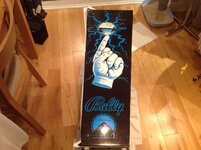
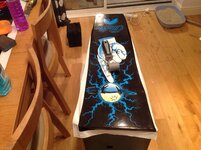
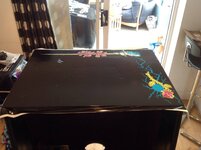
View attachment 5295 Well that is harder than it looks , the decals are a lot thinner than I thought and quite stretchy , not bad for first attempt. A few small air bubbles but will pop them and squeeze out , now for the trimming !
Where did you get the decals from???!!! I know Originals are nice and thick nowadays, however i also know Addams hasnt been officially reproduced (i dont think....)
Mine were really thin, however saying that, they were also a different shade too... Compared to @replicas on his...
off topic but can someone please post the links for felt? i have some mirror blades that need fitting
http://www.1stoppinball.com/collections/ramps/products/felt-cabinet-protectors (make sure you get the long ones)...
oops - sorry - wrong felt...
I used this :
http://www.ebay.co.uk/itm/130906587...eName=STRK:MEWNX:IT&_trksid=p3984.m1439.l2649
Black, 50mm, Loop only. Basically the same as self adhesive felt, only a little more hard wearing...
oops - sorry - wrong felt...
I used this :
http://www.ebay.co.uk/itm/130906587...eName=STRK:MEWNX:IT&_trksid=p3984.m1439.l2649
Black, 50mm, Loop only. Basically the same as self adhesive felt, only a little more hard wearing...
I got them from ebay .com , some company had supposedly gone bust and they were advertising that they had taken over all the stock and they had 3 sets of these decals! , I,m not looking forward to doing the cabinet, with them stretching and creasing on the back box which is less than half the width of the cab. , oh well ,I think I,ll try them tomorrowWhere did you get the decals from???!!! I know Originals are nice and thick nowadays, however i also know Addams hasnt been officially reproduced (i dont think....)
Mine were really thin, however saying that, they were also a different shade too... Compared to @replicas on his...
Tip - When doing the coin door, dont be thinking "ahh it's only a hole"... it will go wrong. Cut a piece of wood to fill it and then decal as per normal.
Even tho "it's only a hole", the slight sag in the decal will screw up the allignment and also cause creasing issues. Took me ages and several heart stopping moments to finally sort mine out after a minor "issue" caused by this.
Even tho "it's only a hole", the slight sag in the decal will screw up the allignment and also cause creasing issues. Took me ages and several heart stopping moments to finally sort mine out after a minor "issue" caused by this.
If the felt squeegee marked the decal they must be quite soft. They look thin in the pictures judging by the way the edges are hanging.
You're gonna have to be extra careful with the sides mate!
You're gonna have to be extra careful with the sides mate!
T
Tell me about it , it's like slightly thicker cling film , you almost stretch it over the faces and push the bubbles and the creases out , I think it might require 2bodies to do the sides of the cabinet , I don't think I,ll be able to hold all of the exposed decal off the face as I,m trying to lay it !If the felt squeegee marked the decal they must be quite soft. They look thin in the pictures judging by the way the edges are hanging.
You're gonna have to be extra careful with the sides mate!
off topic but can someone please post the links for felt? i have some mirror blades that need fitting
I've just used some of this: http://www.amazon.co.uk/dp/B00CI6CTIA/ref=pe_385721_37038051_TE_3p_dp_1
(Was cheaper on ebay, but I had some Amazon vouchers that wanted using)
Pm me your address if you want a freebie. Think I have plenty left
The backing paper should hold it off the cabinet while you smooth it down:

Thanks Steve ,I,m going to try that , but I think that is what I was doing on the backbox. But the decal is that flimsy it is trying to drop onto the wood, so I have to try. And keep a but of tension on the back edge of the decal , I,ve seen a video with a guy putting bits down then pushing all the air bubbles out and creases , this won't do that it sticks like s--t , any way I,ll try wot u said and take it nice and easy , thanks again leeThe backing paper should hold it off the cabinet while you smooth it down:


