2mtrs is a start but you will need around 6 to 8 mtrs to do a full machine.
Pinball info
You are using an out of date browser. It may not display this or other websites correctly.
You should upgrade or use an alternative browser.
You should upgrade or use an alternative browser.
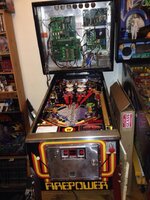
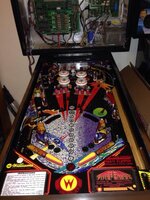
In Progress Firepower Shop Log
- Thread starter RudeDogg1
- Start date
Yeah think I bought about 12 something like that
You have a pm peter
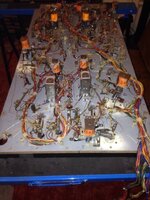
Well I got about halfway through reattaching the last loom (illumination) last night but called it a night at 10:30 was a school night after all. Still waiting for me bleddy switches from oz. typical when I'm not in a hurry for stuff it only takes 3 days from oz but this time it's a week so far grr
2mtrs is a start but you will need around 6 to 8 mtrs to do a full machine.
It's most likely to be used for repairs or extra additions where needed than a do from new.
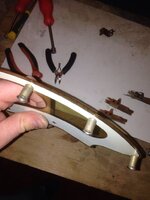
Anyhoo does anyone know how I transfer these metal post things to my new plastic?
Not 100% sure but if they're similar to what's on my FG then I think they're riveted to the plastic. If that's the case then you'll be looking at drilling out and re-riveting but that will be a massive ball ache.
Don't think it's riveted looks almost like it's heated into it
Is there anything of the posts to be seen on the other side of the plastic? They look the same as those on my Paragon. Those are held in place by having their tops mushroomed like a rivet from the topside. To get those off I carefully but firmly wriggled and pulled them until I could get a butter knife underneath to pry them off.
Before re-fitting them I tried to "un-mushroom" the tops by squeezing with some pliers that have a round hole in the side face (I suppose a crimp tool might do it). Once back in the plastic I then fastened them in place with a few hammer taps on a large pin punch to re-mushroom the top tight to the plastic.
Probably better explained with a few photos if you need them!
Is there anything of the posts to be seen on the other side of the plastic? They look the same as those on my Paragon. Those are held in place by having their tops mushroomed like a rivet from the topside. To get those off I carefully but firmly wriggled and pulled them until I could get a butter knife underneath to pry them off.
Before re-fitting them I tried to "un-mushroom" the tops by squeezing with some pliers that have a round hole in the side face (I suppose a crimp tool might do it). Once back in the plastic I then fastened them in place with a few hammer taps on a large pin punch to re-mushroom the top tight to the plastic.
Probably better explained with a few photos if you need them!
Just read a tip on CPR's site about using a drill bit to remove the ring lip so prob gonna try that.
Everything on the underside now connected. GI not 100% someone's sent me some pics to try and help me see all the connections (managed to do most just know some are missing
I seem to be missing the connection which goes to the braid for the pop bumper lights can I make the connection from the light its connected to befor in the line (50.000 bonus light)?
Just read a tip on CPR's site about using a drill bit to remove the ring lip so prob gonna try that.
That sounds like a one-way ticket. Are you removing them so they can be replaced? Sorry, I assumed you'd need to put them back in! I took mine off so they could go in the tumbler for a polish and so that I could clean the grot off the plastic around the holes.
That sounds like a one-way ticket. Are you removing them so they can be replaced? Sorry, I assumed you'd need to put them back in! I took mine off so they could go in the tumbler for a polish and so that I could clean the grot off the plastic around the holes.
Im removing them to go in the new plastic set ;0), you put em back in but use them as a standard post rather than rolled over into the plastic
Well got a lot further tonight was hoping to power it up and then realised there was a couple toasty connectors on the back box light board I'd forgotten to replace so hopefully tomoz night


Can't put in the backglass yet awaiting some metal brackets ect to come back from the platers "looks at Paul" lol


Can't put in the backglass yet awaiting some metal brackets ect to come back from the platers "looks at Paul" lol
As soon as i get my car back i will get over there. Was gonna be tomorrow, however looks like the garage may take longer than they thought, and I may not get it back until late tomorrow
Looking great tho Rudi!!
Oh the joys of cars
Almost as expensive as pinballOh the joys of cars
FIREPOWER is looking hot! Great job!
- Joined
- Jul 21, 2011
- Messages
- 11,336
- Alias
- Ive
Looking good
Huston we have a problem (which expected with my luck) anyhoo just fired her up and when I turn it on it makes a noise or says fire and the backbox lights and one coin door light comes on and blows a fuse f1 high voltage 1/4 amp slow blow. Any idea what's causing this and how I can sort it?
Not sure where to start fault finding no doubt it's my fault for bullet proofing the power board
Unplug connectors from the driver board and MPU. Replace the blown fuses. Add the power connectors to the mpu and switch on. Verify that the MPU gets 6 flashes. Power off. Add the connector giving the power for the 7th flash and boot up again. verify 7 flashes then power off. Add one connector at a time to the MPU then the driver board then switch off and add another until you find the connector loom that is the problem. Then check the connections on that loom.
Good Luck!
Good Luck!
Cheers peter I will have a look when I get home. How do I know which connector gives the 7th flash?
Oops, got my MPU board sets mixed up...! 
 Ignore all refences to LED flashes on the MPU.
You don't need to remove any connections off the MPU just the all the connectors on the driver board except the 40 way one which goes to the MPU. Then add one connector, power on and allow to boot, power off, check the fuses are ok, add another connector, power on, etc and repeat untill the problem has been found.
You don't need to remove any connections off the MPU just the all the connectors on the driver board except the 40 way one which goes to the MPU. Then add one connector, power on and allow to boot, power off, check the fuses are ok, add another connector, power on, etc and repeat untill the problem has been found.
Cheers dude
Well abit of investigating tonight disconnected every connector on the driver board and it still blew no matter what connector I tried. So I went thru the other fuses and f2 for the solenoids had also blown so swapped that to. And did as Pete said tried every connector and the last one 2j13 (special switch inputs) is the culprit so I've prob soldered one on the wrong way or summut. But shouldn't I still be getting sound, desplay and insert lights?
Grr all looks connected ok infact it's connected the same as it came cuz I followed my removal instructions. What do I check next guys? We need to get this baby running for next week.
Also got continuity from each connection on the pf back to the connector
Also got continuity from each connection on the pf back to the connector
Last edited:
So if I understand you correctly - if you disconnect 2j13 and fire up the game it doesn't blow any fuses. Then the problem is something on that wiring loom, you don't need to have soldered something on incorrectly. Can you say what connects where on it? Special switch inputs to me would say things like coin door credits, start button, etc.


