Correct it doesn't blow with it unplugged still no sound, desplay, insert lights and only some pf gi. The switches are all one tab on each of the pop switches and a tab on each of the slings
Pinball info
You are using an out of date browser. It may not display this or other websites correctly.
You should upgrade or use an alternative browser.
You should upgrade or use an alternative browser.
In Progress Firepower Shop Log
- Thread starter RudeDogg1
- Start date
set meter to diode selection and test direction of connections to each of where the wire joins the switch to see if the switch is made or not. Also put back lead on earth and the red lead on each of the switch lugs to see if you have a short.
Cheers peter I'll have ago when I get home. Do I test from the join at the switch back to the corresponding pin in the connector (I'm crap with meters so forgive my gormlessness)
Well after vids on pinside said to check my voltages on the powerboard I decided to do that first.
Well if I'm using my meter right I'm getting some odd readings
Got it set like this and one lead earthed
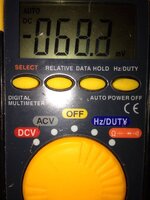
3j5
3 = just under 128
4 = just under -128
6 = 5
As that was a lil odd I tested the others on the board
3j6
Was about right all 5 or just over and under
3j4
All 4 were 020
Now the last one was odd
3j3
8 - 4 were all 040
But 3 which is ground spec. Common switch was -200 and rising I stopped after it got to 200 from arm ache
Now off to do what peter said...
Well if I'm using my meter right I'm getting some odd readings
Got it set like this and one lead earthed

3j5
3 = just under 128
4 = just under -128
6 = 5
As that was a lil odd I tested the others on the board
3j6
Was about right all 5 or just over and under
3j4
All 4 were 020
Now the last one was odd
3j3
8 - 4 were all 040
But 3 which is ground spec. Common switch was -200 and rising I stopped after it got to 200 from arm ache
Now off to do what peter said...
Do I test from the join at the switch back to the corresponding pin in the connector
Not this time - that's a continuity test and you do that when things don't work.
I'm asking you to test each switch first then to test between each side of the switch and your new earth braid to help find the short that blowing your fuses...
god im totally clueless :0( not sure how to test a switch... runs and hides. Although while scratching me head and sobbing uncontrollably I may of found the prob or atleast one of them. On each of the suspect switches on that connector is 1 or 2 black wires on one tab on each switch if I touch it with one of the probes and then touch the upper right pop bumper bracket the 50,000 insert lights that cant be right?
Also the cpu board is showing 2 red leds which according to the drawings is cmos failure (id fitted a NVRAM) have I fooked something up or has it just not been able to do its thing yet because the machine hasn't booted up?
Also the cpu board is showing 2 red leds which according to the drawings is cmos failure (id fitted a NVRAM) have I fooked something up or has it just not been able to do its thing yet because the machine hasn't booted up?
Last edited:
god im totally clueless :0( not sure how to test a switch... runs and hides. Although while scratching me head and sobbing uncontrollably I may of found the prob or atleast one of them. On each of the suspect switches on that connector is 1 or 2 black wires on one tab on each switch if I touch it with one of the probes and then touch the upper right pop bumper bracket the 50,000 insert lights that cant be right?
Correct, it sounds like you've wired something incorrectly.
Also the cpu board is showing 2 red leds which according to the drawings is cmos failure (id fitted a NVRAM) have I fooked something up or has it just not been able to do its thing yet because the machine hasn't booted up?
Something fooked may well be the correct guess.... CMOS is very prone to failure due to static and if you handled the board while installing it...
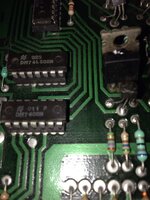
Right while gawping at the machine earlier I noticed a lot of the transistors and the spindly 3 legged things in front on the driver board has dry solder joints. On closer inspection one in this pic looks abit toasty with melted plastic on so gonna replace that one. Now this is gonna sound odd but I have a really good sence of smell and when I first fired the machine up I could smell a faint smell next to the toasty tranny there are 2 little chips (in the pic) I sniffed em and they have a strong chemically odd smell which is what I smelt faintly before just these to chips do you think they are fried? And are they easy to find replacements? Tip122 npn , N7408 quadruple 2 input positive and gate

Last edited:
Think you forgot the photo.
Correct lol
Anyone?
The transistor was the wrong one should be a tip122 but was a 121 dunno if that had anything to do with it. Ordered some new ones and ic's anyway
The transistor was the wrong one should be a tip122 but was a 121 dunno if that had anything to do with it. Ordered some new ones and ic's anyway
Those chips smell ok on my iPad....sorry I'll get my coat.
Any luck with this Rudi?
Looks like it's a job for the legend.
I will carry on tinkering untill andy or someone comes. I've not even looked at the wretched thing since b4 the slam
Decided to put back on some of the hardware today I swear this project is doomed! Putting the light board in today and the bloody thing tipped forward resulting me head butting a display and cracked the bloody glass!
So anyone got a working 6 digit display knocking about they want to sell?
So anyone got a working 6 digit display knocking about they want to sell?
Boards for this project still with Mr Wells Rudi?
Reminds me of my ToM disaster, tipping up the playfield and the LED torch falling back to smash the playfield mirror. . You'll get there Rudi, stick at it.
Decided to put back on some of the hardware today I swear this project is doomed! Putting the light board in today and the bloody thing tipped forward resulting me head butting a display and cracked the bloody glass!
Reminds me of my ToM disaster, tipping up the playfield and the LED torch falling back to smash the playfield mirror.
Yeah he's still got em reminds me I still need to replace that display
Well I've finely come back to my project firepower. After seeing how newdos had clear coated playfields with good results I decided to strip the topside again and clear it.
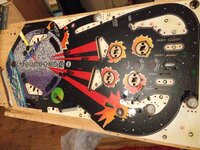
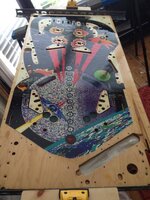
Before
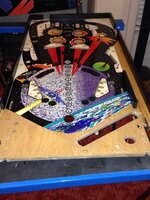
After
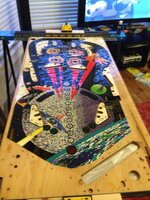
Not sure if I should just leave it a few days to a week to harden and then just give it a good going over with novas 2 to remove any imperfections. Or should I do something else?
Before

After

Not sure if I should just leave it a few days to a week to harden and then just give it a good going over with novas 2 to remove any imperfections. Or should I do something else?
dude, it's impossible from that picture to say 'well done' as it looks like it's all hilly. no doubt that's just the venetian blind effect, but still, take a better pic and we will all go oooh aaaah shiiiiny
i have no real input as i've never done it myself. i assume you put the stuff on, then rub it with very fine sandpaper to create some surface for the next layer, but i'm just guessing here. i only hang around for the pictures and in case something pops up i can grok over
i have no real input as i've never done it myself. i assume you put the stuff on, then rub it with very fine sandpaper to create some surface for the next layer, but i'm just guessing here. i only hang around for the pictures and in case something pops up i can grok over
You are a braver man than me Rudi.
Have you got anywhere to leave it while it dries for a few days?
Have you got anywhere to leave it while it dries for a few days?
Yup I'll just leave it where it is. Yeah it took abit of courage but as I previously has to level 95% of the inserts it really needed clearing anyway
Looks a little matte, does it feel glass smooth?
It's just the pic it's shiney and smooth hence the reflection from the ceiling light 
Taking a good picture of these things is tough. I think even NewDOS struggled showing just how great his Fish Tales looked.
Takes some balls to do it though - so kudos to Rudi for that.
As luck would have it I was talking to a guy at work the other day who works in our MOT bay and it turns out he's well versed in car respraying. I think I might have found someone to clearcoat my R&B playfield. Hurrah!!
That's AFTER i've got the damage repaired of course.
So after inspecting it today there's a few areas on the black I'm not happy with. So gonna flattening it back abit and adding 2 or 3 more coats. Just minor things and u can still feel the small area of planking and I want rid of that
Looks way better Rudi.
Ty need to get this bloody thing finished

