A loverly looking game made to look even better. LED's really do make this game.
Pinball info
You are using an out of date browser. It may not display this or other websites correctly.
You should upgrade or use an alternative browser.
You should upgrade or use an alternative browser.
Today I worked on......
- Thread starter kevlar
- Start date
Received this bobby dazzler if a shooter rod from [mention]Pinoffski [/mention] - lovely it is too. Took a couple of minutes to swap over. Looks lovely in my TOTAN.
Thanks mate - thoroughly recommend his work.
Cheers Mike
Before:
After

Thanks mate - thoroughly recommend his work.
Cheers Mike
Before:
After
Not really today but over the last few weeks I've been moving house so having all my games available is going on hiatus for a little while until the new games rooms are ready at the new place  Thankfully I've got enough space to have 1 game up for play (AFMrLE), 1 game up to work on (Dracula) and Outrun playable
 ")


Thankfully I've got enough space to have 1 game up for play (AFMrLE), 1 game up to work on (Dracula) and Outrun playable I see your dad's garage is still full of a great selection of your machines.
- Joined
- Oct 15, 2013
- Messages
- 102
My next project, always wanted a racing cabinet....

D
Deleted member 2463
Added this to the step on the shed - wood was getting hammered from games going in and out.

Sent from my iPhone using Tapatalk Pro
Sent from my iPhone using Tapatalk Pro
Finally clad the office / pin-shed in timber. Only 3yrs later...

That Xmen translite is really cool

D
Deleted member 2463
And got this decal fitted - just waiting for speaker lights now!


Finally received pizza oven to complete pallet wood bbq area I built during lockdown. Farm next door had stacks of pallets and my bbq was on last legs so got creative and had a slab of marble spare so incorporated that into the work top for pizza prep, obvs lockdown caused a huge demand so had to wait a while but really please with Ooni, highly recommend, bye bye waistline! 

Fifty
Registered
Installed some Cliffy protectors on my Creech today. KISS hole, Snackbar hole, and Trough Eject. I had to take off two of the ramps just to get at the holes. A bit of a pain in the ass, but worth it to protect things from further damage. Looks like someone touched up the Snackbar hole in the past. Not a bad job. See if you can notice it.
Looks like I need to fix one of the rails close to the shooter too. The vinyl is gone. I never noticed it before. The whole area is dirty and needs to be cleaned up. Adding it to my to do list...


Looks like I need to fix one of the rails close to the shooter too. The vinyl is gone. I never noticed it before. The whole area is dirty and needs to be cleaned up. Adding it to my to do list...
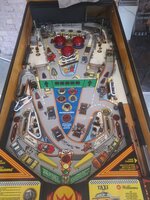
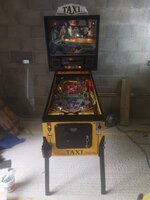
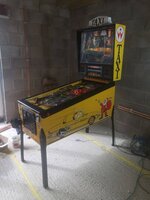
Started to strip my taxi today, Marylin needs a good clean and re-rubber!
Will continue stripping after the footy, new rubbers then rebuild back up tomorrow
Due some fresh powdercoated goodies for it tomorrow, legs,side rails, lockdown bar all black, it's going to look nice!
Will continue stripping after the footy, new rubbers then rebuild back up tomorrow
Due some fresh powdercoated goodies for it tomorrow, legs,side rails, lockdown bar all black, it's going to look nice!
Attachments
Finished this today! Been playing it a while now, after the boards being sorted by Jim, and giving it a really good clean down, it's ready to hit the for sale section tonight.
I hate selling or even seeing dirty games and get the satisfaction out of brining something back to life, it's been a pig, and expensive to fix pig, but my god it looks nice!
I hate selling or even seeing dirty games and get the satisfaction out of brining something back to life, it's been a pig, and expensive to fix pig, but my god it looks nice!
Attachments

Nice. You could make a killing selling something that takes the effort out of those door lips.


Finished the speakers on my Avatar today, night and day difference. Sounds amazing now.
More hassle than I expected with the backbox spacers but now I’ve done one the next will be easy (Lotr).
Sub filter makes a huge difference and needed an Lpad as it was just too much bass!
put some decent 4” JBL’s in there with lower ohms so it wasn’t far off the 4 ohms you want (5.8 in series)
Hot melt glue gun comes in handy☺
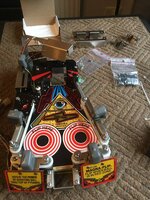
Today I fitted the King Of Payne topper and RGB GI kit to my MMR. It took most of the afternoon on and off to get everything fitted, drilled and wired up. Instructions were pretty well written and easy to follow.
You get 6 new looms to replace the existing GI on the left and right, these contain RGB leds fitted to the bulb holders that you just screw down in the old bulbs holders place. You also get a new back glass channel which has a strip of RGB led lights which really helps light the back of the playfield and castle.
In the backbox you have to fit a new PCB which controls both the GI and the topper. Everything is clearly labelled and pretty much is plug and play. The only bit of the whole job I didn’t enjoy, bar the dust created drilling the topper holes, was cutting the lighting wiring to the pop bumpers. This required some soldering as the kit didn’t include the wire nuts that the manual stated it should come with. If you end up doing this conversion, check you have some wire nuts, as I think it would make that part much quicker in the long run.
Overall I’m happy with the results, it really transforms an already amazing game to an even greater level of awesomeness.The GI lighting really adds a new level of immersion that I wasn’t expecting to be quite as good as it turns out
Anyway here are some pics
Guess what classic Bally SS is next in line for a restoration?......

Eight ball deluxe
Today I fitted the King Of Payne topper and RGB GI kit to my MMR. It took most of the afternoon on and off to get everything fitted, drilled and wired up. Instructions were pretty well written and easy to follow.
You get 6 new looms to replace the existing GI on the left and right, these contain RGB leds fitted to the bulb holders that you just screw down in the old bulbs holders place. You also get a new back glass channel which has a strip of RGB led lights which really helps light the back of the playfield and castle.
In the backbox you have to fit a new PCB which controls both the GI and the topper. Everything is clearly labelled and pretty much is plug and play. The only bit of the whole job I didn’t enjoy, bar the dust created drilling the topper holes, was cutting the lighting wiring to the pop bumpers. This required some soldering as the kit didn’t include the wire nuts that the manual stated it should come with. If you end up doing this conversion, check you have some wire nuts, as I think it would make that part much quicker in the long run.
Overall I’m happy with the results, it really transforms an already amazing game to an even greater level of awesomeness.The GI lighting really adds a new level of immersion that I wasn’t expecting to be quite as good as it turns out
Anyway here are some pics
View attachment 116667
View attachment 116668
View attachment 116669
View attachment 116670
View attachment 116671
View attachment 116672
View attachment 116673
View attachment 116674
View attachment 116675
View attachment 116676
View attachment 116677
View attachment 116678
Pinball envy!
Looks fantastic.
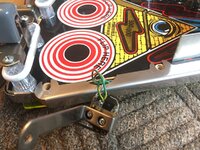
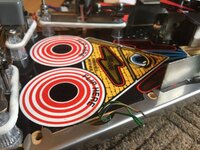
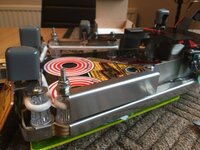
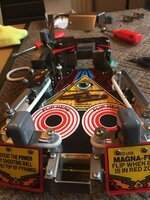
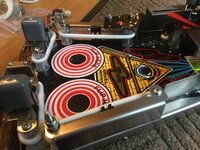
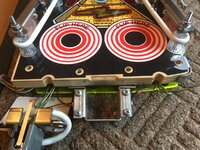
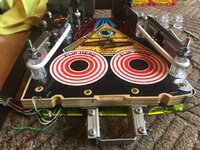
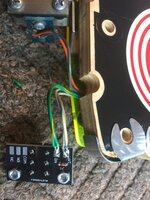
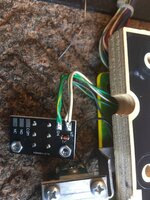
Finally fitted the Twisters Mini Play-field Switch Upgrade...so impressed with the final look
Attachments
-
 IMG_1979.JPG156.1 KB · Views: 33
 -
 IMG_1980.JPG208.9 KB · Views: 35
 -
 IMG_1982.JPG149.1 KB · Views: 33
 -
 IMG_1983.JPG124.3 KB · Views: 33
 -
 IMG_1985.JPG161.6 KB · Views: 33
 -
 IMG_1986.JPG110.5 KB · Views: 33
 -
 IMG_1987.JPG156.5 KB · Views: 34
 -
 IMG_1988.JPG201.9 KB · Views: 32
 -
 IMG_1989.JPG195.1 KB · Views: 33
 -
 IMG_1990.JPG110.8 KB · Views: 34
 -
 IMG_1991.JPG115.1 KB · Views: 34
 -
 IMG_1992.JPG160.1 KB · Views: 31
 -
 IMG_1994.JPG143.4 KB · Views: 31
 -
 IMG_1996.JPG152.9 KB · Views: 30
D
Deleted member 2463
did you not get the screen?
Had some new Infinity Kappa component speakers since the 90’s and thought it was about time I used them
Also fitted a new sub with filter and level control.
Tweeters are hot glued so will easily come off if needed without a mess. Looks strange but I don’t mind and you can’t really see them when lights are dimmed.
Sounds amazing now.

Also fitted a new sub with filter and level control.
Tweeters are hot glued so will easily come off if needed without a mess. Looks strange but I don’t mind and you can’t really see them when lights are dimmed.
Sounds amazing now.


It’s so easily done...

New Screws.. make it look so Shiny!!
Rebuilt Pop Bumpers with help from a friend.. now I know how to do them..
Hand polishing assemblies... oh dear slippery slope

Rebuilt Pop Bumpers with help from a friend.. now I know how to do them..
Hand polishing assemblies... oh dear slippery slope
Catapult light mod from Judge Dreads, tight squeeze to the cab so put a bit of foam on the bit that might cause a scratch.
Lights up in that dark area nicely.
View attachment trim.F0DE2C9A-8590-43E2-AF75-527CC41FF79D.MOV
Lights up in that dark area nicely.
View attachment trim.F0DE2C9A-8590-43E2-AF75-527CC41FF79D.MOV
