What's new
Pinball info

Register a free account today to become a member! Once signed in, you'll be able to participate on this site by adding your own topics and posts, as well as connect with other members through your own private inbox!

Complete Demolished Man!! - A painful and very slow shop log!

Good idea Pete - I hjave some threaded rod about the right size and its very soft so should be easy to hammer - time to get the anvil out

what sort of rivet is this is it a specialist jobby ?

Cheers Kev
 
Hey guys thanks again the support on here is amazing!!!

Like the sound of Titex drills - may check them out - anywhere to get them in particular ?

Got a friend Andrew who hopefully can do a bit of welding for me, if that fails I will certainly give you a shout

Cheers

Kev
[
Try http://www.mitchellfox.co.uk/

You will probably have to ring them as there website is a bit pants but they are pretty reasonable prices and supply good quality stuff.

Regarding the welding I do TIG at work so can re-flow broken welds without having to add extra weld so you essentially end up with something that looks a lot like factory made.
 
The ball guides are going to be the most difficult. I don't think they're repairable.

The only way I could think of would be to take a machine screw of the correct size, shear the head off, and then tack weld it to the ball guide. Could be messy.
 
yeah gonna try the drill out through the t nut from the bottom first pete

Cheers Kev
 
I can fix the ball guide for you Kev.
Is it small enough to send me ?
If so get it sent off to me and I will repair it for you buddy.
D.
 
This is a top shop log, it reflects what is and isn't possible when you start with a rusting hulk as so many pins end up. Keep it up Kev.
 
3 Hours on the playfield tonight just to get all the bloody posts out - want a chew on - nearly threw it in the bin!!!

Of course one post is tuck and will have to be grinded off when I get some more grinding discs for the dremel as I have worn them all out!! Also worn out my socket ratchet getting these off, they were so tight. Only one sheared off but a few of them have no threads left on them and of course the top end has a sheared off bolt in some of them!!

few pics
PC040539.JPG

Spot the twatting post!!!!

PC040540.JPG

all the posts the bottom row are the knackered ones

PC040533.JPG

Even the pop bumper screws sheared off !!

SO off it all goes into the tumbler - dont expect much to happen but some bits might come up a bit LOL !!!!!!!

PC040532.JPG

Glad I ordered a boat load of new nuts and bolts etc !!!

That's it until all the specialist cutting gear turns up now so a weekend off me thinks!!!!

York tomorrow for a nice wet day out - still it's dry in the pubs!!

Cheers Kev
 

Attachments

  • PC040535.JPG
    PC040535.JPG
    115.4 KB · Views: 10
  • PC040536.JPG
    PC040536.JPG
    167.3 KB · Views: 10
  • PC040537.JPG
    PC040537.JPG
    174.5 KB · Views: 11
  • PC040538.JPG
    PC040538.JPG
    136.1 KB · Views: 10
3 Hours on the playfield tonight just to get all the bloody posts out - want a chew on - nearly threw it in the bin!!!

Of course one post is tuck and will have to be grinded off when I get some more grinding discs for the dremel as I have worn them all out!! Also worn out my socket ratchet getting these off, they were so tight. Only one sheared off but a few of them have no threads left on them and of course the top end has a sheared off bolt in some of them!!

few pics
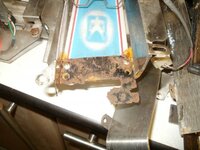
View attachment 23868

Spot the twatting post!!!!

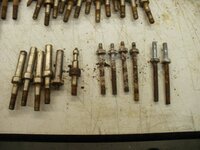
View attachment 23869

all the posts the bottom row are the knackered ones

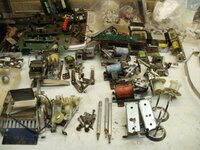
View attachment 23863

Even the pop bumper screws sheared off !!

SO off it all goes into the tumbler - dont expect much to happen but some bits might come up a bit LOL !!!!!!!

View attachment 23862

Glad I ordered a boat load of new nuts and bolts etc !!!

That's it until all the specialist cutting gear turns up now so a weekend off me thinks!!!!

York tomorrow for a nice wet day out - still it's dry in the pubs!!

Cheers Kev
Hi Kev that's some sterling work. I think in order for the tumbler to do its magic you first need to remove the crust. If you get rid of that first it may work its miracles!! Even if you soak in rust remover and then put them in.

Good luck ;)
 
Depending on how the underside of the playfield looks after sanding, you could always "do a Bally" and spray it with matt grey primer? I know that's not the original look but would make a much better "blank canvas" if the rust staining has gone deep into the wood.
 
Oh, and keep up the great work. As others have mentioned, this is an awesome shop lop. Definitely a bit mental and probably economic suicide but an excellent shop log none-the-less. Lovin' the community pitching in with offers to repair or supply parts.
 
Yeah thanks Pete - without the community help on here I dont think it would ever of happened. Fantastic support off all the guys on here

CHeers Kev
 
got the rogue post off today so give the playfield an initial wipedown

before
PC060548.JPG PC060549.JPG PC060550.JPG

And after a quick wipe

PC060554.JPG

Long way to go but looking better already!!

Now there are about 3 bits to touch up but I dont think I'm brave enough to do them - here they are anyway interested in doing them for me or can recommend anyone ? @RudeDogg1

PC060541.JPG PC060544.JPG PC060545.JPG PC060547.JPG

I am happy to pay someone and I would do the clearcoating afterwards

CHeers Kev
 
Looks like a job for @chris platt . He's in Yorkshire and has done great work on other people's machines.
He does great work for a fair price.
 
OMG!! I've been missing for a few days and come back to this. I'm soooooo embarrassed. I never imagined it being this bad :oops::(
 
OMG!! I've been missing for a few days and come back to this. I'm soooooo embarrassed. I never imagined it being this bad :oops::(
HAHA!!!! you will be shamed until the end of your days !!!!!

slow progress to say the least Phil - the rust has been a nightmare but everyone on here is mucking in and sending me bits to keep the cost down to try and get the beast back in one piece and playing properly

Next job is to either find another playfield or get this one touched up. something I'm not good at - not arty at all, so waiting fro a quote for that at the moment

watch this space matey!!

Cheers Kev
 
Well got a very quick response from Chris but afraid it's just not viable. So, @RudeDogg1 is there any chance you could give me a very detailed step by step guide(even more so than last time) of how you did that fix on your BSD playfield as these bits to touch are tiny and I am just going to have to live with it until another playfield comes along (which I doubt one will) ?

Thanks @replicas for pointing me at CHris

Cheers Kev
 
Kev, if the only chips on the PF are the ones you've posted then they shouldn't be too hard to fix. Dab a bit of filler in them and sand smooth. Get some fine artist brushes and a pack of acrylic paints, and then just take your time with it. You can do it! ;)

If you wanted to be really anal, the lines around the inserts could be kept straight with masking tape. The green frog stuff is great for that, pulls easily and leaves a clean line.
 
There is an element of British eccentricity here. You simply have to doff your cap to someone with the patience and skills to sort this one out.
 
How come it's not viable Kev, just not cost effective?
Yeah afraid so it was gonna be 50% of what I paid for it and the play field is just not that good to spend that much on it
 
Kev, if the only chips on the PF are the ones you've posted then they shouldn't be too hard to fix. Dab a bit of filler in them and sand smooth. Get some fine artist brushes and a pack of acrylic paints, and then just take your time with it. You can do it! ;)

If you wanted to be really anal, the lines around the inserts could be kept straight with masking tape. The green frog stuff is great for that, pulls easily and leaves a clean line.
I'm go
Kev, if the only chips on the PF are the ones you've posted then they shouldn't be too hard to fix. Dab a bit of filler in them and sand smooth. Get some fine artist brushes and a pack of acrylic paints, and then just take your time with it. You can do it! ;)

If you wanted to be really anal, the lines around the inserts could be kept straight with masking tape. The green frog stuff is great for that, pulls easily and leaves a clean line.
im gonna give it a go Pete after all it may not look perfect but sure will play a lot better than it did when I first got it!!!

Cheers kev
 
Well got a very quick response from Chris but afraid it's just not viable. So, @RudeDogg1 is there any chance you could give me a very detailed step by step guide(even more so than last time) of how you did that fix on your BSD playfield as these bits to touch are tiny and I am just going to have to live with it until another playfield comes along (which I doubt one will) ?

Thanks @replicas for pointing me at CHris

Cheers Kev
Hi Kev if I can do a PF touch up you definitely can. None of the areas are huge and once you've clear coated over the area your eye won't be attracted to the touch up.

I would mask around the area and fill with the same 2 part filler you've used for the cab. By masking it off you stop from spreading the filler onto the PF. Don't leave the masking on remove whilst still wet or when dry it will be stuck to it. You need to then remask the area before you sand to avoid damaging the PF. Get it flush to the PF (and really smooth) and then you're ready to paint. If you haven't got an airbrush it's only a small area so you can mask the straight lines and paint. Do one area at a time and let it dry before you start on another area. The hard bit will be the red / pinky area this will be a difficult colour to get close. Once you painted you'll then be clear coating the PF (I've read your other shop logs!!!). The two parts to concentrate on is getting the area flush and the colours close.

Good luck you can do it I know you can:thumbs::thumbs:
 
Thanks guys - panic!!!!!!

Anyone get step by step pics would be really cool though and I'm sure help others on this intrepid journey!!!

Sounds like I may have to enlist the artistic talents of my son - @SnakeyD2 for the painting!!!

Cheers Kev
 
Back
Top Bottom