Nice work
Pinball info
You are using an out of date browser. It may not display this or other websites correctly.
You should upgrade or use an alternative browser.
You should upgrade or use an alternative browser.
In Progress Adventures in Budget Restoration: 1978 Bally PARAGON
- Thread starter Nedreud
- Start date
February 2014
A3 SOLENOID DRIVER / VOLTAGE REGULATOR UPGRADE
After giving the sound module a prod I turned my attention to AS-2518-22: the A3 SOLENOID DRIVER & VOLTAGE REGULATOR MODULE. Here's what it looked like when it arrived, not too shabby and tested as giving out the right voltages (thanks @Dave2084):
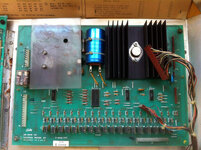
Paragon: A3 AS-2518-23 Solenoid Driver & Voltage Regulator Module by staticboy, on Flickr
But time to get rid of this:
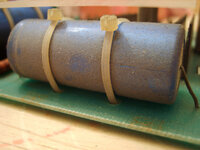
Paragon: Solenoid/Regulator Module Upgrade by staticboy, on Flickr
And this:
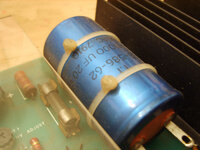
Paragon: Solenoid/Regulator Module Upgrade by staticboy, on Flickr
And make a few other improvements as recommended in Repairing Bally Electronic Pinball Games from 1977 to 1985, Part One: 2c. Before Turning the Game On: Upgrading the Voltage Regulator/Solenoid Driver Board.
New regulator capacitors were ordered from Mouser Electronics UK:
Snip the wires and cable ties, and out comes C23:
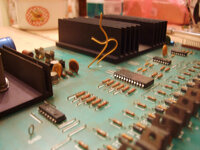
Paragon: Solenoid/Regulator Module Upgrade by staticboy, on Flickr
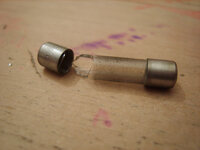
Unsoldered the old wires for C23 and the connections for C26, then cleaned up the solder pads. At this point I noticed that the 8AG 3/16A Fast Blow F1 fuse for the high voltage section was cracked. After removal it just fell apart:
Paragon: Solenoid/Regulator Module Upgrade by staticboy, on Flickr
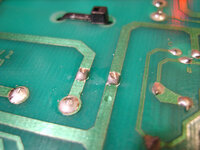
With C23 out of the way I worked one of the recommended upgrade: tying the (-) negative side of C23 to ground. This alleviates strain on J3 pin 10. The instructions said to drop a link on the solder-side from the (-) negative side of C23 straight down to the track below, but I decided to drill a pair of 1mm holes and put in a proper wire link on the component side (the new solder points are the pair right in the midde of this photo):
Paragon: Solenoid/Regulator Module Upgrade by staticboy, on Flickr
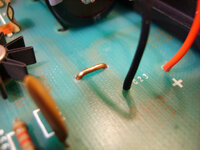
And this is the link on the topside:
Paragon: Solenoid/Regulator Module Upgrade by staticboy, on Flickr
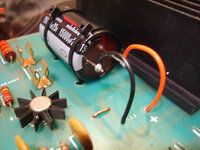
New capacitor looks good with coloured wires and shiny cable ties:
Paragon: Solenoid/Regulator Module Upgrade by staticboy, on Flickr
A similar job was done on C26 except because I purchased a cheaper radial cap but the original was axial I had to run a wire to one of the holes:
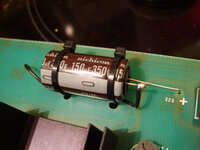
Paragon: Solenoid/Regulator Module Upgrade by staticboy, on Flickr
Both capacitors and new link in place:
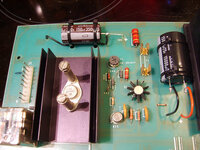
Paragon: Solenoid/Regulator Module Upgrade by staticboy, on Flickr
The other modification is improve a connection that is made between pins 13 and 25 on connector J3. This was done by soldering a wire on the underside between test points TP1 and TP3. Here's the schematic and added in red are the two mods I've made:
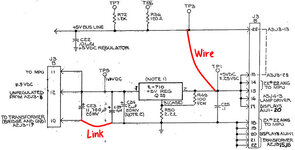
A8 Mods by staticboy, on Flickr
Here's the wire:
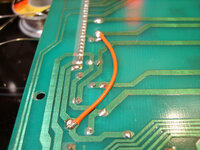
Paragon: Solenoid/Regulator Module Upgrade by staticboy, on Flickr
A3 SOLENOID DRIVER / VOLTAGE REGULATOR UPGRADE
After giving the sound module a prod I turned my attention to AS-2518-22: the A3 SOLENOID DRIVER & VOLTAGE REGULATOR MODULE. Here's what it looked like when it arrived, not too shabby and tested as giving out the right voltages (thanks @Dave2084):

Paragon: A3 AS-2518-23 Solenoid Driver & Voltage Regulator Module by staticboy, on Flickr
But time to get rid of this:

Paragon: Solenoid/Regulator Module Upgrade by staticboy, on Flickr
And this:

Paragon: Solenoid/Regulator Module Upgrade by staticboy, on Flickr
And make a few other improvements as recommended in Repairing Bally Electronic Pinball Games from 1977 to 1985, Part One: 2c. Before Turning the Game On: Upgrading the Voltage Regulator/Solenoid Driver Board.
New regulator capacitors were ordered from Mouser Electronics UK:
- C23 15,000uF 25V £2.34 (now £2.24)
- C26 150uF 350V £2.07 (now £2.41)
Snip the wires and cable ties, and out comes C23:

Paragon: Solenoid/Regulator Module Upgrade by staticboy, on Flickr
Unsoldered the old wires for C23 and the connections for C26, then cleaned up the solder pads. At this point I noticed that the 8AG 3/16A Fast Blow F1 fuse for the high voltage section was cracked. After removal it just fell apart:

Paragon: Solenoid/Regulator Module Upgrade by staticboy, on Flickr
With C23 out of the way I worked one of the recommended upgrade: tying the (-) negative side of C23 to ground. This alleviates strain on J3 pin 10. The instructions said to drop a link on the solder-side from the (-) negative side of C23 straight down to the track below, but I decided to drill a pair of 1mm holes and put in a proper wire link on the component side (the new solder points are the pair right in the midde of this photo):

Paragon: Solenoid/Regulator Module Upgrade by staticboy, on Flickr
And this is the link on the topside:

Paragon: Solenoid/Regulator Module Upgrade by staticboy, on Flickr
New capacitor looks good with coloured wires and shiny cable ties:

Paragon: Solenoid/Regulator Module Upgrade by staticboy, on Flickr
A similar job was done on C26 except because I purchased a cheaper radial cap but the original was axial I had to run a wire to one of the holes:

Paragon: Solenoid/Regulator Module Upgrade by staticboy, on Flickr
Both capacitors and new link in place:

Paragon: Solenoid/Regulator Module Upgrade by staticboy, on Flickr
The other modification is improve a connection that is made between pins 13 and 25 on connector J3. This was done by soldering a wire on the underside between test points TP1 and TP3. Here's the schematic and added in red are the two mods I've made:

A8 Mods by staticboy, on Flickr
Here's the wire:

Paragon: Solenoid/Regulator Module Upgrade by staticboy, on Flickr
May 2014
PROGRESS REPORT: PLAYFIELD OVERLAY DECAL
Been a while since my last post and I've been side-tracked a little by playing some actual real pinball on my new pinball: VECTOR.
But what I have been doing is progressing my ideas for having a complete playfield overlay decal made. So, after following the excellent F-14 Tomcat Shop Log by @Snux I enquired who did the custom cabinet decals: turns out they were done by Jim Cousins at http://www.absolutecontrol.co.uk/ aka @ABSOLUTE CONTROL.
So... I get in touch... we chat... I send Jim my hi-res NOS playfield scan and he "fiddles" with it a bit for a couple of weeks, then says he's popped a sample and colour test in the post. Imagine my utter, jaw-dropping surprise when this arrives a couple of days later:
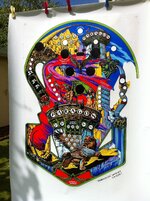
I am still in ABSOLUTE shock. This thing is so beautiful. The quality in terms of resolution, colour and feel is unbelievable. It's 100% full-scale print of the entire playfield on thick, clear laminated quality vinyl. I am itching to get this thing fitted to my Paragon!
And here it is side-by-side with the extra spare rotten playfield I have just for an initial comparison. The colours are a superb match (digital indoor photogrpahy is a bit misleading). Brighter, richer, but very much in keeping with the original NOS:
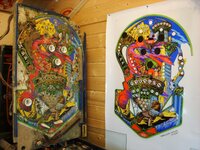
So, my deepest thanks to Jim and I can't wait to get the final master after a couple of very minor adjustments and double-checking it's exactly the right size to overlay the inserts (they're all white on the decal because they're see-through!)
PROGRESS REPORT: PLAYFIELD OVERLAY DECAL
Been a while since my last post and I've been side-tracked a little by playing some actual real pinball on my new pinball: VECTOR.
But what I have been doing is progressing my ideas for having a complete playfield overlay decal made. So, after following the excellent F-14 Tomcat Shop Log by @Snux I enquired who did the custom cabinet decals: turns out they were done by Jim Cousins at http://www.absolutecontrol.co.uk/ aka @ABSOLUTE CONTROL.
So... I get in touch... we chat... I send Jim my hi-res NOS playfield scan and he "fiddles" with it a bit for a couple of weeks, then says he's popped a sample and colour test in the post. Imagine my utter, jaw-dropping surprise when this arrives a couple of days later:

I am still in ABSOLUTE shock. This thing is so beautiful. The quality in terms of resolution, colour and feel is unbelievable. It's 100% full-scale print of the entire playfield on thick, clear laminated quality vinyl. I am itching to get this thing fitted to my Paragon!
And here it is side-by-side with the extra spare rotten playfield I have just for an initial comparison. The colours are a superb match (digital indoor photogrpahy is a bit misleading). Brighter, richer, but very much in keeping with the original NOS:

So, my deepest thanks to Jim and I can't wait to get the final master after a couple of very minor adjustments and double-checking it's exactly the right size to overlay the inserts (they're all white on the decal because they're see-through!)
It certainly is incredible. Great work. Some great research from Peter to get all the high res images sourced and great work from Jim to produce the artwork.
I too watch this with huge interest as I now own a Paragon
I too watch this with huge interest as I now own a Paragon
That's awesome well done Jim
Jim's work is excellent. Not only does he obviously know his stuff about printing, signage and decals (check out stuff they do on http://www.absolutecontrol.co.uk/) but he's a pinhead too, so unlike every other printer I've spoken to he understands what it is we're trying to achieve. That is, phrases such as "cabinet decals" and "playfield overlay" have a meaning and context he understands.That's awesome well done Jim
I'll have to keep him on my radar incase I ever need anything
Hahhahhahaha thanks guys.... It's just me... I love old retro things and want to keep them going and as good as they can be.... I know vinyl is cheating as such but it's a definite solution that can be done again and again if it wares out ...
I tried my hardest to get it perfect and I know there is a few small things I need to tweak but we are nearly there...
Jim
Sent from my iPhone using Tapatalk
I tried my hardest to get it perfect and I know there is a few small things I need to tweak but we are nearly there...
Jim
Sent from my iPhone using Tapatalk
Great work Jim. I can see a few more projects coming your way. 

Jim did some decals for me last week just from a pic of the original and a ruler!!! - good price and really quick!! Much appreciated Jim 
Let's see some pictures when you get them installed.Jim did some decals for me last week just from a pic of the original and a ruler!!! - good price and really quick!! Much appreciated Jim
Not pinball - Change machine - However i shall do anyhow... 
It's just a sticker ...
Sent from my iPhone using Tapatalk
Sent from my iPhone using Tapatalk
Yeh, lets see the decals fitted to your Change machine, good advertisement for Jim.Not pinball - Change machine - However i shall do anyhow...
Yes, let's see! I was toying with getting a few stickers done too, like high voltage warning labels, etc.Yeh, lets see the decals fitted to your Change machine, good advertisement for Jim.
That playfield overlay looks really really nice!
I've experienced one of these that was made in the US for Space Invaders before now, so I have a couple of tips for you :-
Firstly, strip your playfield and line up the overlay and stick it down with something temporary. Shine a strong light through the back of the playfield so you can check the insert alignment. Sadly you will find that it is most likely that your inserts will not all line up exactly. It seems that Bally inserts can vary by a few mm from playfield to playfield, almost as if they did them by hand instead of computer CNC. The ones that are out 1 or 2 mm with hardly matter so you don't need to worry as the light will still cover most of the insert. If you are unlucky, you might have some that are 5mm+ out and you might want to actually consider filling the playfield and moving the insert if you have any that are really bad. The good thing about the overlay is you dont have to wory about the mess that moving an insert will make as long as you keep the PF perfectly flat.
You'll want to smooth out the playfield surface, again as you are covering it, you wont have to care about what it looks like after you attack it with filler and a sander.
It will play weird as hell when you have finished. The surface will need plenty of ball scuffing before it plays like a normal wood PF. Depending on how much you play it, it might take a year+ to settle down. It will be strange but bear with it as it will eventually dial in and become normal
Good luck!
Thanks, for the tips and comments, Luke!That playfield overlay looks really really nice!
I've experienced one of these that was made in the US for Space Invaders before now, so I have a couple of tips for you :-
Firstly, strip your playfield and line up the overlay and stick it down with something temporary. Shine a strong light through the back of the playfield so you can check the insert alignment. Sadly you will find that it is most likely that your inserts will not all line up exactly. It seems that Bally inserts can vary by a few mm from playfield to playfield, almost as if they did them by hand instead of computer CNC. The ones that are out 1 or 2 mm with hardly matter so you don't need to worry as the light will still cover most of the insert. If you are unlucky, you might have some that are 5mm+ out and you might want to actually consider filling the playfield and moving the insert if you have any that are really bad. The good thing about the overlay is you dont have to wory about the mess that moving an insert will make as long as you keep the PF perfectly flat.
You'll want to smooth out the playfield surface, again as you are covering it, you wont have to care about what it looks like after you attack it with filler and a sander.
It will play weird as hell when you have finished. The surface will need plenty of ball scuffing before it plays like a normal wood PF. Depending on how much you play it, it might take a year+ to settle down. It will be strange but bear with it as it will eventually dial in and become normal
Good luck!
Couple of things specific to my situation: I didn't get to play the old game much before stripping it down (and it was my first pin) so I don't have much reference for comparison. Also, I'm going to attempt to make a new playfield (I'm quite handy with a router and I should be getting access to a larger CNC in about 3-6 months) so I could cut the inserts to match the overlay for perfect alignment! It also sorts out most of the problems with filling. I rather like the old screen printed playfield and although it's truly shagged I'd feel pretty bad attacking it with sander and condemning it to oblivion. And I'm going to cover the entire overlay/playfield in a sheet of 0.75mm Makrolon - the same polycarbonate sheet used in those €130 playfield protectors - so it'll play a bit strange from that too.
Biggest problem at the moment is not being able to get all 58 inserts from a single supplier. Even PBR is the US doesn't have the big 1 3/16-inch opaque white inserts although Marco does, but Marco doesn't have the 4 double-star rollover buttons... [sigh]
A
abaxas
I beginning to think your understanding of the word 'budget' is different to mine!
Oh, this is definitely budget! NOS or mint Paragon playfields are like hen's teeth. I've seen NOS go for $1,400, about £1,000! When CPR eventually create a reproduction Paragon it'll be well in excess of anything before it due to the extra size. I estimate a minimum of $800 (they need to invest in new equipment as neither their drum sander or silk-screening is wide enough!) plus shipping $169 plus 20% import duty and charges (say another $200) and you've tipped £700.I beginning to think your understanding of the word 'budget' is different to mine!
Admittedly the ultimate in "budget" would be to not replace the playfield at all, and that is a viable option. I would simply make a polycarbonate playfield protector to preserve what is already there (I don't think one has been done for Paragon yet and I wouldn't pay €130 (£105) plus shipping for a bit of Lexan I could buy for about £10-15). I commented before that mine is too worn and Paragon is too complex (at least for my skills) to contemplate a paint restoration, so for me a vinyl decal is the only option. So, a nice bit of maple ply is about £60 cut to size and delivered, the decal around the same, and £20 for the Lexan. Altogether around £140 for brand spanking new repro playfield.
Of course, it could be a total disaster and look like utter ****e, in which case I fall back to preserving the original playfield under Lexan
When you put it like that Peter, it's a bargain. Plus I'll be paying you to do mine as well 

LOL! Hope you're a patient man... my rate of progress is currently being out-paced by most glaciers...When you put it like that Peter, it's a bargain. Plus I'll be paying you to do mine as well
The bit I'm most miffed about is trying to get a set of replacement inserts. I look on sites like marcospecialties.com or pbresources.com and think "Mmm, not so bad. Inserts only cost 50¢ each." This is of course very misleading because by the time you've ordered from 2 or 3 suppliers because no one has everything, and paid for international postage and import duty, what should have been a cheap bag of a few dozen plastic coins suddenly costs over 50 quid!
Yeh, lets see the decals fitted to your Change machine, good advertisement for Jim.
Before (loads of rust bubbles all over, not just the one or two seen!)....
This was all i sent Jim....
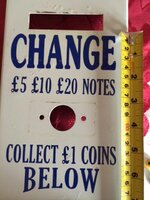
So... The after with Jim's decals... All the info was taken from the above... that was all i sent!!
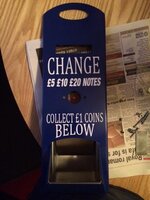
Great Price, really quick delivery... Couldnt be more please.
Many thanks @ABSOLUTE CONTROL
Quick Q Jim - Is it safe to clear enamel lacquer over the top?? or will they curl and dissolve??
Metalwork was stripped back to bare metal and then re-sprayed due to the huge amount of rust on the plate. Decal was just the lettering. I was impressed that just from the one pic the sizes were spot on 
Yep Paul just clear coat it and it should be fine. As long as the clear isn't cellulose it should be cool, you have a spare so do a tester first and slowly build your layers up, not shooting one big one on it
Sent from my iPhone using Tapatalk
Sent from my iPhone using Tapatalk
Nice, and what a great choice of colour, way better than the original.
I thought it was for the machine I picked up for you. But why change that one it was near brand new.
I thought it was for the machine I picked up for you. But why change that one it was near brand new.
Indeed... Thanks again for that Daz - that one now has Cash eprom installed 
Can you pop up pic of the completed machine when it's done! Just curious. And wondering why you have a change machine?Indeed... Thanks again for that Daz - that one now has Cash eprom installed
May 2014
PF STRIPDOWN RE-STARTED
Had a little tidy up in my summerhouse/homeoffice and hung my mountain bike from the ceiling to get it out of the way. Time to get the playfield stripped so I can size-up the decal from @ABSOLUTE CONTROL. Most of the effort tonight went into moving stuff around but I did manage to use my new 1/4-inch SAE Deep Socket Set to remove the shooter arch rail:
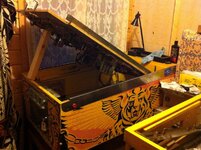
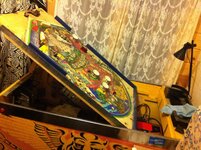
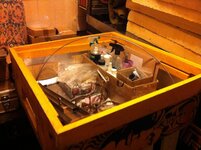
Will do my best to try and do something every day until it's done. You can probably just make out Vector in the last photo buried under a pile of Kingspan insulation to prevent me from playing or fiddling with it instead! Also buried behind the backbox is my Astro Fighter cocktail cabinet arcade video game and under the paisley sheet is a 1973 Japanese pachinko machine to be restored.
PF STRIPDOWN RE-STARTED
Had a little tidy up in my summerhouse/homeoffice and hung my mountain bike from the ceiling to get it out of the way. Time to get the playfield stripped so I can size-up the decal from @ABSOLUTE CONTROL. Most of the effort tonight went into moving stuff around but I did manage to use my new 1/4-inch SAE Deep Socket Set to remove the shooter arch rail:


Will do my best to try and do something every day until it's done. You can probably just make out Vector in the last photo buried under a pile of Kingspan insulation to prevent me from playing or fiddling with it instead! Also buried behind the backbox is my Astro Fighter cocktail cabinet arcade video game and under the paisley sheet is a 1973 Japanese pachinko machine to be restored.
