Pinball info
You are using an out of date browser. It may not display this or other websites correctly.
You should upgrade or use an alternative browser.
You should upgrade or use an alternative browser.
Complete Scared Stiff ... My first playfield swap
- Thread starter s000m
- Start date


All drill bits needed on a pinball will be imperial size. So I would order a set if you plan to do this again.
Ashbo
Site Supporter
looks good. Going up the grades in wet and dry sandpaper?Decided to go at the side rails instead of replace they look 'better'
View attachment 175909
View attachment 175910
OP
OP
Yeah 120, then 220 then 330 then finish off with a metal polishlooks good. Going up the grades in wet and dry sandpaper?
OP
OP
All drill bits needed on a pinball will be imperial size. So I would order a set if you plan to do this again.
Yeah mate I know but finding imperial in this country is a royal pita.
Honestly I'm taking a break from playfield swaps drilling unmarked holes in artwork was especially stressful.
Ashbo
Site Supporter
When the fun stops.....Yeah mate I know but finding imperial in this country is a royal pita.
Honestly I'm taking a break from playfield swaps drilling unmarked holes in artwork was especially stressful.
")
Back in the day most playfield s came with no holes or dimples
Yeah. Your right. Used to drill thru the old playfieldBack in the day most playfield s came with no holes or dimples
")
Really? I have not had to buy a set for years as I dont do that many PF swaps. Did not know.Yeah mate I know but finding imperial in this country is a royal pita.
Honestly I'm taking a break from playfield swaps drilling unmarked holes in artwork was especially stressful.
OP
OP
Doing that is especially god like. I really struggled aligning those wire form holes!Back in the day most playfield s came with no holes or dimples
OP
OP
Redid the wiring for the back box and cabinet looms. They were a bit chaotic.


Also redid the crate decal as it was pretty worn.
My god reassembly of this thing is a bitch!
Removed and sanded it first. Massive ball wear!


Next up application and some mylar for protection.


Also redid the crate decal as it was pretty worn.
My god reassembly of this thing is a bitch!
Removed and sanded it first. Massive ball wear!
Next up application and some mylar for protection.
OP
OP
Tomorrow evening I'll assemble the rails and apron back on and will put the playfield back into the machine ready for plastic and ramp assembly.
Honestly @CHRIS B PINBALLS, @Ant-H, @Matt Adams and @Pick Holder credit to you guys for doing playfield swaps. It's definitely another level of difficulty and very time consuming.
Honestly @CHRIS B PINBALLS, @Ant-H, @Matt Adams and @Pick Holder credit to you guys for doing playfield swaps. It's definitely another level of difficulty and very time consuming.

OP
OP
Had a bit of a mare getting the support rails on. One of the machine screws got damaged and I'm not sure how or when.
When I went to screw it in it so far then locked and ended up popping it's T-nut out.
Had to use vice grips to hold the T-nut while I got the screw out.
Used a new T-nut and found a new area within the recess for it to purchase onto.
Then used another machine screw.
I need to get more of these...
Then when screwing in the backboard the head snaps off!
Anyone doing this get yourself new machine screws these old ones just can't take the stress it seems.
Wife helped out today, likely out of pity.
Playfield is finally back inside the cabinet!
Major milestone here.
OP
OP
I forgot a bloody T-nut in the lane guide on the left side underneath the flipper base..
Wife wasn't impressed as she had marked it as a missed T-nut with some marked masking tape.
Had to juggle the flipper base and hammer in the missing T-nut.
All done thankfully.
Now populated the first quarter of the playfield.
Put all the plastics in for cleaning.


Wife wasn't impressed as she had marked it as a missed T-nut with some marked masking tape.
Had to juggle the flipper base and hammer
in the missing T-nut.All done thankfully.
Now populated the first quarter of the playfield.
Put all the plastics in for cleaning.
OP
OP
Did some more prep, prior further assembly.
First off plastic cleaning...
Found some plastics had black spray paint on them. I imagine someone took a shortcut patching up the cab.

Some isopropyl alcohol and a toothbrush later...

First off plastic cleaning...
Found some plastics had black spray paint on them. I imagine someone took a shortcut patching up the cab.
Some isopropyl alcohol and a toothbrush later...


OP
OP


OP
OP
why does wms artwork always have these little black marks? my nbafb has same marks
View attachment 176244
No idea its on the old playfield so its part of the design?
Ashbo
Site Supporter
I believe it's "dither". It's an optical illusion to give more shades visible to the eye than is available to print with. The theory is you will see dark red here, rather than normal red.why does wms artwork always have these little black marks? my nbafb has same marks
View attachment 176244
OP
OP
I think he means the elements he circled rather than the dithering.I believe it's "dither". It's an optical illusion to give more shades visible to the eye than is available to print with. The theory is you will see dark red here, rather than normal red.
The small black lines.
Ashbo
Site Supporter
Lol, I'll get my coatI think he means the elements he circled rather than the dithering.
The small black lines.
OP
OP
What files did you use for the holes? I remember my dad having round shaped files when I was young, I assume something like this?
Hehe yeah the little black marks not the silk dither dotsLol, I'll get my coat
Iv seen it on loads of wms games, can’t figure out what they are for or if something to do with the silk screen production process maybe?
OP
OP
Onto the next phase.
Finished installing all the posts... same as before filing and drilling all had the same issue... forgot the metal protector around the spider hole.
The old protector was a little chewed up so TBH I'll just leave it.
If I can summon the will I'll put on a new protector in the future.


Finished installing all the posts... same as before filing and drilling all had the same issue... forgot the metal protector around the spider hole.
The old protector was a little chewed up so TBH I'll just leave it.
If I can summon the will I'll put on a new protector in the future.
Does this mean you are going to be calling me or Mr Tatty Addams next time?
You’ll get the hang of it by the 5th one.
You’ll get the hang of it by the 5th one.
OP
OP
I just like griping mate lol. I just won't be doing another any time soon. Now I'm at the playfield assembly it's much more funDoes this mean you are going to be calling me or Mr Tatty Addams next time?
You’ll get the hang of it by the 5th one.

OP
OP
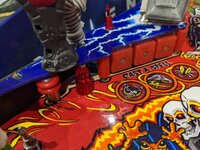
Today's completed tasks.
90% of rubbers installed
All star posts
90% of spacers
All blue plastics in
Wire guides installed
Gate and spring sorted
50% of flasher claws
Dead happy with the progress today.


90% of rubbers installed
All star posts
90% of spacers
All blue plastics in
Wire guides installed
Gate and spring sorted
50% of flasher claws
Dead happy with the progress today.
Last edited:
just had further shifty through your log, looks great albeit a lot of work that I would be staying clear of but well done. One little thing I would suggest thing is chuck a battery saver in there they only a couple of quid and can save you a lot of heartache.
Col
Col