Pinball info
You are using an out of date browser. It may not display this or other websites correctly.
You should upgrade or use an alternative browser.
You should upgrade or use an alternative browser.
Complete Creature from the faded lagoon
- Thread starter s000m
- Start date


OP
OP
HUGE Thanks to @stumblor who sent out, what can only be described as the best Decal goody bag ever!
I wasted no time applying the decals to the apron.
The absolute legend also sent me a back playfield decal, new manfacturer stickers and apron cards!
I was going to mark this shop log complete but the replacement translite I ordered arrived and wasn't cut to the correct size... Once thats sorted its all done!
What a journey and a bloody expensive one!
Would do it all again though I learnt so much on voltage tracing, cap replacements and clear coating on this one. Let alone the experience of basically replacing the top playfield!
BEFORE:

AFTER:

I wasted no time applying the decals to the apron.
The absolute legend also sent me a back playfield decal, new manfacturer stickers and apron cards!
I was going to mark this shop log complete but the replacement translite I ordered arrived and wasn't cut to the correct size... Once thats sorted its all done!
What a journey and a bloody expensive one!
Would do it all again though I learnt so much on voltage tracing, cap replacements and clear coating on this one. Let alone the experience of basically replacing the top playfield!
BEFORE:
AFTER:


OP
OP
YupThat really is amazing stuff.. This one of @xianek's ones?

OP
OP
Next up I need to sort the Line filter.
I've been putting it on the back burner with all the other pins I have on at the moment.
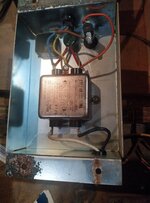
@stumblor can you do me a favour and take a picture of the line filter assembly? I need to see how its supposed to be setup inside the box.
At present mine appears to be real jank and explains why It can sometimes trip my circuit breaker.

I've been putting it on the back burner with all the other pins I have on at the moment.
@stumblor can you do me a favour and take a picture of the line filter assembly? I need to see how its supposed to be setup inside the box.
At present mine appears to be real jank and explains why It can sometimes trip my circuit breaker.
I currently have the one from my Addams out, so can send a photo of that if it helps?
OMG.. lets just bypass the Fuse holder and hard-wire a fuse!!! Least there's one there i guess.....Next up I need to sort the Line filter.
I've been putting it on the back burner with all the other pins I have on at the moment.
@stumblor can you do me a favour and take a picture of the line filter assembly? I need to see how its supposed to be setup inside the box.
At present mine appears to be real jank and explains why It can sometimes trip my circuit breaker.
View attachment 176596
If you're going to remedy this, consider adding a 'thermistor' or inrush limiter in the live connection*. WMS began doing this later on in the Wpc or Wpc/S era. To reduce the (quite frequent) occurrence of the main fuse blowing as the machine was switched on.
* instead of a wire from the fuse holder to the line filter, another disc-like component is fitted in series. As I understand it, this has a high resistance when power is first applied, but rapidly (i.e. in a few ac cycles) warms up and changes to a lower value, preventing a large initial current from being drawn before the transformer builds up resistance from its own magnetic fields. The manual for Star Trek Next Gen seems to be the first to actually show the filter box components, and does so a little better than others, on page 2-29 (it's the same type of filter box, rather than the later one). The description given is thermistor, 8A, 2.5 R 25, part number 5016-12978-00
The filter housing has lost the black plastic plug that blanks off the location for a power socket, too.
Last edited:
OP
OP
Please!I currently have the one from my Addams out, so can send a photo of that if it helps?
OP
OP
Yup I bought some with that specifically in mind. Just need to ensure I copy how its supposed to be wired up. Don't want to blow anything up ><If you're going to remedy this, consider adding a 'thermistor' or inrush limiter in the live connection*. WMS began doing this later on in the Wpcor Wpc/Sera. To reduce the (quite frequent) occurrence of the main fuse blowing as the machine was switched on.
* instead of a wire from the fuse holder to the line filter, another disc-like component is fitted in series. As I understand it, this has a high resistance when power is first applied, but rapidly (i.e. in a few ac cycles) warms up and changes to a lower value, preventing a large initial current from being drawn before the transformer builds up resistance from its own magnetic fields. The manual for Star Trek Next Gen seems to be the first to actually show the filter box components, and does so a little better than others, on page 2-29 (it's the same type of filter box, rather than the later one). The description given is thermistor, 8A, 2.5 R 25, part number 5016-12978-00
The filter housing has lost the black plastic plug that blanks off the location for a power socket, too.
Looking again at your picture, that fragment left on a fuseholder terminal may be a remnant of a thermistor originally fitted. I added a mains lead and trailing socket to so many games, but I can't recall when WMS introduced it.
OP
OP
Yup think you're right.Looking again at your picture, that fragment left on a fuseholder terminal may be a remnant of a thermistor originally fitted. I added a mains lead and trailing socket to so many games, but I can't recall when WMS introduced it.
Will fix it as soon I figure out where I put the fuse holder

OP
OP
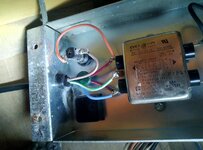
Thanks mate.Does this help Scott?
Fitted a new power lead on my Taxi so had the power box open.
Ant sent me his Addams Family in case anyone ever searches this they can have this picture to help put theirs together. The only thing I need to check on is whether or not these have a positive and negative leg.
I've been busy with JD this weekend. Once JD is done I'll get onto creech again. I want to to do some final touch up to the front.

Re. polarity of the thermistor; since it's used for ac power, I think it wouldn't be polarity-conscious. If it is, I'd expect there to be a marking on the component.
OP
OP
I figured that may be the case but wanted to be sure before I start messing around with any direct power feedsRe. polarity of the thermistor; since it's used for ac power, I think it wouldn't be polarity-conscious. If it is, I'd expect there to be a marking on the component.
OP
OP
perfect thanks!A thermistor is a special resistor so no polarity.
 thankfully you had a more accurate pic to go from.


