What's new
Pinball info

Register a free account today to become a member! Once signed in, you'll be able to participate on this site by adding your own topics and posts, as well as connect with other members through your own private inbox!

Complete Creature from the faded lagoon

s000m

Site Supporter
Joined
Apr 12, 2021
Messages
3,332
Location
Swindon
Alias
Scott
So I was a bit unprepared for this one, but who can anticipate a super glued on ramp?
😭

Cab is in fair condition but I might take a leaf out of @Dex-Jay on this one and do touch up over decal. If I stuff it up I'll sand blast and decal. 🤣

PXL_20220331_203321294.jpgPXL_20220331_203326011.jpgPXL_20220331_203328350.jpgPXL_20220331_203337154.jpgPXL_20220331_203341793.jpgPXL_20220331_203347601.jpgPXL_20220331_203350822.jpg

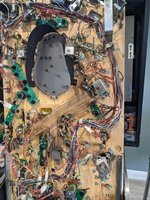
Next inspection the playfield dear God don't I love a challenge eh?

PXL_20220326_115914500.jpg

Stripped it down to find many of the plastics are 3D prints with stickers.... The BOM is growing!

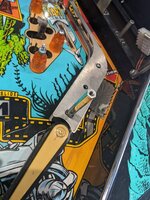
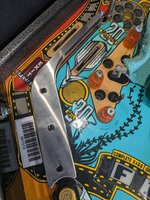
Then I hit the left ramp. Scratched my head can't figure what's holding down then...

PXL_20220331_165816895.jpg

Yup that's super glue. Spent a total of 2 hours getting it off.

PXL_20220331_180145014.jpg

It took some of the playfield wood off with it. I'll add it to the wood filler list.

Going to need a new left ramp, this one is wrecked...

Good 4 - 5 hours later got most of the top elements off.

PXL_20220331_193114961.jpg

Good 1 hour of novus 2 later.

PXL_20220331_204339196.jpg

PXL_20220331_204341397.jpg

PXL_20220331_204345457.jpg

PXL_20220331_204348073.jpg


Looking not too bad

PXL_20220331_204334491.jpg

Cleaning the plastics now.

Will update soon...
 
Doesn't look too bad. Did it fire up and play?
Good work so far
Yeah played ok. Coils all worked need to replace one which a taped on lug.

Couple of fuses are not the glass slow blows so will replace ASAP.

Some of the playfield used 3D printed plastic guides where others had snapped or broken.

I'm replacing all plastics some including the signs are just cheap 3D printed plastic with a low quality scan slapped on top.

New left ramp it's basically falling apart.

New bulbs some are either blown or missing.

The super glued ramp had me stressing but I got it off.
 
Cab is in fair condition but I might take a leaf out of @Dex-Jay on this one and do touch up over decal. If I stuff it up I'll sand blast and decal. 🤣
Absolutely! You'll save that! Clean, degrease, buff off the crud, make sure it's wax free then assess it. If it needs a light sand to level it then do so, fill n paint. Easy!

Just don't let it start doubting yourself, stick with it. Ebay cheap chinese 000 brushes, small flat ones, apply paint with one brush and immediately correct it if need be with another brush with thinners / turps.
Work tight, clean, straight, ideally with latex gloves and take your time. Match colour ideally in natural light too. Cabinet looks good, just a slightly tatty head. It will look better with that sticker gone too.
 
Hold your horses - that's one of the (super rare?) light blue playfields. We've seen these once before.

1648803817522.png
Usually they are either hot pink or light pink.

1648803921500.png

Now yours is definitely not due to fading, since other 'red' locations are fine and the light blue colour is consistent all the way up the playfield. No idea what the story is with this type but I've only ever seen it once before, maybe it's the same game, I dunno.
 
Hold your horses - that's one of the (super rare?) light blue playfields. We've seen these once before.

View attachment 165396
Usually they are either hot pink or light pink.

View attachment 165397

Now yours is definitely not due to fading, since other 'red' locations are fine and the light blue colour is consistent all the way up the playfield. No idea what the story is one this type but I've only ever seen it once before, maybe it's the same game, I dunno.

Yes it's super rare. Pay me loads mate 😂

Nah sorry it's fade.

received_265408822465978.jpeg
 
Hold your horses - that's one of the (super rare?) light blue playfields. We've seen these once before.

View attachment 165396
Usually they are either hot pink or light pink.

View attachment 165397

Now yours is definitely not due to fading, since other 'red' locations are fine and the light blue colour is consistent all the way up the playfield. No idea what the story is with this type but I've only ever seen it once before, maybe it's the same game, I dunno.
Have an April Fools cake sir 😎✊
 
I wonder why the pink fades but the red doesn't ??
Probably cheap light pink paint. Thankfully there's a decal for it.

Pedretti make it. Painting that pink back in is out of my skillset.
 
Last edited:
So today I focused on the following:

Another 2 hours or so of the playfield.

Then i focused on what lied beneath...

Hologram surprisingly still works but is blue (fairly common I hear). Will look to add the HolomodSP tbh I really like the look of the LCD screen.

Removed the Hologram and lagoon surround so I could get to the lagoon plastic. It hadn't been removed in a LONG time. The rubbers which act like washers for the tension had completely eroded. No wonder there was a massive lip topside.

Took a damn long time to clean off.

PXL_20220401_121424809.jpg

PXL_20220401_121427292.jpg

PXL_20220401_124113063.jpg

PXL_20220401_124120282.jpg


Next up the tunnel. Again hadn't been touched in a while was completely black.

PXL_20220401_112944227 (2).jpg

PXL_20220401_113826106.jpg

Cleaned and fitted lagoon, shroud and tunnel back

PXL_20220401_145034871.jpg


I removed the old lagoon decals. I'll get some new ones. These were trashed.

Finally I noticed a key thing on the playfield.

The rear left playfield guide was missing!

PXL_20220401_112947546.jpg

I had a similar issue with BSD but they were bent so far they were practically 90 degree's.

This one had only one guide left and it was the 45 degree (b variant guide) looking at the manual it should be the same as the BSD so I got my old rear guides that I had replaced from BSD out and painstakenly straightened the buggers till they looked good.

I wanted to buy new ones but I've only ever from them from 2 places Pinball parts in europe and Marco. I was looking at £40 and right now I can't afford it (unless someone buys my JP LE! - hint hint)

Anyway guides fitted and all is well.


PXL_20220401_150752275.jpg
 

Attachments

  • PXL_20220401_145034871.jpg
    PXL_20220401_145034871.jpg
    185.1 KB · Views: 1
Subway ramps can get ridiculously grubby! They can look like smoked perspex!

Screen Shot 2022-04-01 at 17.05.17.png
 
Began wood filling and painting the playfield.

Damn some of playfield had holes in it where it shouldn't been at it all night..

Before:
PXL_20220401_175730166.jpgPXL_20220401_175738289.jpgPXL_20220401_175845026.jpgPXL_20220401_175929459.jpgPXL_20220401_175738289.jpg
 
So let's start with the backbox repair.

Following advice from @Dex-Jay I first proceeded to repair the damage. There was a huge nasty cut through the claw and went from side to side. Huge chunks missing too around several areas. I was worried the wife wouldn't be able to fix this.

Purple claw marks were also in un-even in gradient.

PXL_20220402_083228313.jpgPXL_20220402_083225679.jpgFB_IMG_1648973224795.jpg

Final result came out pretty good! Hard to keep the claw colour consistent, maybe I should have just sanded them down.

None the less an improvement.

FB_IMG_1648973232034.jpg
 
Next up for some reason, someone thought it would be great to repair the lock down bar receiver mount by adding 2 F Off massive screws next to the left flipper button!

PXL_20220326_120704526.jpg

I've removed one, sanded it down and painted over. I'll have to fix the lock down bar receiver mount first....
 
Back onto the playfield we did some more touch up and the results came out pretty good.

PXL_20220401_200143195.jpgPXL_20220401_195900009.jpgPXL_20220401_195845044.jpgPXL_20220401_195848713.jpg
 
Note to self take pictures of what star posts and screws go where I literally lost hours trying to figure out what went where!

PXL_20220331_204334491.jpg
 
Plastics and metals were either ultrasonic cleaned or tumbled. Lane guides and hex posts came out great. As did the pop bumper caps and star posts.

I kept finding severe amounts of chalky residue on everything! Took ages to get off as was bloody everywhere!
 

Attachments

  • PXL_20220402_134457066.jpg
    PXL_20220402_134457066.jpg
    135.8 KB · Views: 14
  • PXL_20220402_134452106.jpg
    PXL_20220402_134452106.jpg
    156.4 KB · Views: 14
  • Like
Reactions: Jib
The playfield and underneath was littered with incorrect screws which damaged the playfield. I had to do A LOT of wood filling to repair the holes. For instance star posts on the slingshot middle holes were so wide that you couldn't secure down the star posts!

PXL_20220331_204339196.jpg

PXL_20220402_200640936.jpg

PXL_20220401_200722560.jpg
 
Next up I installed the new bulbs. Lots of burnt out flashers. Man I hate incandescents!

One flasher must have caught fire it's cremated the wood underneath and bubbled the insert!

I bought a full set of insert, GI and backbox comet LED'S from retro arcade specialists great guy David really helped me out. Highi recommend!

More on the other stuff I ordered from him later.

I also installed titan rubbers. I went with clear and some pink. I think in hindsight I should have gone all pink. Much of it won't matter as the ramps cover them all!

PXL_20220402_210626834.jpgPXL_20220402_203032930.jpgPXL_20220402_203028801.jpgPXL_20220402_203024360.jpgPXL_20220402_203026521.jpgPXL_20220402_203018910.jpgPXL_20220402_203012050.jpg
 
I still need flashers for the backbox most were either missing or broken.

Same for the playfield.

Some back box lights straight out don't work. Might need to replace the holders.

received_304256158455958.jpeg
 
Translite was filthy. Gave it a massive scrub down.

received_1152625695472473.jpeg
 
Nearly forgot. Had to deal with a sheered screw on a post. Squeaky bum moment but got it off with a drill bit extractor.

received_532300588266262.jpegreceived_542708914124454.jpeg
 
Back
Top Bottom