Finally finished the SM restore so I've finally got round to starting my Indiana Jones. Its a total restore of everything, cab, decals, pf the whole shabang!!!
Pinball info
You are using an out of date browser. It may not display this or other websites correctly.
You should upgrade or use an alternative browser.
You should upgrade or use an alternative browser.
Complete Williams Indiana Jones - The Path to Adventure!!
- Thread starter Marble Madness
- Start date
OP
OP

So the list of stuff I'm doing is as follows
- full strip of the cabinet
- replate all the large metal
- re-spray the cabinet & backbox
- re-decal the cab & backbox
- total upper playfield strip
- re-decal the apron
- all plastic cleaned, any broken replace
- all metal posts tumbled
- new rubbers
- new star posts
- fit ruins light mod (thanks Dreads
 )
)- 24k gold plate the rails
- ball guides cleaned and re-polish
- clean all wiring
- all metal cleaned / polished / tumbled
- new coil sleeves
- flipper re-build kit
- all boards cleaned
- fit new molex connectors
- fit 24k goldplated - lockdown bar, siderails, hinges, gun
I think thats about it but I've probably forgot some things. If anyones got any comments feel free to chime in always appreciate a little help along the way.
Attachments

OP
OP


OP
OP

My preffered choice of weapon for tackling the decals is a heatgun. Unless you use 40 grit sandpaper you can spend forever trying to get down to the wood. The heatgun is quicker and with a little practise you can remove the glue when you pull off the decal. Don't burn off the decal, warm it up and start pulling. If you've got any remaining glue scrap it into little worms let it cool and then scrape off with a stanley blade.
OP
OP

The fibre board has taken some moisture in and expanded so its sand, sand, sand, sand and then sand some more until I get it back smooth again. I start with 80 grit and work my way up to 180 grit. Then its on to filing, once filled I then sand off and then check for any imperfections refill and then sand again right up to 400 grit. A finish that feels like glass is where it will end

I'm sure I recognise those scrapes. Is this Stoptaps old one?
OP
OP
Hi @Paul R Owen there are no flies on you this morning!! It is indeed @stoptap old machine in a time before he went stern on us allI'm sure I recognise those scrapes. Is this Stoptaps old one?
I'm hoping after a thorough wipe down with the flannel and the mud is removed from Indy's face it wont look like its still residing in the 'temple of doom'

I bought this from The Heighway man. We had to get it upstairs very early one morning. God knows what the neighbours thought. Kept it for a few years, then sold it to Stoptap and we obviously had to get it downstairs.
OP
OP
That explains Indy's scrapes poor machine took a beating that dayI bought this from The Heighway man. We had to get it upstairs very early one morning. God knows what the neighbours thought. Kept it for a few years, then sold it to Stoptap and we obviously had to get it downstairs.
don't envy you that day trying to get a wide body up some stairs 
I'm going to be even more all Stern shortly.Hi @Paul R Owen there are no flies on you this morning!! It is indeed @stoptap old machine in a time before he went stern on us all
I'm hoping after a thorough wipe down with the flannel and the mud is removed from Indy's face it wont look like its still residing in the 'temple of doom'
Looking forwards to this restore Graham.
OP
OP
Hi @stoptap youve got me all intriguedI'm going to be even more all Stern shortly.
Looking forwards to this restore Graham.
are you going all love in an elevator on us?The restore is coming along nicely thanks for the machine
I was about to puller the trigger on a NIB but my bathroom self destructing put paid to that.Hi @stoptap youve got me all intrigued
The restore is coming along nicely thanks for the machine
I'm going to be even more all Stern shortly.
Looking forwards to this restore Graham.
Me too!

OP
OP
Trouble with the waterworksI was about to puller the trigger on a NIB but my bathroom self destructing put paid to that.
I'm thinking it's a met then
if it is very nice choice sir!!!Not a MET. I don't thing MET Pros actually exist. They never come up for sale.Trouble with the waterworks
I'm thinking it's a met then
OP
OP
Looks like I'm going to need the spot light and thumb screws tomorrow evening to get what the new addition to the collection is!!!!Not a MET. I don't thing MET Pros actually exist. They never come up for sale.
Are you going to pump me thoroughly in the de-briefing room ?Looks like I'm going to need the spot light and thumb screws tomorrow evening to get what the new addition to the collection is!!!!
OP
OP

I've finished sanding the backbox and put the first coat of filler on. I'm trialling a new filler which is more robust than the current one. Its specifically for corners and edges dries black but turns a light grey when sanded. Once this is sanded off I'll check to see what I've missed, fill and sand again and then its out with the spray paints!!
OP
OP

Sorry for the grainy pictures, but I've upgraded the phone now so the picture quality will improve in a short while. You're not seeing double here as well as the IJ backbox is another I'm doing for someone else. The bb's are now primed and ready for the topcoat before sending off for the screen print warning sign putting on.
The backbox has come up really well its back with me now but in 'storage' while I crack on with the rest of the machine.
I'll put a picture of the backbox finished later in the shoplog when I get it back.
OP
OP
Are you going to pump me thoroughly in the de-briefing room ?
there's a long line of us just waiting for you to turn up!!!!!!!!!!
OP
OP

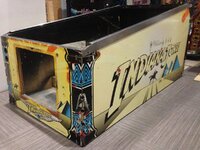
That's the cab completely stripped and the metal that is too big to go into a tumbler is going off for plating.
Structurely the cab is in good nick except for the scrapes which will be filled and the dirt which we'll sand back and clean up. First I need to remove those decals bring on the heat gun and sander

OP
OP


Back in the early nineties they definately spent more money on glue, these are stuck on really well. Funny that some decals from cabs of the same era come off really well, these have been much harder. The glue is so strong it's pulled a little of the wood off, its no issue though as I'll fill this and sand flat. Even the bottom of the cabs really dirty!!!
OP
OP


Here's a before and after picture of the underneath. It's fibre board so you can sand off any dirty but black marker or glue from tape soaks into the board and is very difficult to remove
OP
OP
Let the sanding begin....


I always try to keep the labels, I'm one of those who'd also prefer to see mine as it did out of the box.
I try to keep the wood grain as well it all looks a bit plasticy imo if not. Others prefer it the other way, we're all different!!
I always try to keep the labels, I'm one of those who'd also prefer to see mine as it did out of the box.
I try to keep the wood grain as well it all looks a bit plasticy imo if not. Others prefer it the other way, we're all different!!
OP
OP

OP
OP
So the cab has been put to one side just waiting for the sunnier weather, its on to the playfield.
Full strip of the upper pf, the deck itself is in good condition to say its 24 years old.


Everything needs a good clean, I've ordered some plastics, new starposts, new rubbers, new bats and rubbers. I'm doing something a little different and hopefully it will work really well. All the metal will be polished in a tumbler and the rails will be regrained and polished. The wireforms are already away for 24k gold plating.
Full strip of the upper pf, the deck itself is in good condition to say its 24 years old.
Everything needs a good clean, I've ordered some plastics, new starposts, new rubbers, new bats and rubbers. I'm doing something a little different and hopefully it will work really well. All the metal will be polished in a tumbler and the rails will be regrained and polished. The wireforms are already away for 24k gold plating.
OP
OP


Here's a picture of the pf fully stripped before the cleaning begins

OP
OP
Now the deck is clear of all parts the method I use is a full foam clean to remove all the dirt. I let it work its magic for a few minutes and then clean it off.

After giving it a thorough clean I move on to t-cut. It gets rid of the marks and stractches and starts bringing back the shine. Once its been t-cutted I move onto the treasure cove polishing kit. I've used other ways but I find you really can't beat it, it does cost a few quid but its worth every penny.
The next picture is of the mylar, even the treasure cove kit isn't improving the shine on this stuff much so its coming off using the freeze spray technique. Being careful it works a treat

It's coming up really well, but not finished yet just waiting for some new polishing stuff to be delivered so we'll move on to the underside until it arrives.

After giving it a thorough clean I move on to t-cut. It gets rid of the marks and stractches and starts bringing back the shine. Once its been t-cutted I move onto the treasure cove polishing kit. I've used other ways but I find you really can't beat it, it does cost a few quid but its worth every penny.
The next picture is of the mylar, even the treasure cove kit isn't improving the shine on this stuff much so its coming off using the freeze spray technique. Being careful it works a treat
It's coming up really well, but not finished yet just waiting for some new polishing stuff to be delivered so we'll move on to the underside until it arrives.
OP
OP
 The polishing stuff arrived let's see if it can work some more magic. The haze is caused by the product before buffing off once dried
The metalwork tumbled as well its all coming together nicely

