What's new
Pinball info

Register a free account today to become a member! Once signed in, you'll be able to participate on this site by adding your own topics and posts, as well as connect with other members through your own private inbox!

In Progress Rocky & Bullwinkle Shop Log

I just couldn't go to the extremes that some of you guys do, with polishing up the backplates and mains boxes (and even the tilt bob). I have far too many machines to have the time.

However the OCD part of me can't help being jealous at how nice those metal bits look now that you have polished them ;)
 
Shame all that hard work will be covered with boards :hmm:
Haha, yeah and much like all the other stuff inside the cabinet which will only be seen by me too.

As i've said before if I had more than one Pin then i'd probably find it easier to salve my OCD and not do it - but whilst i'm waiting for the cab to be painted i'm killing time so I might as well do it properly. After all, I will know that it's been done properly. :rofl:
 
it's kinda like this elvish script inside the gold painted cab here in the gorgeous LOTR restoration thread by @Hiro996 - but even Kev didn't go so nuts as to polish up the metal board behind the boards that sits inside the backbox behind the backglass, look how lazy he was: here
 
I stand by my OCD :p

Pretty much done now anyway so onto the next part that needs polishing up.
 
Spent an hour in the sun this afternoon. Finished polishing up the CPU board and the power box.

Came up nice in the end, although i've learned it's very hard to accurately photograph shiny things.

2015-06-06 14.49.06.jpg

2015-06-06 14.49.26.jpg
 
Have you lacquered that Mr Worm?? Only because it wont take long for the standard "fog" to re-establish :(
 
Not yet @Paul as I ran out of time and had to go pick the family up from an event they'd been to. I'm going to mask off the PCB mounting holes and thren give it a spray with clear lacquer in the next day or so. Probably also do the same with the power box but that shouldn't need masking as its earthed on the bottom side when you screw through the earth braid.
 
Well I had a go at applying a couple of coats to the power box today just to see how I fared.

Have to say that i'm not happy with it because it's totally taken the shine off the metal. It's still better than the dull grey that the box was originally but it's certainly not as shiny as it was. I used a plasticote clear lacquer but I notice that the finish is satin so perhaps the reason why. Would I fare any better with a gloss finish or is this just part and parcel of the process?

If so then I might well be tempted to just polish it back down to the metal and apply a liberal amount of brasso or autosol to give it a bit of protection?
 
Panic over.

I picked up some of this on the way home from work tonight.

i1_adis_ws_i_washford_204581_d1fc31f448cc9529b734c447567c4e6e._.jpg

As it specifically said on the label that it was ideal for protecting alloy wheels I figured it should be good for the job. Sure enough it's left a nice shiny finish.

Now if only i'd not been a total div and tried spraying it in the middle room upstairs. The lighting in there is utter crap and having now brought it downstairs I can see I oversprayed one side and it's run. Drat!!

So now i'll have to wait for it to fully dry before stripping it all back and starting over again. Note to self: Don't do spraying in poor lighting conditions. It's just asking for trouble.
 
Thanks @Hiro996

Although all this polishing is well and good - i'll feel much happier once the cab is painted and I can start refitting stuff into it. Hopefully not too much longer.
 
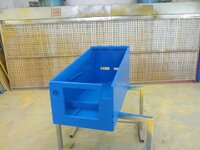
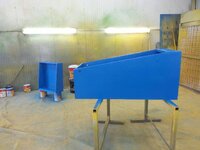
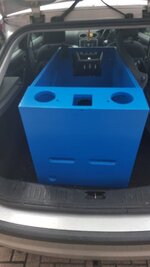
There's been some progress on the painting of the cabinet. I got these photos sent to me this morning :)

att_3.jpg

att_2.jpg

Unfortunately this coat isn't dry enough to flat it back yet and apply another coat so it's going to be a little longer. How long depends on if @Davey D can squeeze it in between other jobs this week. If not then he's away on holiday for a couple of weeks. But either way it should hopefully be back here towards the start/middle of July and then I can get cracking. Of course massive thanks to Dave for doing this; saved me the hassle of getting a compressor and having to do it myself.

First job once it gets back is to reinstall the cabinet braid. I'll also look at applying the decals to the head but that won't happen until i'm happy that the paint is well and truly dry. Progress should actually be a fair bit quicker once the cabinet is back because i've slowly gathered a lot of the needed parts over the past 6-12 months.
 
Heh, don't remind me. This must be one of the longest running shop logs there is and I feel a tad guilty for that.

But I guess it's partly down to my growing confidence. When R&B first showed up I was a total noob and even stripping the head to get it in the house was a daunting task. But as time has come on i've become more and more confident so i've gone from an initial strip down and rough clean to a full tear down and rebuild job.

It's still got some way to go yet but i'm hoping that at the end of it i'll have a very nice example of an R&B, even if it's not a factory original.
 
It's a great log and I've found it useful, thank you. Two years or not I hope you're enjoying the journey the end result is so going to be worth it.
 
Not done much on this lately as i've been away for work.

I got back on Friday and over the weekend I remembered about an experiment I started before I went away.

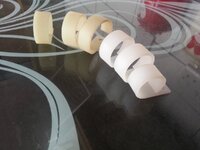
The cable loops off the Pin were all horrible and yellow from aging so I took it upon myself to have a crack at getting them back to white again.

Ingredients were as follows. Some Vanish oxi-action. I mixed a scoop of this with some water and left the test candidates to soak in it for a few hours.

2015-06-21 13.05.38.jpg

Then I got a zip-loc bag and put a liberal amount of this cream peroxide in it. This was got from a local branch of Wilkos but i'm sure you can get a much larger amount of peroxide for less money by just grabbing it off eBay.

2015-06-21 13.05.51.jpg

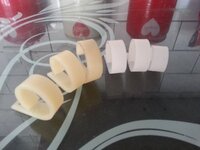
Then you're just meant to stick it in the sun for a bit. The day I started this it was miserable and no sodding sunlight at all. I left the bag on the window sill in the bedroom upstairs and forgot about it until earlier today. Here's the results. Obviously the three on the right have been treated whilst the others are original.

Reckon I might as well do them all. Came out pretty nice as it happens.

2015-06-21 13.05.14.jpg 2015-06-21 13.05.23.jpg
 
...Then I got a zip-loc bag and put a liberal amount of this cream peroxide in it. This was got from a local branch of Wilkos but i'm sure you can get a much larger amount of peroxide for less money by just grabbing it off eBay.

Yeah Yeah I bet you just got it out of your bathroom cupboard from when you get your highlights done :-D
 
Haha, I don't need highlights. A combination of kids, grandkids and foster kids means my hair is rapidly greying - so Phil Schofield is now my new hero. Maybe one day my hair will be as white as his.... ;-)
 
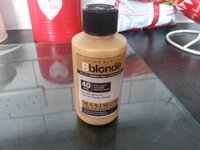
I bought a few bottles of bblonde to sort out the yellowing on the monitor surround of my Sega Net City.

I just happened to buy it at the same time I had a haircut. When I got home I told my wife that I was going to try going blonde with the new haircut. She just looked at me and said "oh ok...". :)
 
So things are likely to start moving again now. I've been and picked this up today.

2015-07-21 13.13.42.jpg

The head was transported home yesterday and like a doofus I managed to lift a small section of the ply from the rear of the head. Thankfully it's only a very small piece and I have the original bit of ply so I can adhere it back in place. It's not actually going to be visible once it's all back together but i'll take some time to get it patched back up.

First job once this gets home is going to be to apply the new decals to the head. I need a practice run with the smaller decals to make sure i've got my method down before I try the full size ones on the cabinet. I'll also probably fit the new ground braid before I do that anyway as it'll need lying on it's side to make the job easier.

Thanks to @Davey D for very kindly doing the paint job for me. It looks awesome and the blue is actually a very good match for the decals.
 
Well the cabinet has safely made the trip home and is now back in the middle room at home. It's a bit of a squeeze in there now because whilst it's been away the wife had bunk beds put in there so the grandkids can stay over from time to time - how inconsiderate. ;-)

It should be possible to work in there so long as I plan ahead and take care. With that in mind i've been giving some thought on how to proceed. No photos as yet because the lighting in that room is pretty poor; I really need some daylight to get some photos and to be fair there isn't much to show right now.

The first jobs to be tackled will be:

1. Applying the decals to the sides of the backbox. I figured that as it's the first time i've ever done it then it would make sense to start with the easier decals. I've got some adhesive backed cork which I can use to fashion some pads which i'll place on top of the decal when I clamp it. This should mean it gets held in place firmly without marking the decal.

2. I've also ordered some Rapesco 24/6 copper staples in readiness for fitting the new cabinet braid.

Tonight i've undertaken a little prep-work in readiness for fitting the decals. Unfortunately during the paint job one side of the head managed to pick up a couple of very tiny bumps and these would have shown through the decal. I took a razor blade and very carefully scraped down over the bumps with the blade at a 90 degree angle. After a short while both of the bumps had gone and I was left with a totally smooth finish; visually it's left a slight mark but of course that won't be seen as it's under the decal.

Realistically I probably won't do the decals until the weekend. I don't want to rush things and screw it up. This is the method i'm intending to use, but rather than having someone hold the top i'll most likely clamp it in place just to make absolutely sure it doesn't shift (i've been amazed how easily they move even when applying pressure to them).


The only thing i've not decided on yet is how to trim them back. From what I understand I need to use a scalpel blade but hold it at a 45 degree angle and run it down the edge of the backbox, but i've also heard of people cutting it back 1mm from the sides to prevent it being caught and lifted. My gut feeling is to trim it flush to start and see how it looks. I can always take it back further if needed.

Sorry for the text-heavy post. Hopefully some pictures will be up over the weekend.
 
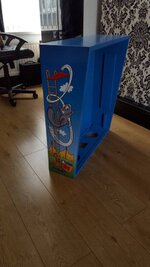
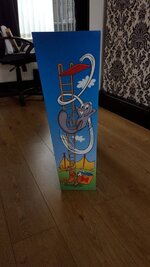
I finally bit the bullet today and applied the backbox decals. I was absolutely bricking it and even with the help of the missus it was nerve-wracking.

They look absolutely fab but there were a couple of very minor issues. On the first side I rushed like an idiot and under up with some teeny tiny air bubbles underneath. They're barely noticable and most of them have pushed out. I took much longer over the second side and that looks much much better.

The only downside is that for some reason one of the registration marks ended up still being visible. I noticed it before applying them but I presumed that as I applied them they might stretch ever so slightly, but even so the registration point is still there. It's absolutely tiny and not really noticable.

Oh, and the blue we used for the paint is a perfect match. Nice one @Davey D .

Anyway, pictures.

2015-07-25 12.06.45.jpg

2015-07-25 12.26.19.jpg
 
It wasn't too bad. I did a rough cut with the blade at a fairly steep angle and then went round again at about 45 degrees.

As it happens it's trimmed it neatly enough that the decal can't be lifted by brushing your hand against it so there's no need to take it back any further. I did manage to slightly catch the pain on the back edge so i'll dig out a kids paintbrush and touch that in later.
 
Thanks for the words of support.

I got a bit more done after the decals were on. I've refitted the PCB mounting plate and all of the cable management loops. The big capacitor and the fuse holders and bridge rectifiers are also back in place.

I've also stripped down the locking mechanism for the back glass so I can prime and respray the locking plate. Oh, and i've drilled out the rotolock bolt hole that I accidentally filled in - so now that's done I should be able to get on with fitting the new ground braid.

I'll stick some photos up when i've got a bit more to show.
 
Back
Top Bottom