You should be able to download the labels from inkochnitos site
Pinball info
You are using an out of date browser. It may not display this or other websites correctly.
You should upgrade or use an alternative browser.
You should upgrade or use an alternative browser.
In Progress Rocky & Bullwinkle Shop Log
- Thread starter Wiredworm
- Start date
Yup, you can Rudi. Thanks for the reminder though 
It's just the serial number panels that i'll have to take care of - but yeah the rest of the labels needed can either be printed from the site you mention or a few of them are also available as repros (the roto lock one on the back for example). There is a guy on Pinside who is trying to get enough interest to have a batch of vinyl printed labels for the DE tables made up. I've registered my interest in those so will most likely leave the labels until last as i've got plenty of other stuff to be doing in the meantime.
It's just the serial number panels that i'll have to take care of - but yeah the rest of the labels needed can either be printed from the site you mention or a few of them are also available as repros (the roto lock one on the back for example). There is a guy on Pinside who is trying to get enough interest to have a batch of vinyl printed labels for the DE tables made up. I've registered my interest in those so will most likely leave the labels until last as i've got plenty of other stuff to be doing in the meantime.
So yet again I got no more sanding down done thanks to the damned weather. I'll be so happy when the Summer finally arrives.
I did, however, cast my eye over the rear of the cabinet where the rotolock is going to be reconnected once the paint job is done. This part of the cabinet usually suffers and whilst this one hasn't totally failed yet it's clear that it's on it's way out.
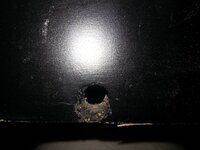
Of course this has all got to be sanded back and resprayed but it set me thinking about what I might do to try to prevent this from getting worse. I thought that what would be really ideal would be a piece of metal tube just the right size. And then I remembered when we had the new kitchen delivered we had some heavy duty pan drawers which came with a nice system where you could interlink 'pipes' to make a framework to seperate your pans and stuff. The missus hated the idea so the tubes got taped together because I said 'they might come in handy for something'.
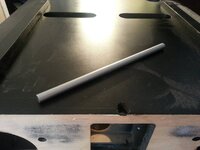
I had no idea that they'd help with the pinball though.
Turns out the tube is an exact fit.
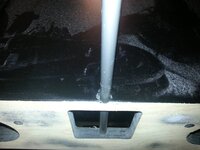
I dug the rotolock out tonight and put it roughly in place and then checked to make sure everything lined up nicely and it looks to be just fine. So all that's left now is to grab the hacksaw and trim off a length of the pipe. Once that's done I can then use wood filler around it to restore the rest of the area. Hopefully this will help to adhere the tube in place thus preventing damage to the wood again in the future (although it'll get far less use from now anyway).
So a minor result - now the clocks have changed i'm hoping I might get the sanding back during the evenings. We should have daylight until at least 7pm so should be able to squeeze a couple of hours in each night.
I did, however, cast my eye over the rear of the cabinet where the rotolock is going to be reconnected once the paint job is done. This part of the cabinet usually suffers and whilst this one hasn't totally failed yet it's clear that it's on it's way out.

Of course this has all got to be sanded back and resprayed but it set me thinking about what I might do to try to prevent this from getting worse. I thought that what would be really ideal would be a piece of metal tube just the right size. And then I remembered when we had the new kitchen delivered we had some heavy duty pan drawers which came with a nice system where you could interlink 'pipes' to make a framework to seperate your pans and stuff. The missus hated the idea so the tubes got taped together because I said 'they might come in handy for something'.

I had no idea that they'd help with the pinball though.
Turns out the tube is an exact fit.

I dug the rotolock out tonight and put it roughly in place and then checked to make sure everything lined up nicely and it looks to be just fine. So all that's left now is to grab the hacksaw and trim off a length of the pipe. Once that's done I can then use wood filler around it to restore the rest of the area. Hopefully this will help to adhere the tube in place thus preventing damage to the wood again in the future (although it'll get far less use from now anyway).
So a minor result - now the clocks have changed i'm hoping I might get the sanding back during the evenings. We should have daylight until at least 7pm so should be able to squeeze a couple of hours in each night.
Errrrr, so I managed to get some more sanding done today. Unfortunately the missus got a new bed delivered for our daughter so time was limited but I at least managed to get the other side of the cabinet done and also the back. Started on the interior and then ran out of sanding disks - with it being Easter Sunday everywhere was shut so couldn't continue.
As the exterior is now done I can hopefully get on with filling the dings and scrapes. Alas no photos this time around due to rushing, but hopefully have some posted soon.
As the exterior is now done I can hopefully get on with filling the dings and scrapes. Alas no photos this time around due to rushing, but hopefully have some posted soon.
So i'd been wondering where the holes had gone that should be used to secure the roto-lock. Now that the back is sanded down I can see exactly where.
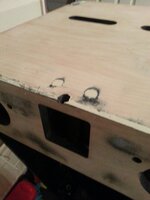
I presume the square segment of the bolt had managed to rotate and wear the wood away hence why they've been filled in, but as I plan to refit the original rotolock I need to do something about this. The original plan was to simply drill out from the other side because the holes are still present on the interior.
Of course that wasn't going to work because it's too tight to get the drill in. Anyway, i'm picking up a right angle adapter in the next day or two so then I can carefully drill the holes back out. I need to test with the roto-lock in place before I fit the piece of pipe and fill around it to stop the wood in that area getting any worse. I'd feel a bit stupid if I fill it in place and then find the hex wrench won't fit in correctly because it's not all in alignment.
Well finally it happened. The weather was nice and the pinball gods smiled on me, and there was much rejoicing at the altar of the pinball.
Or, to put it another way, I got an early start at work today so finished at 1pm. As i'd worked from home I had a free afternoon that I could immediately take advantage of. Given it was a nice day it seemed rude not to go outside and get some work done. It's been a cold miserable old winter and i'm so happy to get moving again.
Anyway, the exterior artwork is all now removed. The interior still needs a bit of a going over by hand (some areas are too tight to get the ROS into) but I figured I should really start fixing up the dings and scrapes. So after some time with our friend Ronseal two-part wood filler and the sander I finished up with this.
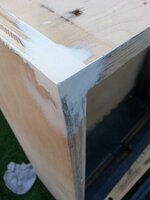
Still not totally done but the priority for now was to get a fairly nice square edge. I've got some 600 grit discs on order and when those arrive and i've finished the filling i'll work up though 180, 240 and up to 600 grit so the exterior is a nice mirror smooth finish.
I think these corners came up nicely to say they had a good 5 or 6mm thickness of ply missing from them. I've still not quite perfected the art though as I generally end up over-filling, sanding back and then realising that i've not quite managed to get enough filler into the hole. Anyway, it takes a bit longer but thankfully filler and my time isn't that expensive.
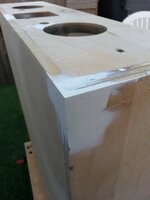
I also cracked out the dremel and used it to chop a 1cm long piece of the metal pipe off. This was the pipe that came with the new B&Q kitchen. By an amazing coiocidence it's just the right size to fit in the rotolock hole. I also had to drill out the holes for the rotolock fitments because someone had managed to fill them in when fixing up the rear. With the rotolock temporarily in place I could check to make sure that the pipe position was correct and that the hex wrench would still line up and work the mechanism. Great news - it did. So after some careful filling and sanding I ended up with this. Look how surprised it looks!!
(The left hole chipped away like that when I drilled through so i'll probably use a drill bit to plug the hole and then apply some more filler just to tidy it up, although I realise I need to make sure there is a square recess there for the bolt to fit into. I'll need to be careful when tightening the rotolock to make sure I don't tear through the filler)
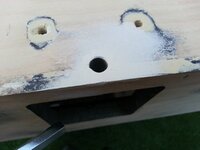
More gratuitous filler shots.....
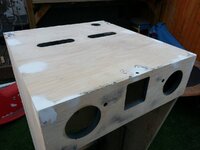
And also today I finally got started on tearing the playfield down. Very slow progress as i'm bagging and labelling the parts as I go along, but hey, at least it's started now.
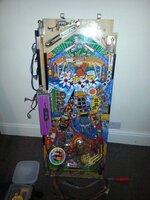
Still lots more filling to do but i'm hoping that the filling and sanding will be done before the end of the month. I'm hoping that by then i'll have got my spare cab painted up so we can compare the paint finish with the decals and make sure it's a good match. Then it'll be onto undercoating and painting and then the fun really starts.
Or, to put it another way, I got an early start at work today so finished at 1pm. As i'd worked from home I had a free afternoon that I could immediately take advantage of. Given it was a nice day it seemed rude not to go outside and get some work done. It's been a cold miserable old winter and i'm so happy to get moving again.
Anyway, the exterior artwork is all now removed. The interior still needs a bit of a going over by hand (some areas are too tight to get the ROS into) but I figured I should really start fixing up the dings and scrapes. So after some time with our friend Ronseal two-part wood filler and the sander I finished up with this.

Still not totally done but the priority for now was to get a fairly nice square edge. I've got some 600 grit discs on order and when those arrive and i've finished the filling i'll work up though 180, 240 and up to 600 grit so the exterior is a nice mirror smooth finish.
I think these corners came up nicely to say they had a good 5 or 6mm thickness of ply missing from them. I've still not quite perfected the art though as I generally end up over-filling, sanding back and then realising that i've not quite managed to get enough filler into the hole. Anyway, it takes a bit longer but thankfully filler and my time isn't that expensive.

I also cracked out the dremel and used it to chop a 1cm long piece of the metal pipe off. This was the pipe that came with the new B&Q kitchen. By an amazing coiocidence it's just the right size to fit in the rotolock hole. I also had to drill out the holes for the rotolock fitments because someone had managed to fill them in when fixing up the rear. With the rotolock temporarily in place I could check to make sure that the pipe position was correct and that the hex wrench would still line up and work the mechanism. Great news - it did. So after some careful filling and sanding I ended up with this. Look how surprised it looks!!
(The left hole chipped away like that when I drilled through so i'll probably use a drill bit to plug the hole and then apply some more filler just to tidy it up, although I realise I need to make sure there is a square recess there for the bolt to fit into. I'll need to be careful when tightening the rotolock to make sure I don't tear through the filler)

More gratuitous filler shots.....

And also today I finally got started on tearing the playfield down. Very slow progress as i'm bagging and labelling the parts as I go along, but hey, at least it's started now.

Still lots more filling to do but i'm hoping that the filling and sanding will be done before the end of the month. I'm hoping that by then i'll have got my spare cab painted up so we can compare the paint finish with the decals and make sure it's a good match. Then it'll be onto undercoating and painting and then the fun really starts.
Cracking Job there with the cab and filler 
EDIT - Not literally thankfully
EDIT - Not literally thankfully
Well i'm cursing the weather yet again. Cold, wet and damp has meant zero sanding time for me this weekend - so yet again the cabinet stands in the back room waiting for some decent weather so I can finally get it finished.
The good news is that i've had a few hours this evening to continue the playfield strip down. All ramps and plastics have now been stripped off and i'm almost at the point where i'm ready to start stripping the ball guides and the posts. That'll have to wait until I get back from Denmark.
A few really good bits of news though:
1. All the plastics are in pretty good order. There's a small piece missing out of one plastic so I need to find a replacement for that. I've already sourced a replacement for the one which sits below the Nell Assembly and although it's not NOS it's in one piece and find apart from some minor scratches. Need to invest in some Novus to give all the plastics a thorough shine up.
2. The left ramp is battered to hell but I managed to get a replacement for this a few months back when Best of Pinball had some in stock. I was a little worried about the Rocky ramp because that one is also prone to being battered but after stripping mine out and comparing with some photos of a NOS one i've found online it turns out it's actually in perfect condition. A bit dirty and could do with a clean, but otherwise fine. Nice.
Nice.
I think I need to buy more storage boxes though. It's quite surprising how much space all these bits take up once you start bagging them up.
Alas, not much in the way of pictures this time around. I'll hopefully get some more posted when I get back from Denmark.
The good news is that i've had a few hours this evening to continue the playfield strip down. All ramps and plastics have now been stripped off and i'm almost at the point where i'm ready to start stripping the ball guides and the posts. That'll have to wait until I get back from Denmark.
A few really good bits of news though:
1. All the plastics are in pretty good order. There's a small piece missing out of one plastic so I need to find a replacement for that. I've already sourced a replacement for the one which sits below the Nell Assembly and although it's not NOS it's in one piece and find apart from some minor scratches. Need to invest in some Novus to give all the plastics a thorough shine up.
2. The left ramp is battered to hell but I managed to get a replacement for this a few months back when Best of Pinball had some in stock. I was a little worried about the Rocky ramp because that one is also prone to being battered but after stripping mine out and comparing with some photos of a NOS one i've found online it turns out it's actually in perfect condition. A bit dirty and could do with a clean, but otherwise fine.
I think I need to buy more storage boxes though. It's quite surprising how much space all these bits take up once you start bagging them up.
Alas, not much in the way of pictures this time around. I'll hopefully get some more posted when I get back from Denmark.
Blimey, I had no idea just how time consuming it was going to be doing this playfield strip. I've spent a fair few hours now and labelling and photographing everything that i've removed is adding to the timescale. I got really brave last night and finally desoldered the lamp holders for the pop bumpers so they could be removed. Now the playfield is looking like this.
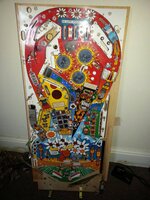
The process is also taking longer as I plan to swap out a lot of the horrible Data East posts with suitable replacements. I'll be using colour matched post rubbers behind the B-O-M-B targets and a variety of colours of Star Posts elsewhere. As I go through the strip down i'm bagging up the parts, labelling them and also noting down if the parts will be replaced; I figured it was worth doing as there's no point in polishing up parts that won't be used.
I'm guessing the pop bumpers hadn't been stripped before as they were bloody filthy.
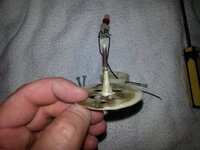
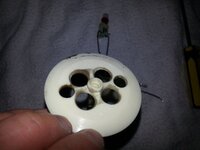
Not sure if i'll just clean the skirts yet or if i'll replace them with new ones.
Also, the cabinet work is still ongoing. This is partly due to my lack of skill applying the filler, partly due to the weather and partly due to my OCD. Initially I ended up over-filling a lot and then having to sand back which is time consuming. I've got better as i've gone along but it's added to the timescale. It's also quite amazing to me how many dings and scrapes you notice once you start getting a good close look at the woodwork. The vast majority of the major damage is now filled and sanded and I applied yet more filler last night which will hopefully see the last of the marks covered up. A bit more sanding to get things flush and I should be ready for the finer grade sanding to bring it up to a totally smooth finish ready for painting.
The playfield is going to be fully stripped top and bottom and then i'm considering removing the mylar so I can get the artwork touched up. I may even take NewDos's lead and give it a few coats of clear. Let's see how brave I get.

The process is also taking longer as I plan to swap out a lot of the horrible Data East posts with suitable replacements. I'll be using colour matched post rubbers behind the B-O-M-B targets and a variety of colours of Star Posts elsewhere. As I go through the strip down i'm bagging up the parts, labelling them and also noting down if the parts will be replaced; I figured it was worth doing as there's no point in polishing up parts that won't be used.
I'm guessing the pop bumpers hadn't been stripped before as they were bloody filthy.


Not sure if i'll just clean the skirts yet or if i'll replace them with new ones.
Also, the cabinet work is still ongoing. This is partly due to my lack of skill applying the filler, partly due to the weather and partly due to my OCD. Initially I ended up over-filling a lot and then having to sand back which is time consuming. I've got better as i've gone along but it's added to the timescale. It's also quite amazing to me how many dings and scrapes you notice once you start getting a good close look at the woodwork. The vast majority of the major damage is now filled and sanded and I applied yet more filler last night which will hopefully see the last of the marks covered up. A bit more sanding to get things flush and I should be ready for the finer grade sanding to bring it up to a totally smooth finish ready for painting.
The playfield is going to be fully stripped top and bottom and then i'm considering removing the mylar so I can get the artwork touched up. I may even take NewDos's lead and give it a few coats of clear. Let's see how brave I get.
Well after a huge amount of filling and sanding I feel like i'm almost at the point where I can get painting. I just need to run a sanding block over the interior to clean that down a little, although it doesn't require quite as much attention as the outside because obviously it's only being painted and I don't have to worry about decals being stuck onto that area.
I've also found a couple of last dints on the main cab which i'll fill tonight and then hopefully over the next couple of nights I can start with the higher grade grits to get a nice smooth finish. I've already done a couple of sides of the backbox using 600 grit and my god it feels soooo smooth. Really chuffed with how it turned out and looking forward to getting it painted up now.
I've used a detail sander along the edges on some sides to put a little chamfer on it as it seems to be the norm on the DE back box at least.
Anyway, pictures. Just a few of the back box. Once the main cabinet is done i'll post some pictures of that too.
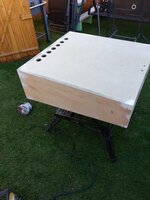
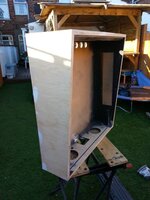
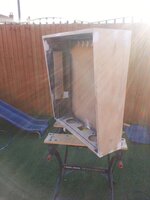


Corrr, it's been a right old busy week. Sanding on the cabinet is ongoing and will hopefully be done in the next few days. I've done a couple of sides with 600 grit and my god it feels as smooth as glass now. Lovely stuff and hopefully it'll show through once the painting is done and the decals fitted.
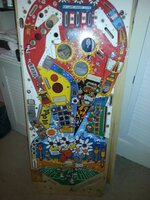
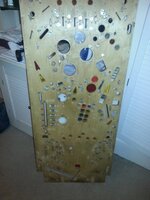
I've also spent a fair few hours during the evenings this week stripping the top and bottom of the playfield. The top has been done before but not to this extent; the last time I didn't take the pops off and I couldn't really clean as well as I wanted to because all of the lamp holders were in place. Well now after a week of spending the nights stripping it down i'm left with this.
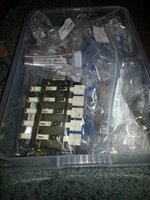
All of the bits i've removed have been bagged up and labelled. Amazingly pretty much everything from the underside fitted in this one box.
And what of the rest of the loom? What happened to that?
Well it turned out that the piece of ply I bought to use for the new back of the cabinet was just the right size. So I slapped it down next to the playfield and slid everything across before refixing the support posts back in place.
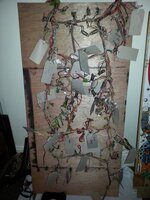
As you can see theres, erm, one or two tags which i've used to mark off the various coils and switches that need reconnecting. Not bothered labelling the GI wired because once everything is back in place it should be quite obvious what goes where; and I took lots of photos for reference too.
Next plans?
Well i'm going to clip the staples on the GI lampholders on the back and desolder those. Then i'll polish it up with a bit of pledge, pledge, pledge, just to tidy it up a bit. And then I think I might have a look at lifting the mylar before taking photos to see how much it's going to cost to have the damage to the playfield touched up. It's not actually too bad but it'd be nice to get it pristine and then look at clearcoating it.
I've also started on stripping down the DMD panel tonight so the parts for that can be packed away too ready for cleaning and rebuilding.
I've also spent a fair few hours during the evenings this week stripping the top and bottom of the playfield. The top has been done before but not to this extent; the last time I didn't take the pops off and I couldn't really clean as well as I wanted to because all of the lamp holders were in place. Well now after a week of spending the nights stripping it down i'm left with this.


All of the bits i've removed have been bagged up and labelled. Amazingly pretty much everything from the underside fitted in this one box.

And what of the rest of the loom? What happened to that?
Well it turned out that the piece of ply I bought to use for the new back of the cabinet was just the right size. So I slapped it down next to the playfield and slid everything across before refixing the support posts back in place.

As you can see theres, erm, one or two tags which i've used to mark off the various coils and switches that need reconnecting. Not bothered labelling the GI wired because once everything is back in place it should be quite obvious what goes where; and I took lots of photos for reference too.
Next plans?
Well i'm going to clip the staples on the GI lampholders on the back and desolder those. Then i'll polish it up with a bit of pledge, pledge, pledge, just to tidy it up a bit. And then I think I might have a look at lifting the mylar before taking photos to see how much it's going to cost to have the damage to the playfield touched up. It's not actually too bad but it'd be nice to get it pristine and then look at clearcoating it.
I've also started on stripping down the DMD panel tonight so the parts for that can be packed away too ready for cleaning and rebuilding.
Well I was all set to get outside and finish sanding the cabinet tonight. And then this happened.
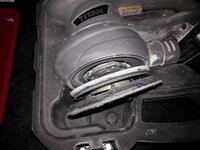
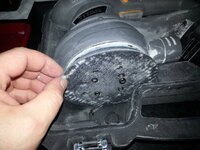
Yeah, the pad that holds the sanding disk has managed to come free. Worse still all but one of the screws holding it in place has shredded the threads from the hole to which they were secured. Only got it in August but have a feeling that i'm going to be in for a fight if I want a free replacement.
Aaah, well onto ScrewFix in the morning.
Well Titan is a ****e brand in afraid
Maybe it's a case of getting what you pay for - it was only £40 after all.
Reviews on Screwfix seemed relatively favourable and it's not had that much use.
Although to be fair I now get the feeling that I should have been checking and tightening the screws at regular intervals, which I haven't. So maybe I actually contributed to the problem myself.
Reviews on Screwfix seemed relatively favourable and it's not had that much use.
Although to be fair I now get the feeling that I should have been checking and tightening the screws at regular intervals, which I haven't. So maybe I actually contributed to the problem myself.
Last edited:
They should replace that no problem at all.... Just take it in and say that whilst you were using it it did that.... and shagged up the threads... And that it must have been faulty when you bought it... i.e. cross threaded...
I should have been checking and tightening the screws at regular intervals, which I haven't
Of course you haven't, you're not a weirdo
I'm so so pleased by that comment Dan.
Even more so considering we've actually met in the past ;-)
I'll have a chat with them tomorrow - to be fair they have a good rep for customer service so i'm feeling relatively positive.
Even more so considering we've actually met in the past ;-)
I'll have a chat with them tomorrow - to be fair they have a good rep for customer service so i'm feeling relatively positive.
Screwfix have got to swap that for you. For that to happen after light duties of use is just not on. Yes Titan is not the best make but that should not be happening.
Maybe put a little more money to it and upgrade to the next model up.
Maybe put a little more money to it and upgrade to the next model up.
Well top service from Screwfix - replaced it with no issues and even had the details of the purchase already logged on the computer so no need to faff about with receipts and stuff.
Under normal circumstances i'd have taken @replicas advice and bumped it up a model with some extra cash but unfortunately it's already been a very expensive month and as I need to crack on with the cabinet sanding I had to just do a straight swap.
Still, the end is now in sight and with a bit of luck sanding should be completed in the next few days.
Today i've managed to finally get the GI strings and the lamp holders removed from the back of the playfield. I found it interesting to note how the GI strings near the top lanes were done - they'd clearly put a loop of wire around the first staple and then worked it from there. It meant I had no choice but to desolder that lamp to extricate the staple before soldering the wire back in place. No biggie but it gave some insight into how these machines are put together.
Anyway, I changed my mind about how to remove them. I ended up snipping the staples in the middle and removing most of the lamp holders with the wires still connected. And voila:
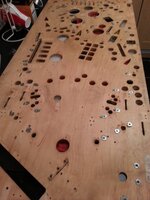
All that's left on the back now is the T-Nuts. Some of them are just pushed in place whilst others have a hex screw holding them down. Anyone know why the difference?
Still not sure if i'm going to bother removing them or not. There's some damage on the bottom which i'm really tempted to repair with some wood filler. If I remove the T-Nuts it wouldn't be too tough to then give it a sand over with 600 grit just to make it nice and smooth again. Hell I could even go the whole hog and paint it. Not sure if anyone else has done that or if it's even worth it. Something for me to think about.
Then my attention turned to the top. I've decided to bite the bullet and strip the mylar off. One way or another this baby is being clearcoated; either by me using the same method @newdos used or i'll get someone else to do it.
I figured i'd try doing the removal using the freeze spray method. The hardest part was getting it started. But after a little gentle prying I got a corner lifted on the section near the pops.
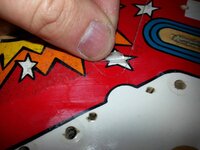
Once it was lifted it was plain sailing. Took me just a minute or two to get the lot off.
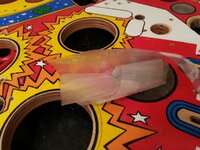
Obviously it's left some of the adhesive behind so I need to break out the plain flour and go to town on that. Once that's done and it's polished up the outline of where the mylar was will disappear. I've already removed the mylar around the Aesop Hole and that's proven to be the case there. As you can see the paintwork near the hole needs touching in.
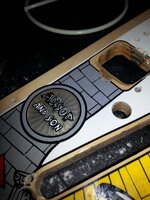
The only issue i've hit so far is that a couple of bits of the mylar are resisting my attempts to lift them. There's one right in front of the S-A-V-E-D targets which when I run my finger over it, it actually feels recessed instead of standing proud. Strange. And then there are a couple of half-circles in front of the slingshots too which also seem to be stuck solidly in place.
Need to proceed with caution as I don't want to screw anything up.
Anyway, I changed my mind about how to remove them. I ended up snipping the staples in the middle and removing most of the lamp holders with the wires still connected. And voila:

All that's left on the back now is the T-Nuts. Some of them are just pushed in place whilst others have a hex screw holding them down. Anyone know why the difference?
Still not sure if i'm going to bother removing them or not. There's some damage on the bottom which i'm really tempted to repair with some wood filler. If I remove the T-Nuts it wouldn't be too tough to then give it a sand over with 600 grit just to make it nice and smooth again. Hell I could even go the whole hog and paint it. Not sure if anyone else has done that or if it's even worth it. Something for me to think about.
Then my attention turned to the top. I've decided to bite the bullet and strip the mylar off. One way or another this baby is being clearcoated; either by me using the same method @newdos used or i'll get someone else to do it.
I figured i'd try doing the removal using the freeze spray method. The hardest part was getting it started. But after a little gentle prying I got a corner lifted on the section near the pops.

Once it was lifted it was plain sailing. Took me just a minute or two to get the lot off.

Obviously it's left some of the adhesive behind so I need to break out the plain flour and go to town on that. Once that's done and it's polished up the outline of where the mylar was will disappear. I've already removed the mylar around the Aesop Hole and that's proven to be the case there. As you can see the paintwork near the hole needs touching in.

The only issue i've hit so far is that a couple of bits of the mylar are resisting my attempts to lift them. There's one right in front of the S-A-V-E-D targets which when I run my finger over it, it actually feels recessed instead of standing proud. Strange. And then there are a couple of half-circles in front of the slingshots too which also seem to be stuck solidly in place.
Need to proceed with caution as I don't want to screw anything up.
The bit pictured below (around the character with the speech bubble) looks circular and originally I thought it was mylar. But it actually feels a little sunken and i'm now wondering if it's just an insert which isn't full levelled.
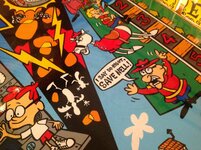
Looking at this picture of the rear of the plafield you can clearly see the circular 'window' in front of the five square inserts over to the left side.
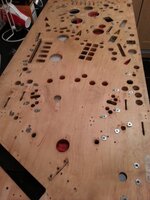
Stupid question time. Will applying a few coats of clear maybe help level this off?

Looking at this picture of the rear of the plafield you can clearly see the circular 'window' in front of the five square inserts over to the left side.

Stupid question time. Will applying a few coats of clear maybe help level this off?
Would this only work if you planned to clearcoat the entire surface after? Or is this a good fix for leveling out just a sunken insert Pete? Can you add a link to the 2k please?As for that sunken insert, it could be levelled with a few heavy coats of proper 2k clear but not the rattle can clear - it's too thin.
I think you'd have to clear the entire playfield. And doing it with 2k clear means you'd also need the associated equipment such as the spray gun and compressor.
Personally I don't really want to invest in equipment to do that job as i'm unlikely to use it again. So if I want to go that route then i'll more likely look for a friendly automotive shop who could do it for me.
Haha, brave or stupid - I guess time will tell.
To be fair it became less daunting as things progressed and i've taken an absolute tonne of photos just so I know what went where.
Personally I don't really want to invest in equipment to do that job as i'm unlikely to use it again. So if I want to go that route then i'll more likely look for a friendly automotive shop who could do it for me.
Wow you're brave fully stripping the underside of the playfield.
Haha, brave or stupid - I guess time will tell.

To be fair it became less daunting as things progressed and i've taken an absolute tonne of photos just so I know what went where.
watch this with interest @Wiredworm !!! the rattle can gives a decent finish but as @PeteB pointed out a bit to thin for levelling - proper ceramic clearcoat buy an automotive shop should do the trick though!
Brave man removing the Mylar I haven't dared try this yet and instead just cleared over the top for extra protection which works fine as long as your mylar isn't lifting
Cheers Kev
Brave man removing the Mylar I haven't dared try this yet and instead just cleared over the top for extra protection which works fine as long as your mylar isn't lifting
Cheers Kev
The freeze spray method worked really well. Once i'd got a corner lifted it was just a case of spray and then lift a few times.
I had to lift at least one section of Mylar on mine because it's near the scoop and the paintwork there was damaged so it had to come up for the repainting job to be done. It's going to get clear coated but exactly how hasn't been decided yet. Priorities right now are to get the adhesive cleaned up before giving it a good polish and hopefully getting it over to Chris to have what little damage there is touched in.
Time to start trying to find someone local who could clear it for me. Or, does anyone on this forum have the tools and skills to do it?
Would this only work if you planned to clearcoat the entire surface after? Or is this a good fix for leveling out just a sunken insert Pete? Can you add a link to the 2k please?
Pretty much yeah. I've only filled a sunken insert once but have done a few clears before. Some people say that after you've cleared the PF you should then fill up inserts using an eye dropper, but to me it makes more sense doing it the other way around. Fill up first, then clear the whole PF, then sand it all down.
I used to buy my 2k from a local car paint shop but the same stuff should be available online, it's called Omni-Cron. Other brands are fine.
Personally I don't really want to invest in equipment to do that job as i'm unlikely to use it again. So if I want to go that route then i'll more likely look for a friendly automotive shop who could do it for me.
Agreed. Even though I've got a spray gun I'd much rather get someone else to do it now. Those guys are doing it every day in a proper room for it and can get a lovely finish.
Not much to report lately as i'm still slowly sorting, photographing and labelling parts.
One development - i've now got a quote for both having the playfield damage repainted and also having it clearcoated. Result.
Hopefully i'll get that booked in soon.
One development - i've now got a quote for both having the playfield damage repainted and also having it clearcoated. Result.
Hopefully i'll get that booked in soon.
Last edited:
Well i've finally finished the big strip down of the entire machine. It's taken bloomin ages and i'm shocked at just how much time disassembling, photographing and labelling things has taken.
Unfortunately I have limited space so I have to be organised so that when the cabinet is sprayed and decalled I can take each component one at a time, clean it and then refit it.
So after much stripping, labelling, photographing and sorting i've ended up with this.
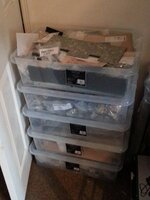
Five boxes consisting of cabinet parts, under playfield components, over playfield components, PCB's and PCB's and assorted spares and ramps.
I'm off to see the newly sprayed 'spare cab' tomorrow to match the decals to it and see if the blue being used is a close enough match. If that all turns out ok then i'll get the sanding on the donor cab done and hopefully i'll be ready for fitting decals within a week or two. Then the rebuild can finally kick into gear.
I also need to get over to Huddersfield sometime in the next week or two in order to have the playfield touched in and clearcoated.
Unfortunately I have limited space so I have to be organised so that when the cabinet is sprayed and decalled I can take each component one at a time, clean it and then refit it.
So after much stripping, labelling, photographing and sorting i've ended up with this.

Five boxes consisting of cabinet parts, under playfield components, over playfield components, PCB's and PCB's and assorted spares and ramps.
I'm off to see the newly sprayed 'spare cab' tomorrow to match the decals to it and see if the blue being used is a close enough match. If that all turns out ok then i'll get the sanding on the donor cab done and hopefully i'll be ready for fitting decals within a week or two. Then the rebuild can finally kick into gear.
I also need to get over to Huddersfield sometime in the next week or two in order to have the playfield touched in and clearcoated.
just buy Fintan's and put the best bits all together to make two machines?
Frankenwinkle
Frankenwinkle

