Pinball info
You are using an out of date browser. It may not display this or other websites correctly.
You should upgrade or use an alternative browser.
You should upgrade or use an alternative browser.
In Progress Rocky & Bullwinkle Shop Log
- Thread starter Wiredworm
- Start date
The head box with the decals on is looking really nice! 
I have to say that after not playing my RAB much for the last couple of years, I have really got back into playing it in the last few days, it is very addictive!

I have to say that after not playing my RAB much for the last couple of years, I have really got back into playing it in the last few days, it is very addictive!
I really like the blue much better than the black version.
Why not do the cap and bridge upgrade and get one of inkonitos boards
Why not do the cap and bridge upgrade and get one of inkonitos boards
Not sure what that is - you have a link to any more info?Why not do the cap and bridge upgrade and get one of inkonitos boards
As i've got a stack to do with this one I suspect i'll leave it as is for now - but it'd be nice to know about the upgrade as it's something I could do later.
He's selling them on here it replaces the fire hazard cap, bridges and not enough fuses with 1 small board with 2 small caps and everything else on
I decided to say 'balls' to the idea of matching the staples to the originals. Instead i'm now using some 8mm staples which are a slightly higher gauge wire. What's more important to me is making sure that the routing of the braid is nice and tidy. Only put the part in the back of the cabinet so far but will hopefully get a bit more done tomorrow.
Photos once the braid is in.
Photos once the braid is in.
Blimey fitting the cabinet braid is taking longer than I expected. Almost done now so hopefully pictures to follow in the next day or two. Once the braid is done i'll drag the cabinet down and try to get the decals on.
Finally got the braid finished. I was surprised how long it took but it wasn't helped by me wanting to keep it super tidy or having to do it in a very cramped room. The wife has managed to sneak some bunk beds into my pin room and it's making things a bit of a squeeze.
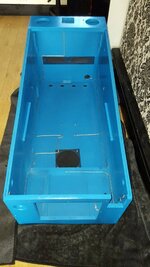
I've also started giving the PCB's a bit of a cleanup. They're actually in really good shape. I'm not so sure what's gone on here though. This is the rear of the PPB. It looks like someone has tried trimming back the legs on some of the diodes after they've been soldered in place?
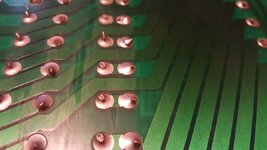
The main cabinet has now been dragged back downstairs. Not enough room upstairs for me to even think about fitting decals. Hopefully i'll get those fitted in the next few days and then I can start putting things back into the main cabinet. Woo hoo!!

I've also started giving the PCB's a bit of a cleanup. They're actually in really good shape. I'm not so sure what's gone on here though. This is the rear of the PPB. It looks like someone has tried trimming back the legs on some of the diodes after they've been soldered in place?

The main cabinet has now been dragged back downstairs. Not enough room upstairs for me to even think about fitting decals. Hopefully i'll get those fitted in the next few days and then I can start putting things back into the main cabinet. Woo hoo!!
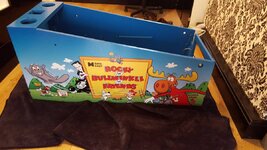
So, finally got around to fitting the side decals.
Am I happy with the job? Well if I was being ultra-picky then i'd say no. I managed to get a few small air bubbles which i've had to work hard to remove and a minor imperfection at one point has managed to cause very very slight damage to the decal. But every single other person who's seen it has basically said 'wow' and drooled over it.
So maybe i'm just being too fussy. Anyway pictures.....
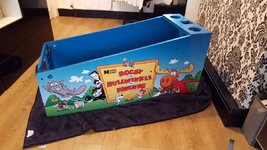
Hopefully i'll get the front decal on before we head off to France for a few days. I was debating using a filler panel to make applying the decal easier but after giving it some consideration it might be easier to squeegee and avoid air bubbles if i'm applying to two smaller spells of wood at the top and bottom of the coin door.
Am I happy with the job? Well if I was being ultra-picky then i'd say no. I managed to get a few small air bubbles which i've had to work hard to remove and a minor imperfection at one point has managed to cause very very slight damage to the decal. But every single other person who's seen it has basically said 'wow' and drooled over it.
So maybe i'm just being too fussy. Anyway pictures.....


Hopefully i'll get the front decal on before we head off to France for a few days. I was debating using a filler panel to make applying the decal easier but after giving it some consideration it might be easier to squeegee and avoid air bubbles if i'm applying to two smaller spells of wood at the top and bottom of the coin door.
where's the imperfection then?
Theres a few - but i'll not point them out. And to be fair they're only noticable if you look really really closely.
The wife says it's just me being picky. And she's probably right (but don't tell her that I admitted to that).
The wife says it's just me being picky. And she's probably right (but don't tell her that I admitted to that).
Yeah it looks awesome mate. Nice one
How was the blue on the cabinet matched to the decal?
How was the blue on the cabinet matched to the decal?
It was a bit of luck. We use paint colour BS18E53 for parts we make for one of our customers. It looked something near, so we painted his old cabinet as a colour test against the decals and it matched well so went with it on the new cabinet
Looks great BTW @Wiredworm now hurry up and get it built
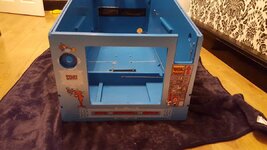
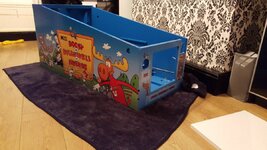
Front decal done. Was mainly worried about making sure that the logo below the coin door was level. I think it's ever so slightly out but close enough for it not to bug the hell out of me. Aligning it was a total pain in the ****. The registration marks were a total waste of time because when they were aligned the cut-out for the start button was a mile out. I ended up trimming the hole for the start button and basing the position around that, and even then it's slightly out.
Still thinks it looks fab though and certainly better than it did before.
So what's my summary on decal fitting?
Well I think for a first go it went relatively well. I could certainly do it better if I had to do it over again and that's easily evident when you notice that I had nearly no air bubbles with the final decal (granted the front one is smaller and there's more places to push the air bubbles out the side).
Lessons i've learnt:
1. How you store the decals is very important. I don't know quite how but two of mine had managed to gain a couple of creases which, whilst not severe, made the whole process of fitting the decal even more tricky.
2. Get someone to help. In my case the missus was pulling the backing whilst I held the decal being applied in one hand and squeegeed with the other.
3. Cabinet prep is key. The sanding and filling on mine was pretty good and Dave did a great job with the painting. Even so we did identify a few minor points where a contaminant had got onto the paint and left a small piece of debris. In most cases it was no problem; simply use a razor blade at 90 degrees to the cab and gently slide it back and forth. But like an idiot I missed a couple of these one one side and it made life super-tricky for me. Lesson learnt - take more time checking in future before applying decals.
Now that that job is out of the way the cabinet can go back upstairs and I can start reinstating things.
Still thinks it looks fab though and certainly better than it did before.


So what's my summary on decal fitting?
Well I think for a first go it went relatively well. I could certainly do it better if I had to do it over again and that's easily evident when you notice that I had nearly no air bubbles with the final decal (granted the front one is smaller and there's more places to push the air bubbles out the side).
Lessons i've learnt:
1. How you store the decals is very important. I don't know quite how but two of mine had managed to gain a couple of creases which, whilst not severe, made the whole process of fitting the decal even more tricky.
2. Get someone to help. In my case the missus was pulling the backing whilst I held the decal being applied in one hand and squeegeed with the other.
3. Cabinet prep is key. The sanding and filling on mine was pretty good and Dave did a great job with the painting. Even so we did identify a few minor points where a contaminant had got onto the paint and left a small piece of debris. In most cases it was no problem; simply use a razor blade at 90 degrees to the cab and gently slide it back and forth. But like an idiot I missed a couple of these one one side and it made life super-tricky for me. Lesson learnt - take more time checking in future before applying decals.
Now that that job is out of the way the cabinet can go back upstairs and I can start reinstating things.
Progress has been a bit slow of late as we've been away. A few small jobs have been done.
1. The transformer has been reinstated back into the cabinet.
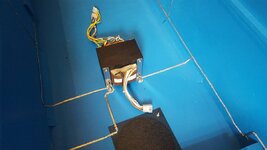
2. And i've reinstated the bottom half of the rotolock mech.
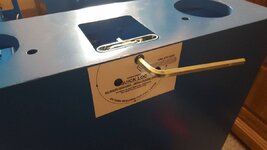
3. Fitted a new cord cup as well (I need to check this as i've noticed now that the plastic grille on the bottom of the cabinet needs refitting. It might be easier to do this with the cord cup removed).
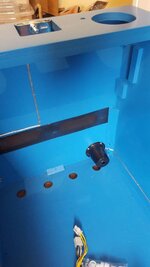
4. And fitted the new glass trims. Hardly a big job as they just press fit.
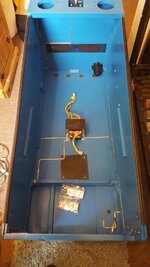
Next jobs:
1. Fit the cable management loops
2. Clean the 3 parts of the wiring loom and reinstate these
3. Get the AC box and power switch back in place
1. The transformer has been reinstated back into the cabinet.

2. And i've reinstated the bottom half of the rotolock mech.

3. Fitted a new cord cup as well (I need to check this as i've noticed now that the plastic grille on the bottom of the cabinet needs refitting. It might be easier to do this with the cord cup removed).

4. And fitted the new glass trims. Hardly a big job as they just press fit.

Next jobs:
1. Fit the cable management loops
2. Clean the 3 parts of the wiring loom and reinstate these
3. Get the AC box and power switch back in place
Wow! In Pic 2 do you have the captive nuts in place for the two bolts that secure the BB upright (polished as well I trust)? I got the bolts and imperial size for them from you know where 
The rotolock uses a regular washer and nyloc nut on the interior side for fitting, but the coach bolts have a rectangular section near the head which is meant to stop them spinning when you fasten the nyloc. In my case I had to fill and redrill the hole though because the wood had deteriorated in that area so the rectangular section probably wouldn't help that much; needless to say I was VERY careful when tightening it.
I didn't polish the bottom section as it was brand new from Marco's. The bolts actually came from my old cabinet and I just resprayed them in satin black. The top section will need polishing before I refit it though and I ordered some replacement bolts from Marcos as well. They're slightly longer than I need them but I can trim them down with the dremel.
I didn't polish the bottom section as it was brand new from Marco's. The bolts actually came from my old cabinet and I just resprayed them in satin black. The top section will need polishing before I refit it though and I ordered some replacement bolts from Marcos as well. They're slightly longer than I need them but I can trim them down with the dremel.
i will buy it back from you for £600 if you like?
I'll take that as 'dibs' if I do ever decide to sell then Dan, but to be honest it's unlikely. It's my first Pin so it's automatically a bit special, but the theming is also very appealing to me.
I dread to think how much i've spent on it since I got it though.
I dread to think how much i've spent on it since I got it though.
Next update in what is quickly becoming the worlds longest shop log. Apologies for that. I should have just done it right from the very beginning.
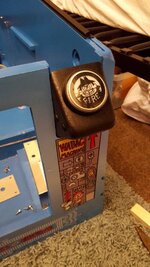
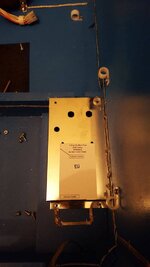
Firstly some good news. The new Boris Button and it's housing have finally been fitted. Surprisingly when I came to refit it I found that for some reason the brackets don't match up to the old holes in the cabinet. I'm not sure if it's down to the housing or what but I wasn't too fussed about making some new holes.
When I got the machine there was this metal shim inside the housing but I don't think it's a factory original part and when I tried to make use of it during the refit I found that it's slightly narrower than the housing and when you tightened the bolts it causes the plastic to bow. Given that the machine is now going to be HUO it seemed a bit of overkill so i've not bothered making use of it.
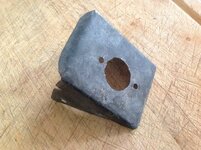
And all fitted.
Now onto the bad news and the reason for the long delay. I started to refit the AC power box and the first part of doing that was to refit the AC Switch Plate. The hole is obviously already there for the switch and there were some screw holes which were perfectly aligned with those on the plate. Nice and easy I thought.
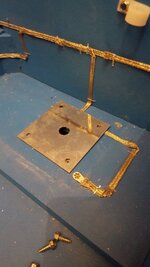
And sure enough when I put the AC box in place that looked to be about right.
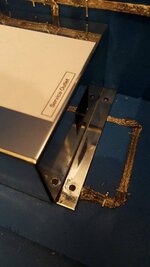
But then I spotted a slight problem.
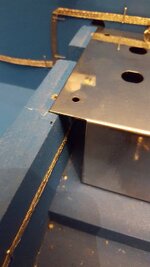
Yup, the length of the AC box meant there wasn't enough wood at the opposite end into which I could secure it. It's almost as if the AC switch plate has been mounted too close to the front of the cab. The screw nearest the side of the cab isn't as bad because their is a support gusset in the corner so it can screw into that. The screw hole you can see above was actually caused by the initial 'hack' I did.
The first hack was to try to bend the vertical section at the front of the AC box. It didn't look nice and it also put a hell of a strain on the screws holding things in place. I didn't like it at all.
So now i've had to take another route. I've got some wood and cut it to size so it will fit at the top of the AC box. I'm just painting it up and then i'll adhere it in place so we've got something to afix the AC box to.
Once that's done the AC box should be ready for it's fuse holder and everything can be fixed back in place.
Firstly some good news. The new Boris Button and it's housing have finally been fitted. Surprisingly when I came to refit it I found that for some reason the brackets don't match up to the old holes in the cabinet. I'm not sure if it's down to the housing or what but I wasn't too fussed about making some new holes.
When I got the machine there was this metal shim inside the housing but I don't think it's a factory original part and when I tried to make use of it during the refit I found that it's slightly narrower than the housing and when you tightened the bolts it causes the plastic to bow. Given that the machine is now going to be HUO it seemed a bit of overkill so i've not bothered making use of it.

And all fitted.

Now onto the bad news and the reason for the long delay. I started to refit the AC power box and the first part of doing that was to refit the AC Switch Plate. The hole is obviously already there for the switch and there were some screw holes which were perfectly aligned with those on the plate. Nice and easy I thought.

And sure enough when I put the AC box in place that looked to be about right.

But then I spotted a slight problem.

Yup, the length of the AC box meant there wasn't enough wood at the opposite end into which I could secure it. It's almost as if the AC switch plate has been mounted too close to the front of the cab. The screw nearest the side of the cab isn't as bad because their is a support gusset in the corner so it can screw into that. The screw hole you can see above was actually caused by the initial 'hack' I did.
The first hack was to try to bend the vertical section at the front of the AC box. It didn't look nice and it also put a hell of a strain on the screws holding things in place. I didn't like it at all.
So now i've had to take another route. I've got some wood and cut it to size so it will fit at the top of the AC box. I'm just painting it up and then i'll adhere it in place so we've got something to afix the AC box to.
Once that's done the AC box should be ready for it's fuse holder and everything can be fixed back in place.

Hmmm that is strange. Is the power switch in the underside of the PSU meaning if you moved it the switch wouldn't line up with the hole??
Could this cab be from a different revision that used a slightly different PSU?
I've still got your old cab at work so I can get some measurements to see what is different
Could this cab be from a different revision that used a slightly different PSU?
I've still got your old cab at work so I can get some measurements to see what is different
The switch isn't fixed as such but it goes into a mounting plate and that is then fixed into position directly over the hole in the cab. I checked it tonight and it's spot on the center of the hole so i'm pretty sure that's how it's meant to be. The position of this switch plate means you can't physically push the AC box any further back towards the rear of the cab either.
The only other possibility I can see is that maybe Data East used two different sized AC boxes but the difference would be only a centimeter or two so it seems a bit odd if that's the case.
Perhaps I should grab the measurements from my cab in the morning and pop down to compare them against the old cab? Assuming you're free for 5 minutes of course?
Yeah I'll be about all day

