Pinball info
You are using an out of date browser. It may not display this or other websites correctly.
You should upgrade or use an alternative browser.
You should upgrade or use an alternative browser.
In Progress Rocky & Bullwinkle Shop Log
- Thread starter Wiredworm
- Start date
The swicth plate looks pretty square so rotating wont make any difference.
Can the AC box not sit on the edge of the switch plate ? If the switch is the obstruction, can you rotate it to make it easier, i know a few of my machines switch on towards me some off towards me and there is one that at the minute goes left on, right off I havent done anything to it yet, i will look at rotating it when i next work on it (probably)
Edit:
Astty, Good to see the DEC ruler getting another starring role.
Can the AC box not sit on the edge of the switch plate ? If the switch is the obstruction, can you rotate it to make it easier, i know a few of my machines switch on towards me some off towards me and there is one that at the minute goes left on, right off
 I havent done anything to it yet, i will look at rotating it when i next work on it (probably)
Edit:
Astty, Good to see the DEC ruler getting another starring role.

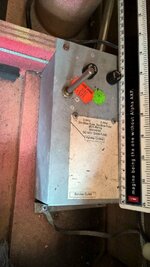
The switch plate is totally square so no mileage in rotating it.
But, i've just been to visit @Davey D who has very kindly proposed a better fix. He's going to trim one edge of the plate off and redrill the holes. This will then mean I can easily slide the AC cover back further so it will then screw into the intended position.
It's probably a nicer way to achieve the goal than adding more timber to the cabinet. I'll pick the plate up tonight and hopefully will have some time on Sunday to try it out.
No time on Saturday though - off to watch some 80's bands perform in the middle of Clumber Park.
It's been a bit of a busy weekend but I did get the time to do a little bit of work yesterday.
Thanks to @Davey D for trimming down the switch plate. The AC box cover now fits nice and neatly and my OCD is saved. Everything is all wired back up in that respect and we have a nice new AC cord as well.
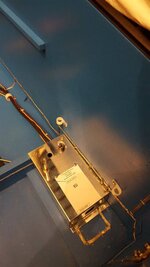
And the Tilt Bob is also now back in place (minus the wiring at the moment but that'll be fitted soon).
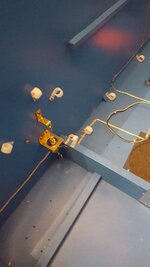
And I got a few more bits of hardware reinstated. The safety strap is back in along with it's nice new vinyl decal. Also got the knocker plate and the coin box lock plate in too. Will get the plug wired up tonight and then it's onto other stuff. Need to get an order put in for some new yellow flipper buttons and cabinet protectors too.
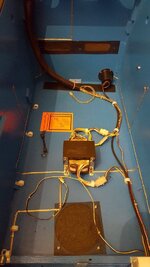
Thanks to @Davey D for trimming down the switch plate. The AC box cover now fits nice and neatly and my OCD is saved. Everything is all wired back up in that respect and we have a nice new AC cord as well.

And the Tilt Bob is also now back in place (minus the wiring at the moment but that'll be fitted soon).

And I got a few more bits of hardware reinstated. The safety strap is back in along with it's nice new vinyl decal. Also got the knocker plate and the coin box lock plate in too. Will get the plug wired up tonight and then it's onto other stuff. Need to get an order put in for some new yellow flipper buttons and cabinet protectors too.

Been a bit slow of late and it's not looking to improve as i've got to head over to Sweden tomorrow for 3 days.
However, I did manage to get a few hours in today. Taking pictures of the work is tricky at best because the room is really really cramped. Working in there is a bit of a nightmare but at least it's clean and dry.
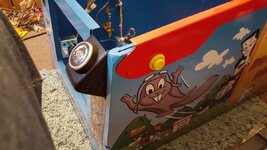
I've now got the side rails back on and i've fitted some nice new shiny yellow buttons. They look much nicer than the boring white ones on there originally. I think the red powder coating on the rails also works well with the new decals. I decided to colour match the bolts but they're going to need doing again because the paint was still not fully dry when I pushed the bolts through and it's marked them; but i've got loads of spare coach bolts of that size so I reckon i'll paint a couple of those up and swap them out in a few days time. (I'm wondering the paint being soft was due to me not shaking the paint can long enough before applying it)
I also managed to get the second part of the wiring back in place. This was the part with the flipper stacks and the lights for the start button and launch button.
It turned out that the bulb holder for the new Boris Button had a slightly different fitting mechanism so I had to desolder and swap it over; I was originally planning on just keeping the old switch and bulb holder in place. No big deal though - just a 5 minute job.
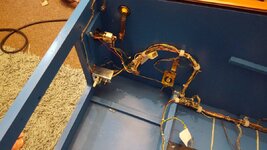
And here's a quick overview of where we stand. I've also fitted the rear glass channel and have had the glass back in place. It's a really tight fit but I guess that's quite common when you've fitted totally new glass channels. I'm sure they'll loosed up over time.
I've also got the playfield rests back in place.
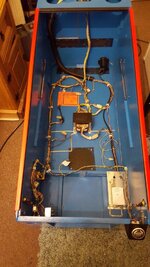
Next up? Well i'll probably look at getting the lockdown bar in place and once that's done the majority of work in the main cabinet is done; just a few more jobs in the backbox to do and we should be able to get that back onto the main cabinet.
However, I did manage to get a few hours in today. Taking pictures of the work is tricky at best because the room is really really cramped. Working in there is a bit of a nightmare but at least it's clean and dry.
I've now got the side rails back on and i've fitted some nice new shiny yellow buttons. They look much nicer than the boring white ones on there originally. I think the red powder coating on the rails also works well with the new decals. I decided to colour match the bolts but they're going to need doing again because the paint was still not fully dry when I pushed the bolts through and it's marked them; but i've got loads of spare coach bolts of that size so I reckon i'll paint a couple of those up and swap them out in a few days time. (I'm wondering the paint being soft was due to me not shaking the paint can long enough before applying it)

I also managed to get the second part of the wiring back in place. This was the part with the flipper stacks and the lights for the start button and launch button.
It turned out that the bulb holder for the new Boris Button had a slightly different fitting mechanism so I had to desolder and swap it over; I was originally planning on just keeping the old switch and bulb holder in place. No big deal though - just a 5 minute job.

And here's a quick overview of where we stand. I've also fitted the rear glass channel and have had the glass back in place. It's a really tight fit but I guess that's quite common when you've fitted totally new glass channels. I'm sure they'll loosed up over time.
I've also got the playfield rests back in place.

Next up? Well i'll probably look at getting the lockdown bar in place and once that's done the majority of work in the main cabinet is done; just a few more jobs in the backbox to do and we should be able to get that back onto the main cabinet.
Last edited:
I've also got the PCB's all cleaned up and back in the back box now. The flipper board also had the same treatment.
I didn't change the caps on the PSU in the end because closer inspection suggests it might already have been done. There's certainly now evidence of 'bulge' from any of the caps. Worst case it's not a big job to remove it again if it does need a bit more TLC.
I think the flipper board might need a new fuse holder so i'll get some of those ordered in, but for now i've stuck it back in the cabinet so it's somewhere safe.
This is absolutely bloody brilliant! I love the cabinet all painted up inside! This exactly how far i want to go with my Corvette Machine!
Keep up the amazing work!
Dunc
Keep up the amazing work!
Dunc
Been a bit slow on progress of late. We've had some problems with our foster daughter and that's delayed things somewhat. I've also had the tumbler running to get all the bits for the backbox all nice and shiny.
Jobs done most recently have been:
Anyway. Here was the lightboard once it had been stripped down ready for painting.
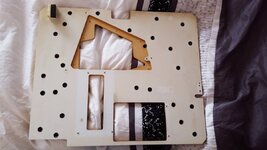
And now - all painted and back in the cabinet.
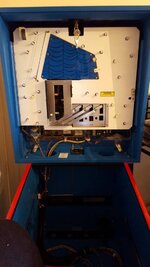
Jobs done most recently have been:
- Removed and stripped down the light board
- Resprayed the light board (thanks to @PeteB for the pointers on the process; it came up lovely)
- Applied the new warning decal on the light board
- Fitted new LEDs on the light board
- Polished and refitted some of the fitments including the locking mechanisms and hat trick pivots
Anyway. Here was the lightboard once it had been stripped down ready for painting.

And now - all painted and back in the cabinet.

So last night I finally got around to getting the DMD and Speaker Panel back together.
I bought some 2mm acrylic from a local supplier and using a combination of a drill and the dremel I managed to cut it to shape. The corners were cut back to allow the plastic to sit inside the DMD mounting posts and a drilled hole and a couple more cuts with the dremel created a recess in the middle so that could also sit over the middle mounting post. Not the tidiest of jobs as it happens but as it's not visible I felt I could live with it.
A little more work and we're back to this.
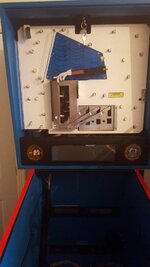
Now the best thing about getting to this point is I can finally turn it on for the first time and see if we have any life or not. This was the nervous moment where I hoped and prayed i'd put everything back the right way around.
There's a bit of a long pause during the boot process but I presume that's because of the amount of stuff still not connected up. To be honest I was just glad it booted up with DMD and sound.
Still to do on the cabinet:
1. Refit the earthing straps on the DMD panel
2. Finish re-instating the Hat Trick Animation in the Back Box.
3. Install the knocker in the cabinet
4. Refurb and refit the coin door and that section of wiring loom
5. Sort out the lockdown bar; it's too tight
6. Replace the side rail bolts with the newly painted ones
7. Refit the skyline plastic at the rear of the cabinet
That's about it - once that lot is done then i'm onto the playfield. Really need to get that shipped off to Chris to have the paint work done on it though.
I bought some 2mm acrylic from a local supplier and using a combination of a drill and the dremel I managed to cut it to shape. The corners were cut back to allow the plastic to sit inside the DMD mounting posts and a drilled hole and a couple more cuts with the dremel created a recess in the middle so that could also sit over the middle mounting post. Not the tidiest of jobs as it happens but as it's not visible I felt I could live with it.
A little more work and we're back to this.

Now the best thing about getting to this point is I can finally turn it on for the first time and see if we have any life or not. This was the nervous moment where I hoped and prayed i'd put everything back the right way around.
There's a bit of a long pause during the boot process but I presume that's because of the amount of stuff still not connected up. To be honest I was just glad it booted up with DMD and sound.
Still to do on the cabinet:
1. Refit the earthing straps on the DMD panel
2. Finish re-instating the Hat Trick Animation in the Back Box.
3. Install the knocker in the cabinet
4. Refurb and refit the coin door and that section of wiring loom
5. Sort out the lockdown bar; it's too tight
6. Replace the side rail bolts with the newly painted ones
7. Refit the skyline plastic at the rear of the cabinet
That's about it - once that lot is done then i'm onto the playfield. Really need to get that shipped off to Chris to have the paint work done on it though.
Nice one Pete, so when do we see it working?
Unfortunately it's going to be a while.
The playfield still needs to go to Chris for some minor repairs and then the rebuild on that can commence. But as absolutely everything was stripped it's going to take a while to clean everything and get it back together.
Unfortunately real life means I can only spend an hour or two per week on the rebuild so i'll be surprised if it's back together this side of Christmas.
Been a bit slow going of late unfortunately - but tonight I finally got a couple of jobs done.
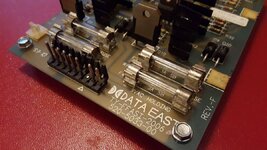
Firstly i've replaced the fuse holders on the flipper board because one was really loose and the fuse didn't feel to be making good contact. I figured that for the cost of fuse holders and as the board was out the cabinet I might as well do them all at the same time. Of course this should have been a really quick job but like a total n00b I forgot to check the orientation of the holders and managed to fit a few of them the wrong way round. And when I say 'few' I actually mean all but 2 of them - I mean what's the odds of that eh?
Anyway, removed them and refitted with no issues.
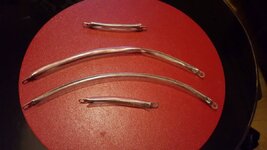
And secondly I finally got some PVC tubing and made up some new earthing straps for the speakers and DMD/speaker panel. The speaker straps weren't too bad but the PVC tubing had gone yellow. The DMD straps that were fitted previously had managed to lose their fittings so had been held in place but just screwing through the braid. I figured I might as well make new ones to keep it tidy.
Not so many more jobs to do in the cabinet now. Hoping to get the playfield shipped off for the paint work to be done in the next week.
Firstly i've replaced the fuse holders on the flipper board because one was really loose and the fuse didn't feel to be making good contact. I figured that for the cost of fuse holders and as the board was out the cabinet I might as well do them all at the same time. Of course this should have been a really quick job but like a total n00b I forgot to check the orientation of the holders and managed to fit a few of them the wrong way round. And when I say 'few' I actually mean all but 2 of them - I mean what's the odds of that eh?
Anyway, removed them and refitted with no issues.

And secondly I finally got some PVC tubing and made up some new earthing straps for the speakers and DMD/speaker panel. The speaker straps weren't too bad but the PVC tubing had gone yellow. The DMD straps that were fitted previously had managed to lose their fittings so had been held in place but just screwing through the braid. I figured I might as well make new ones to keep it tidy.

Not so many more jobs to do in the cabinet now. Hoping to get the playfield shipped off for the paint work to be done in the next week.
hello, I read every page of this post,
and it is a beautiful restoration,
I also have a rocky and Bullwinkel, I buy down there three weeks and I have changed many component on the power supply and the ppb, but I still have a little problem when I plays and the lion turns into the hat, the fuse F5 in the ppb burn, I do not understand is that this fuse blows randomly at times when the lion came out to 6 times, or 3 times, or 1 times. For test against coil mode, the fuse will not burn.
I also had no nell log engine, I buy from marco the usa, and I redid the gear pulley on my machine cnc
What is the coil resistance of the Lion solenoid?hello, I read every page of this post,
and it is a beautiful restoration,
I also have a rocky and Bullwinkel, I buy down there three weeks and I have changed many component on the power supply and the ppb, but I still have a little problem when I plays and the lion turns into the hat, the fuse F5 in the ppb burn, I do not understand is that this fuse blows randomly at times when the lion came out to 6 times, or 3 times, or 1 times. For test against coil mode, the fuse will not burn.
I also had no nell log engine, I buy from marco the usa, and I redid the gear pulley on my machine cnc
for now it works, changing the diode 1N4004 through 1N4007, what is strange is that the 1N4004 diode that I removed was still good.
which is the result of the restoration of this beautiful pinball ??
I will follow this post carefully.
which is the result of the restoration of this beautiful pinball ??
I will follow this post carefully.
Hi Olivier,
Work has come to a grinding halt at the moment.
The cabinet is pretty much fully complete but the playfield needs some work doing. It makes no sense to rebuilt it without first getting the paintwork touched in and then clear-coated. But right now I have a lot going on and a wedding to be sorting out - so the whole job is 'on hold' until around September and then hopefully I will get it finished.
Interestingly CPR have listed Rocky & Bullwinkle as a potential candidate for a repro playfield. I've registered an interest so that might also be a route to go.
Pete
Blimey, things have been quiet around these parts lately.
But, the good news is that things should start to move along shortly. I've got a holiday to Cyprus to get out of the way but i'm already talking to Chris Platt about getting my playfield over to him to have the artwork touched in and then the whole thing clear coated. I'm hoping to get it to him around the middle of August so i'm hoping things will start moving around here once I get the playfield back; no idea how long it will be but at least things will start to shift again.
I'm also looking to grab a DMDST32 so I can add some colour to the dots; expect to see more posting here in the next 2-4 weeks.
Had a road trip to Harrogate tonight to drop the playfield off to Chris Platt.
A lovely guy who had gone to the trouble of cooking extra food so I could join him for a bite to eat; alas I had to do a quick turn around because the daughter was waiting for me at home and wouldn't go to bed until I got back. It's going to take a while to get the playfield back because he's got someone clear coating it for me and each coat needs to cure for a while before the next, but at least it's in the right place now. I might even start cleaning up some of the components ready for refitting once it comes back (although my gut is telling me to leave it and just do one thing at a time to make life a tad easier for myself).
Whilst I was there he showed me a TOTAN playfield he'd just finished. It looked absolutely stunning; if anything i'd say Chris is more critical of his own work than anyone else because he reckons if you stuck your nose right up to the playfield you could see the work he'd done. Personally I couldn't tell and considering a number of parts had been down to the wood it looked fantastic.
I take it he must be sanding flat each layer of clear before doing the next if he's waiting for each one to cure? If so that playfield will end up looking like a sheet of glass!
I wanted to ask you, since your customising your game a bit, what made you choose the blue decals over the black ones? I'm led to believe blue is original but I've seen a lot of black ones kicking about too. I don't know if that's people customising their game or if the factory actually made a few like that.
I wanted to ask you, since your customising your game a bit, what made you choose the blue decals over the black ones? I'm led to believe blue is original but I've seen a lot of black ones kicking about too. I don't know if that's people customising their game or if the factory actually made a few like that.
Yeah, Chris said the guy does somewhere in the region of 10 coats with curing and sanding between each. The TOTAN he showed me looked incredible and as you say it had a sheen like a sheet of glass. Super excited now to see what he can do with R&B. In my case the damaged areas were incredibly small, but unfortunately this doesn't make life much easier as he has to strip back around the damaged areas to make sure the new paint is blended properly.
As for the customisation i'm doing. Data East actually made most of these machines in blue but they did a limited run in black, most of which ended up in the European market. The cabinets were originally screen printed and when I got mine there was no chance to get decals for them. As luck would have it though a guy over on Pinside decided to make some custom decals and I have to say I much prefer his artwork over the originals. The thread he posted on Pinside is here but I have to presume that someone has had a word with him about the decals because he's not willing to sell any more. He did a set in black too, but I much prefer the originals and as the cabinet isn't 'factory original' now anyway (nor will it ever be unless someone starts producing screen-printed cabs) then i'd figure i'll go with my preference.
Interestingly since then i've spotted that Pinball Center in Germany has started stocking the original artwork as decals in both blue and black. You can see the blue decals here: http://www.pinball.center/en/shop/p...t-for-adventures-of-rocky-und-bullwinkle-blue
I still much prefer the artwork i've ended up with though. Maybe not factory original but I think it looks great.
sorry if this has been asked before, but where did you obtain your tumbler?
Looking online, it seems that its either China or USA on ebay and they're pretty costly from China
Looking online, it seems that its either China or USA on ebay and they're pretty costly from China
This company sells them - they normally list on eBay toowhere did you obtain your tumbler?
http://www.sportsmanguncentre.co.uk/lyman-twin-tumbler-230v-uk
brilliant thanks!
As for the customisation i'm doing. Data East actually made most of these machines in blue but they did a limited run in black, most of which ended up in the European market. The cabinets were originally screen printed and when I got mine there was no chance to get decals for them. As luck would have it though a guy over on Pinside decided to make some custom decals and I have to say I much prefer his artwork over the originals. The thread he posted on Pinside is here but I have to presume that someone has had a word with him about the decals because he's not willing to sell any more. He did a set in black too, but I much prefer the originals and as the cabinet isn't 'factory original' now anyway (nor will it ever be unless someone starts producing screen-printed cabs) then i'd figure i'll go with my preference.
Interestingly since then i've spotted that Pinball Center in Germany has started stocking the original artwork as decals in both blue and black. You can see the blue decals here: http://www.pinball.center/en/shop/p...t-for-adventures-of-rocky-und-bullwinkle-blue
Awesome! I also have the Rocky & Bullwinkle decals in both BLUE here: http://www.retrorefurbs.com/shop/rocky-bullwinkle-pinball-cabinet-decals-blue/ and BLACK here: http://www.retrorefurbs.com/shop/rocky-bullwinkle-data-east-pinball-cabinet-decals/
I also have Lethal Weapon 3 in both blue and black. All much cheaper than Pinball Center!

I've been informed that the paint work on my R&B playfield is done and it's headed for clearcoating now.
This bit will take some time as they do quite a few coats and it needs time to cure between each. On top of that it's being done between other jobs. Aaah well, it's waited this long so a few more weeks won't hurt.
This bit will take some time as they do quite a few coats and it needs time to cure between each. On top of that it's being done between other jobs. Aaah well, it's waited this long so a few more weeks won't hurt.
Great news! Really looking forward to seeing the next progress pics of it coming together!
Dunc
Dunc
I hadn't realised it was back in August when I dropped the playfield off.
Anyway, Chris has been in touch and it's all done and ready for collection. Nice!!
Alas, I can't get there at the weekend as i'll be at Play Expo and i've got a car full of people anyway which means i'd never squeeze the playfield in the back. Looks like i'll have to make a special trip over next week to grab it. Pictures will be posted as soon as I get it back; then the full part really starts.
Playfield collected. It looks flipping awesome but it's still got a lot of the polishing compound in some of the holes.
I'll get it cleaned up and post pictures. Hopefully later tonight but if not then in the next day or so. I'm so impressed with the work Chris has done.
I'll get it cleaned up and post pictures. Hopefully later tonight but if not then in the next day or so. I'm so impressed with the work Chris has done.

