What's new
Pinball info

Register a free account today to become a member! Once signed in, you'll be able to participate on this site by adding your own topics and posts, as well as connect with other members through your own private inbox!

In Progress Adventures in Budget Restoration: 1978 Bally PARAGON

I tried to remove the flipper bats off mine the other day. But could I undo the ****ing screws?? Could I ****!!!:mad:
So basically , I gave up:rolleyes:
Those little hex grub screws can be right little f*****s! :mad: You absolutely have to have the right size tool and it needs to be SAE/Imperial and not Metric. Sure a 3mm Allen key looks like it fits but there's just too much play in it for the torque you'll need to undo the little sods.

You need a 1/8" (one eighth inch) Allen key or hex bit. 1.8" is 3.175mm, so you can see where that free play comes from when using a 3mm Metric tool. Hex bits are good as you can connect them up to a mini-socket set to get some good leverage.

Have a look at my opening post on the Pinball Tools thread...
 
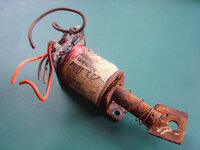
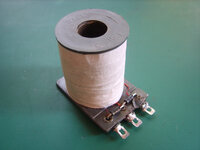
So, I need a new flipper coil. Thought I'd see if I can salvage one off the junk playfield I have. Here we go:

farm4.staticflickr.com_3913_14672786940_4b99d8e5e9_c.jpg

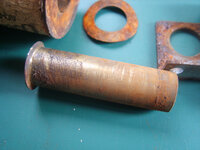
Bit of an **** pulling out the plunger as it's all rusty. Assumed it was badly mushroomed but actually not. It was just well jammed into a BRASS coil sleeve!

farm6.staticflickr.com_5561_14856389711_bd6d5989a2_c.jpg

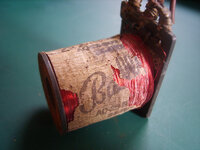
Very dirty and covered in rust from the metal parts, but all of that will wash off. The label is toast but can print a new one of those. The coil wires look good with the red enamel coating intact. Resistances are good too: 3.5Ω and 309Ω. Tested an old plastic coil sleeve slid in easily so it's not distorted on the inside either.

farm4.staticflickr.com_3848_14672932147_66db79522e_c.jpg

Great. Saved myself another £10.
 
Cheers Peter. Great advice. I'll seek one of those out
I think I put some links to stuff on eBay further down that Pinball Tools thread. Probably expired now but you should be able find the seller and at least get an idea of price. The pack of Imperial hex bits was just a couple if quid posted.
 
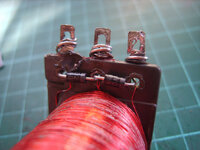
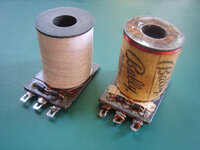
Got up super-early today at 7am to get some pinball time in before the kids get up. Managed to clean up that old flipper coil pretty good; buffed the bobbin with Novus #3 to get rid of the rust stains, bit of alcohol to get rid of the label gunk. Replaced the 1N4004 diodes with 1N4007 (I've got a big bag of them and they're the same just rated for higher voltage). Used masking tape to recreate the sticky coil wrapper tape. I'll print off a Bally wrapper on yellow card with the correct numbers and put this on top like the outhole kicker.

New diodes just before soldering:

farm4.staticflickr.com_3883_14678992978_3c7d9d5852_c.jpg

All done! Masking tape wrapper:

farm6.staticflickr.com_5580_14679081917_5f63f50216_c.jpg

Managed to salvage another original Bally coil from the junk playfield. Would be nice to replace another of the non-Bally flipper coils:

farm6.staticflickr.com_5570_14862536801_927dca3011_c.jpg

I'd say that's job done. £10 still in my pocket and another tenner when I do the other one!
 
Cant you make some replacement labels for the coils?

I know templates are available for later styles but why not have a go with the one you have?
 
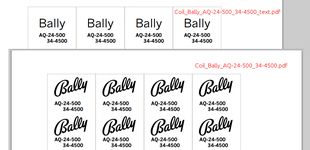
Hi @abaxas. I found repro print-your-own coil wrappers on the net. I did one for the outhole kicker. Just need to print off another for the different coil number. Thought the masking tape was good idea as it keeps the windings in place.
 
Thanks for the tip Peter. I hadn't realised that.

Also works for some of the Data East wrappers too. Will be doing mine at some point too. :)
 
Have just spent the last half an hour searching for my last sheet of yellow card. Turns out it ended up in the kids craft box... I despair, I really do...
 
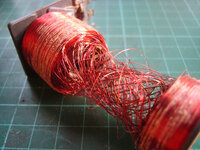
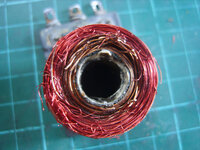
Guess I won't be so lucky with that second coil. After taking the coil wrapper off I noticed there was a slight gap in the windings. The whole bobbin felt a bit bendy too. After giving it a gentle tug it just fell in half. I guess this is what happens to a burnt out coil?

farm6.staticflickr.com_5560_14875870574_3fc905d5c2_c.jpg

Cut the wires to revel the insides. Didn't need to cut through the central plastic, it was already gone. Judging by the fact the thicker inner coil wires have lost their red enamel coating I'd guess this overheated and cooked at some point.

farm6.staticflickr.com_5588_14875870364_7e51481fda_c.jpg
 
August 2014
FLIPPER REBUILD CONTINUED

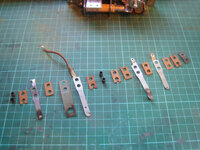
Time to work on the EOS and Secondary Flipper switch that's fitted the main flipper. Again, I exploded the parts in order:

farm4.staticflickr.com_3864_14888509662_69bc32252b_c.jpg

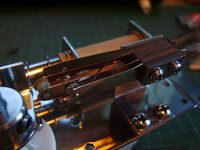
The metal plates and contacts were polished with the Dremel, the glass fibre spacers had their edges sanded smooth and the plastic tubes cleaned with Novus. The screw heads were buffed and the switch re-fitted to the bracket on the flipper mech:

farm4.staticflickr.com_3890_14702174910_d5aea4a346_c.jpg

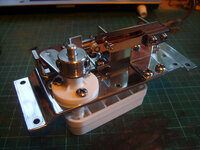
That's the other main flipper done. Just need to refit the coil:

farm4.staticflickr.com_3858_14888506852_ebf5651cd7_c.jpg

Getting there slowly but surely...
 
August 2014
MORE PINSMUT

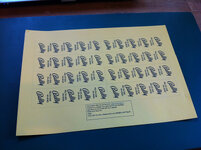
Another early start in the pinshack got me time to finished off my flipper rebuild. I ordered some sheets of self-adhesive yellow printer paper for making repro coil wrappers which arrived in the post yesterday. The paper is from China which explains why a UK company was able to offer it for £1.99 for 10 x A4 sheets posted 1st Class! But it went through my Canon inkjet printer without issue:

farm4.staticflickr.com_3911_14901160901_96937c2862_c.jpg

farm6.staticflickr.com_5596_14717585419_91e45600d6_c.jpg

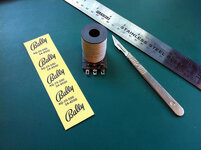
The coil wrappers are from http://www.pinballrebel.com/pinball/cards/coil_wrappers.htm and download as PDF. Make sure you print at 100% to get the scaling right! Then simply cut with a sharp craft knife. I use the sharpest possible - a Swann-Morton #3 handle fitted with 10A surgical blades:
farm4.staticflickr.com_3862_14903865762_a9d84d0dda_c.jpg

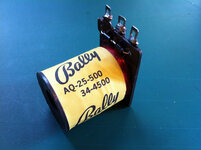
I have to admit to having three attempts to fit the label correctly. I had to trim it a little narrower than indicated on the sheet and it was a good idea to fit the masking tape first to smooth out the surface of the windings. The secret seems to be pulling the sticker as tightly as possible without tearing whilst wrapping it around the coil. I'm rather pleased with the result:
farm4.staticflickr.com_3882_14717673817_bb9443a1b0_c.jpg

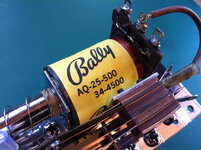
Of course, the only logical thing to do next was to fit it back on the flipper! Not forgetting the sprung washer, of course:
farm4.staticflickr.com_3873_14717547680_51876cb6e1_c.jpg

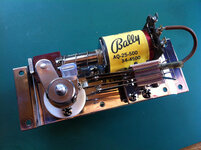
Job's a goodun' me thinks! I also added a short piece of clear plastic tube to the pawl arm that activates the EOS switch. I'd noticed the switch leaf is getting a little worn so this should help to reduce that. I need to source some new tubing to make some new anti-short covers for the switch connections; the ones on there are so grotty and yellowed:
farm4.staticflickr.com_3857_14904218065_8dc09e9a99_c.jpg

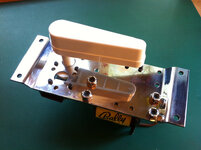
Last thing to show are the nyloc nuts fitted on the underside to the coil bracket screws. This is my mod to help minimise the screws working loose, which has happened on all 8 of the flippers I own ;) The screws are only just long enough to bite into the nylon so I may yet replace them with some longer hex cap bolts:
farm4.staticflickr.com_3840_14717671647_8c186e2a1a_c.jpg
 
You've set the bar high Nedreud. I'd love to be able to get somewhere close to that level of attention to detail when I rebuild my R&B.

Do you have a link to the adhesive backed paper you got please?
 
Thanks @Gaz Shiells and @Wiredworm. It ain't rocket science, just spit'n'polish, elbow grease and time.

The paper is here: http://www.ebay.co.uk/itm/120877749187. I ordered Monday morning and it arrived next day, 1st Class. Seems nice and sticky. I had a couple of attempts to get it right and after only a few minutes the adhesive had stuck so well I had to destroy the label to peel it off, so hopefully that bodes well for it staying stuck on for a few years wrapped around a hot coil!
 
Guys not sure if you have noticed but a lot of the coil wrappers on pinball rebel (Williams I have been doing) have two pages, one is in white but the other is coloured as per the coil so I have been printing mine on plain white paper with a colour laser then wrapping around the coil and sticking with a bit of PVA and its worked a treat!!!

Just another alternate solution!!

I just use coloured paper and a lil copydex glue
 
Guys not sure if you have noticed but a lot of the coil wrappers on pinball rebel (Williams I have been doing) have two pages, one is in white but the other is coloured as per the coil so I have been printing mine on plain white paper with a colour laser then wrapping around the coil and sticking with a bit of PVA and its worked a treat!!!

Just another alternate solution!!
I'd wondered that about Williams coils. They have all these pretty coloured labels when they're listed on eBay or Marco. So, at some point there was a colour-coding system? SS-era Bally coils are all yellow(ish) as far as I can tell. Only difference between those on Paragon (1979) and Vector (1982) is the bobbins are dark grey on the former and white on the latter.
 
I'd wondered that about Williams coils. They have all these pretty coloured labels when they're listed on eBay or Marco. So, at some point there was a colour-coding system?

Yes, Williams used colour coding for their parallel-wound flipper coils (F-14 onwards, including 'Fliptronic' games).
In decreasing order, these were;
  • Blue (11629)
  • Orange (11541) - the standard rating for solid-state controlled flippers
  • Red (11630) - the standard rating pre-Fliptronic, demoted to upper flippers afterwards
  • Green (11722) - a weaker coil for upper flippers
  • Yellow (11753) - used for small flippers, such as Addams Family & Swords of Fury
It's quite likely there was a system for the earlier serial wound coils as well, not that I saw many of those games with additional flippers. The usual 50v serial flipper coil (23-600, i.e 600 turns of 23 gauge) was Blue, and the upper flippers on Grand Lizard used Red coils with a smaller, 24-gauge, 600 turn primary winding.
 
Last edited:
Hey, @Jay Walker! Wow, been doing some real head scratching over this "series" and "parallel" winding of flipper coils! Looked at lots of photos of flipper coils and can see that old series coils have just a single diode, but I believe old Bally coils like my AQ-25-500/34-4500 are also series due the arrangement of the diodes. I think the Williams "parallel" coils are wound the same way but it's how the diodes are connected across the windings that's different. As far as I can tell it would be possible to convert a "series" coil to "parallel" by repositioning the diodes, but don't know what impact this has on the rest of the flipper circuitry? There are plenty of guides on-line about replacing series with parallel on Williams games, including adding a suppression capacitor, so I guess replacement parallel coils are configured in such a way that they present the same or similar load across the connection lugs.

Interesting... exactly the sort of thing I'll spend all evening researching!
 
Back
Top Bottom