not strictly pinball.. however....


Yes Red would work well, blue or even green would work with Meteor. I'm saving the red ones I have for Fireball 2. The beauty of how I've designed there is they are very easy to change - as the display unit just plugs into the controller board beneath. So a 1 min job to swap all 5 displays to another colour.How about a red to match those flaming meteors?[emoji2]
Sent from my SM-G960F using Tapatalk
You're welcome Davey, LEDs purchased from Best of Pinball (your recommendation) €20.14 including shipping.Lovely stuff Chris, thanks for the great feedback. Whose 86 LED bulbs did you use by the way? They look great.


Fitted MadNats speaker prototypes To my Simpsons using his feed frenzy board and WOW!
A video explains them better and if anyone interested get in touch with Mike (Madnat) for details.
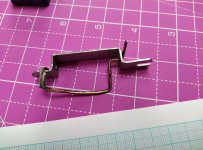

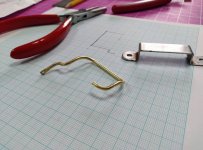

Replaced the gnarly mist gate that's been on my BSD since I've owned it.

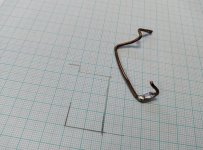
Surely that left hand side is supposed to feed through from the inside of the bracket rather than the outside (that way it wouldn’t be resting against the post rubber.
Yeah you'd think that was the correct wire form but seems to be by design (see product pic from a supplier).Surely that left hand side is supposed to feed through from the inside of the bracket rather than the outside (that way it wouldn’t be resting against the post rubber.
(See photo for example of what I mean)
Sent from my iPhone using Tapatalk

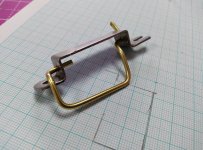
Surely that left hand side is supposed to feed through from the inside of the bracket rather than the outside (that way it wouldn’t be resting against the post rubber.
(See photo for example of what I mean)
Sent from my iPhone using Tapatalk
That's a one way gate, the mist gate is bi-directional...
It's not bi directional, it lifts to let the ball out and lifts to let it back in.
Great vid - and such a cool setup Col - thanks for sharing.
For folks interested in doing the same - the board is available in the classified section. Happy to help supply and setup.
Cheers
Mike
That's exactly what it is Neil.. WS2812B in this example. Other versions of LED's also supportedDoes it work with individually addressed LEDS?


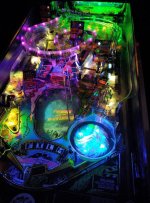
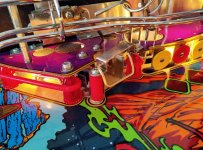
That looks lovelyElektra gets some nice new Blue score displays.
it has an extra one, so 6 units all in all View attachment 134727View attachment 134728
View attachment 134729