What's new
Pinball info

Register a free account today to become a member! Once signed in, you'll be able to participate on this site by adding your own topics and posts, as well as connect with other members through your own private inbox!

Today I worked on......

Finally plucked up the courage to remove the lift trim from my FG back glass.

Went for my own variation on the hang it upside down technique.

Backglass upside down, top resting on the sofa. Holding the lift trim with a hand either end, gently jiggle one side then the next. After about 10 minutes it was off. Thanks fcuk for that 🫣🫣🫣

IMG_6554.webp
 
Finally plucked up the courage to remove the lift trim from my FG back glass.

Went for my own variation on the hang it upside down technique.

Backglass upside down, top resting on the sofa. Holding the lift trim with a hand either end, gently jiggle one side then the next. After about 10 minutes it was off. Thanks fcuk for that 🫣🫣🫣

View attachment 295448
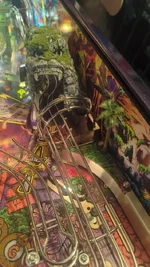
I’ve got to go through that pain soon. I’ll try your technique
 
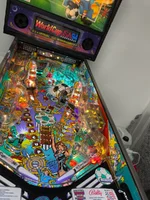
Have moved SpiderMan into the workshop for a full refurb 😊
TBD:
Cabinet tidy up
New decals
Replace Doc Ock magnet
Pinblaster
Pinsound speakers and sub
Fit a full set of @Colywobbles protectors
Replace stock pop bumpers
New rubbers
Full clean and polish
View attachment 294808View attachment 294809View attachment 294810

Received the final pieces for Spider-Man, many thanks to @Colywobbles and @David retro. Just a few more finishing touches and decals to be fitted to the back box👍

IMG_2508.webp
IMG_2502.webp
 
Finally got some time to get some bits on Kong today, purple back box trim, purple/blue prismatic powder on the armour, shooter rod and the kong cave from back alley creations.
PXL_20251223_093143459.webpPXL_20251223_093122964.MP.webpIMG-20251223-WA0005.webp
PXL_20251223_093143459.webp
PXL_20251223_093122964.MP.webp
 

Attachments

  • IMG-20251223-WA0002.webp
    IMG-20251223-WA0002.webp
    112.1 KB · Views: 5
Fun with stern long range optos. Do not do this 😅! So have an opto transmitter getting a sad 4.4V at the connector rather than the full 5. The opto transmitter has 2x 150 ohm resistors in parallel current limiting the Tx, but these were measuring more like 80 ohm combined, so the low rail and high resistance were making for a sad opto setup.

Piggyback 200 ohms in parallel to bring series R down to 57 ohm. I measured this opto tx to run with a 1.41v forward voltage drop, so this pushes it to about the limit of 52 mA. Dirty hack but it does the job. I'm going to pinball hell 😆 but I just wanna play my game.

IMG-20260101-WA0009.webp
IMG-20260101-WA0010.webp
 
Finally finished my refurb of Spider-man, many thanks to @Colywobbles @David retro @1stoppinball for supplying my needs 😃
I had a major issue with the Sam switch matrix, must have caused a short cct at some stage and whilst looking cleared it, unfortunately it turned out that the matrix drive mosfets Q2 and Q4 on the CPU got toasted🫣 managed to replace them yesterday and it’s now playing like a dream😃IMG_2567.webpIMG_2566.webpIMG_2565.webpIMG_2564.webpIMG_2563.webpIMG_2562.webpIMG_2561.webpIMG_2560.webpIMG_2559.webp
 
Slightly mundane lunchtime fix - had an intermittent issue with upper flipper sometimes not firing. I initially thought this would be an issue with the lower flipper EOS as this triggers the upper on this era of machine. Looked fine and had continuity through to the upper flipper coil. Then I thought duh, you’re overcomplicating it, go straight to the source!

Upon closer inspection, the upper flipper NC EOS switch had one of its contacts completely worn down to bare metal:

IMG_3586.webp

Compared with its shiny new replacement:

IMG_3588.webp

Quick soldering job and a little adjustment and we’re back in business.
 
Installed some new art blades the other week for World Cup Soccer and Lethal Weapon 3, and I’m really pleased with how they’ve turned out. They’ve completely lifted the look of both machines — such an improvement over what was on there before. I used the Windex method for the install, which worked really well overall. In hindsight, I could’ve prepped the wood a bit better on Lethal Weapon 3 as the surface wasn’t quite as smooth as it should’ve been — but even so, it’s a big step up and I’m happy with the result. Always learning, always tweaking…
 

Attachments

  • IMG_1902.webp
    IMG_1902.webp
    221.3 KB · Views: 15
  • IMG_1901.webp
    IMG_1901.webp
    178 KB · Views: 14
  • IMG_1899.webp
    IMG_1899.webp
    193.9 KB · Views: 12
  • IMG_1906.webp
    IMG_1906.webp
    200.6 KB · Views: 13
  • IMG_1907.webp
    IMG_1907.webp
    239.3 KB · Views: 14
Sanding the main playfield off Shrek (my mate needs his sander back) ready to apply the new Beavis and Butthead decal.

80 grit then 120, 400, 800, 1200, 2000 and finally 2500 wet and dry with Novus 2. Holes will then be cut to size using circular punches, and two coats of clear coat applied. Never done this before but plenty of guidance from Mark @Pinballsurgery and it’s great fun. All my artwork is then done.

IMG_6052.webp
 
Back
Top Bottom