Amazing. I cant think to imagine what this lots adding up to - hope you keeping a spreadsheet !
Pinball info
You are using an out of date browser. It may not display this or other websites correctly.
You should upgrade or use an alternative browser.
You should upgrade or use an alternative browser.
Complete Terminator 2 Restoration
- Thread starter Ant-H
- Start date
Amazing. I cant think to imagine what this lots adding up to - hope you keeping a spreadsheet !
Thanks mate. Trust me, nothing is written down, it all gets stored in my head, that way my wife will never know
But to be honest, I’ve tried to do as much as I could to save money, and the 2 biggest costs that I’ve spent, other than the original purchase of the game, has been on the new playfield and the chrome/polishing work.
A lot of the other parts I’ve bought, like leds, new plastics etc, I would of bought anyway had I left it as it was.
There are only 2 more higher priced parts I want to get now. A colour DMD and a Pinsound set up.
Dropped off the coin door off at the platers today. Before I did, I had to fabricate a couple of brackets so that I could mount the service buttons etc to the inside of the door.
I used some stainless that I had spare and shaped it so that it matched the original mounting brackets.
Once I was happy, I tapped the holes and spot welded them in place.
I then gave the front of the coin door a good sand in order to remove the heat marks from the welds.
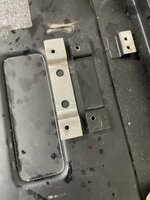
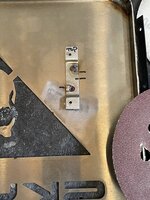
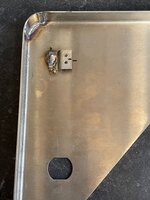
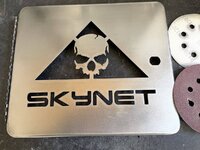
I used some stainless that I had spare and shaped it so that it matched the original mounting brackets.
Once I was happy, I tapped the holes and spot welded them in place.
I then gave the front of the coin door a good sand in order to remove the heat marks from the welds.


Earlier in the week, I refitted all the metal posts along with a set of new red star posts. I installed a full set of comets last night as well as clear Titan rubbers. Though I’m not keen on the colour choice of the rubbers and star posts, so I think I’ll swap them out.
Next step I put the canon back together, with a new coil and switch then wired it in place. Before I fit the cover for the canon, there’s a couple of small modifications I want to do to it but am just waiting on some parts in order to complete it.
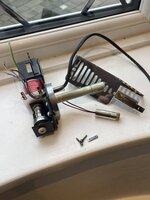
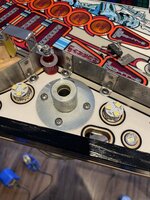
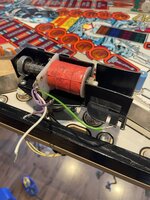
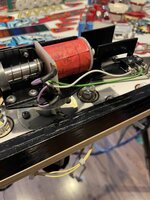
Next step I put the canon back together, with a new coil and switch then wired it in place. Before I fit the cover for the canon, there’s a couple of small modifications I want to do to it but am just waiting on some parts in order to complete it.


Last edited:
I ordered a load mods from @Judge Dreads last year, one being his cool T1000 target mod.
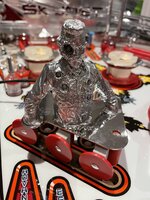
I was keen to get a T1000 somewhere on the playfield, as apart from one small image on a plastic, there is no other real mention of the character and imo, JD’s one is definitely the best I’ve seen.
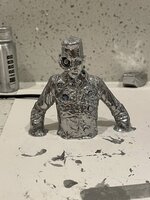
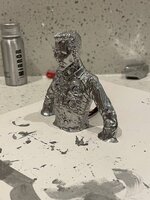
The mod comes finished in a nice gun metal grey, however as I’ve polished everything up on the playfield, I wanted the T1000 to stand out abit more.
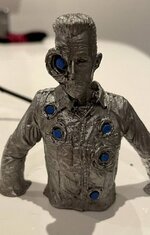
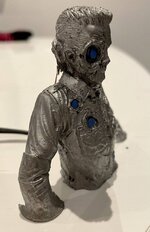
I tested a few different mirror paint products but was not happy with the shine of any of them.
So following on from @stumblor recommendation in an earlier post, I ordered some Culture Hustle Mirror Paint. First thing before trying it out was to cover the tiny leds with some masking tape.
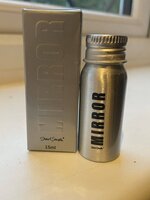
The paint itself isn’t cheap and the bottle is a lot smaller than I expected. However I was pleasantly surprised with the results. It goes a very long way and whilst I wouldn’t call it a true mirror finish, it has given the T1000 his famous shiney liquid metal look.
I also tried the paint on a test piece for the skull mod that I’m planning on starting this weekend. The finish wasn’t great and the mirror shine wasn’t as good on a smooth flat surface when compared to the textures of the T1000 mod.
Overall though, I would also say this paint is the best diy mirror paint out there
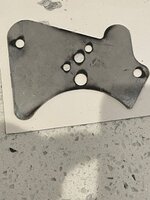
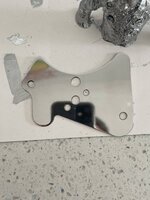
Next job was to polish the mounting plate that comes with the mod so it would look like an extension of the T1000. I’ll test fit it after I’ve changed the rubbers.
I was keen to get a T1000 somewhere on the playfield, as apart from one small image on a plastic, there is no other real mention of the character and imo, JD’s one is definitely the best I’ve seen.
The mod comes finished in a nice gun metal grey, however as I’ve polished everything up on the playfield, I wanted the T1000 to stand out abit more.


I tested a few different mirror paint products but was not happy with the shine of any of them.
So following on from @stumblor recommendation in an earlier post, I ordered some Culture Hustle Mirror Paint. First thing before trying it out was to cover the tiny leds with some masking tape.

The paint itself isn’t cheap and the bottle is a lot smaller than I expected. However I was pleasantly surprised with the results. It goes a very long way and whilst I wouldn’t call it a true mirror finish, it has given the T1000 his famous shiney liquid metal look.
I also tried the paint on a test piece for the skull mod that I’m planning on starting this weekend. The finish wasn’t great and the mirror shine wasn’t as good on a smooth flat surface when compared to the textures of the T1000 mod.
Overall though, I would also say this paint is the best diy mirror paint out there
Next job was to polish the mounting plate that comes with the mod so it would look like an extension of the T1000. I’ll test fit it after I’ve changed the rubbers.


Last edited:
I was gonna say, geez those results aren't great... but then realised it was the before pics!
Defo miles better
It’s definitely the best chrome paint I tried and made a huge difference to how it looked standard.
Some of the diy “chrome” spray paints I tried were shocking.
I think If you want anything better, you’d have to get it professionally spray chromed.
I'm a fan of Stuart Semple's Black 2 - it's sooooooo black (he's done a black 3 that's even blacker, but not as durable finish-wise)
That’s good to know as I was actually looking at this product earlier today and was wondering how good actually was.
looks great finished, what does it do light up?It’s definitely the best chrome paint I tried and made a huge difference to how it looked standard.
Some of the diy “chrome” spray paints I tried were shocking.
I think If you want anything better, you’d have to get it professionally spray chromed.
View attachment 157626
looks great finished, what does it do light up?
Thanks mate. Yes, looking at the wiring diagram, I believe the leds flash when you hit any of the 3 stand up targets below it.
That's coolThanks mate. Yes, looking at the wiring diagram, I believe the leds flash when you hit any of the 3 stand up targets below it.
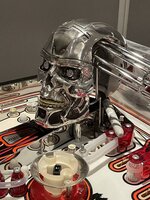
In my opinion, there are 2 toys on the T2 playfields that Williams really cheaped out on. The hunter killer ship and the T800 skull. Step one is to tackle the skull. First job was to find a suitable replacement.
The original T800 skull that was on my playfield was battered to say the least. It was held together literally with glue
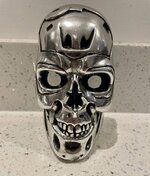
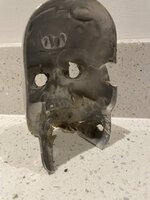
After some research, it seemed most people go with the Loot Crate skull mod, which does look a lot better and is more harder wearing. So I purchased one as it was only £8 with the plan to use that. The only thing I wasn’t keen on was that it was quite small and I think the skull needed to be a focal point on the playfield.
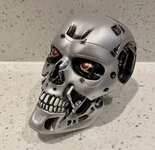
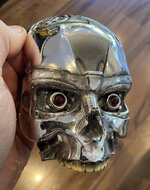
So the search continued for something else. I eventually stumbled across a perfect skull in a random little shop on day trip to Hastings. It’s actually a resin box so you could remove the top piece. It has a nice shiny finish which was exactly what I was looking for, and it was a good size. The only problem was it was going to need some major modding for it to work.
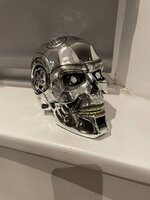
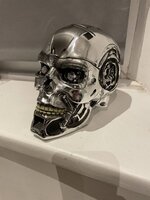
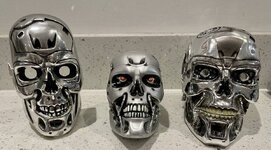
The original T800 skull that was on my playfield was battered to say the least. It was held together literally with glue


After some research, it seemed most people go with the Loot Crate skull mod, which does look a lot better and is more harder wearing. So I purchased one as it was only £8 with the plan to use that. The only thing I wasn’t keen on was that it was quite small and I think the skull needed to be a focal point on the playfield.

So the search continued for something else. I eventually stumbled across a perfect skull in a random little shop on day trip to Hastings. It’s actually a resin box so you could remove the top piece. It has a nice shiny finish which was exactly what I was looking for, and it was a good size. The only problem was it was going to need some major modding for it to work.


Last edited:
The other original Williams skull and usual aftermarket skull mods completely cut the back of the skull off and mount it in front of the wire form.
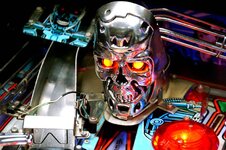
I didn’t want to do this as its literally half a skull. So idea was to somehow have the wire form actually go in the skull then out the side.
First job today was to completely mask it up and mark the area I need to remove.
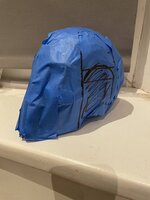
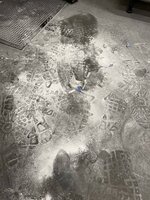
Out came the dremal and 6 hours later going backwards and forwards to check fitment, followed by more grinding and cutting it looked like it might work. The dust was unreal.
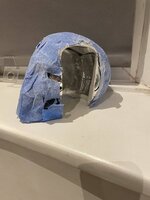
After a few more hours today of more checking, grinding and checking and grinding, I’ve got it to a point that I’m really happy with. It looks awesome when compared to the original as from one side you can’t tell the wire form to coming out of the side.
The next step is to mod the eyes so it can accept some leds and come up with a way to mount it.
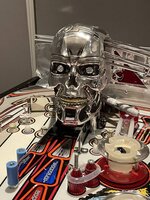
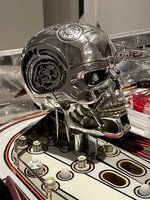
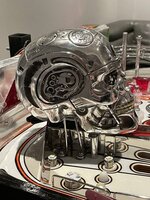
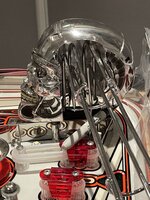

I didn’t want to do this as its literally half a skull. So idea was to somehow have the wire form actually go in the skull then out the side.
First job today was to completely mask it up and mark the area I need to remove.

Out came the dremal and 6 hours later going backwards and forwards to check fitment, followed by more grinding and cutting it looked like it might work. The dust was unreal.


After a few more hours today of more checking, grinding and checking and grinding, I’ve got it to a point that I’m really happy with. It looks awesome when compared to the original as from one side you can’t tell the wire form to coming out of the side.
The next step is to mod the eyes so it can accept some leds and come up with a way to mount it.


Last edited:
Most T2 skull mods completely cut the back of the skull off and mount it in front of the wire form. I didn’t want this as it literally half a skull. So idea was to somehow have the wire form actually go in the skull then out the side.
So first job today was to completely mask it up and mark the area I need to remove.
View attachment 157685
Out came the dremal and 6 hours later going backwards and forwards to check fitment, followed by more grinding and cutting it looked like it might work. The dust was unreal.
View attachment 157687View attachment 157686View attachment 157688
After a few more hours today of more checking, grinding and checking and grinding, I’ve got it to a point that I’m really happy with. It looks awesome when compared to the original as from one you can’t tell the wire form to coming out of the side.
The next step is to mod the eyes so it can accept some leds and come up with a way to mount it.
View attachment 157692View attachment 157693View attachment 157694View attachment 157695View attachment 157696
That is so sweet!
Thanks guys. It was a complete headache to do as there was so much fine tuning to get it to fit around the wire form. Worth it in the end though.
I’m going to test fit the eyes next and figure out how to mount it in place
I’m going to test fit the eyes next and figure out how to mount it in place
I've just read this thread from start to finish and I'm gobsmacked. Truly outstanding attention to detail and work, I'm really looking forward to that coin door coming back.
Honestly mate, you have done an incredible job.
Honestly mate, you have done an incredible job.
Thanks mate, I really appreciate it. 

The plan for today was to sort out the eyes and a way of mounting the skull to the playfield.
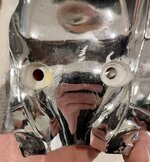
First job was to drill the eye sockets out so that light could shine through.
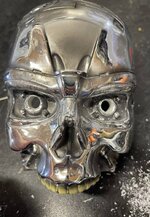
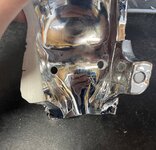
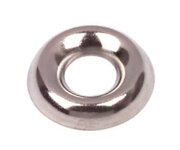
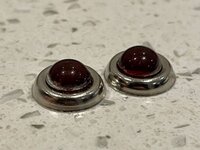
I then used 2 red transparent plastic jewels/beads from my wife’s craft room and glued each one to a plated screw cup washer I got from screwfix. Once the skull is complete, I’ll glue these to the eye sockets.
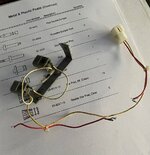
Looking at the lights/eyes from the original skull, I could see that I couldn’t use any of it due to the lack of space I had inside due to the wire form.
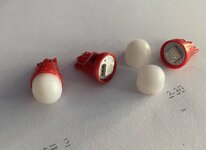
For the bulbs, I used a couple of non ghosting red comet leds and removed the frosted domes to exposes the actual led.
Using my trusty Dremel I ground in 2 mounting areas to the socket on the inside of the skull so that I can sink the bulbs in place.
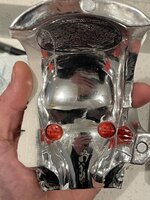
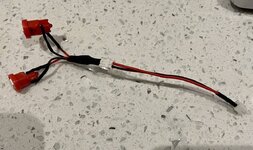
For the wiring side I’ve used a comet pinball matrix kit, which replaces one of the GI bulbs at the back of then playfield and let’s me run a wire with a 2 way splitter up to the bulbs for the eyes.
Did a quick test, and I’m really pleased with the final result. I just need to paint the inside of the skull black and then I can fix the bulbs in place.
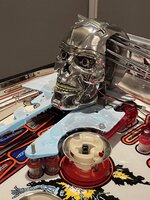
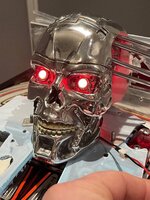
First job was to drill the eye sockets out so that light could shine through.


I then used 2 red transparent plastic jewels/beads from my wife’s craft room and glued each one to a plated screw cup washer I got from screwfix. Once the skull is complete, I’ll glue these to the eye sockets.


Looking at the lights/eyes from the original skull, I could see that I couldn’t use any of it due to the lack of space I had inside due to the wire form.

For the bulbs, I used a couple of non ghosting red comet leds and removed the frosted domes to exposes the actual led.

Using my trusty Dremel I ground in 2 mounting areas to the socket on the inside of the skull so that I can sink the bulbs in place.


For the wiring side I’ve used a comet pinball matrix kit, which replaces one of the GI bulbs at the back of then playfield and let’s me run a wire with a 2 way splitter up to the bulbs for the eyes.

Did a quick test, and I’m really pleased with the final result. I just need to paint the inside of the skull black and then I can fix the bulbs in place.


Thinking of a way to mount the skull was a real head scratcher and at times very frustrating. 
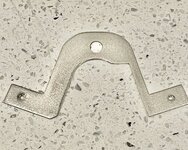
The original flimsy plastic skull was held in place by 2 small L brackets and another bracket under it’s chin. The L brackets couldn’t be used as I would have to fix them somehow to outside which I didn’t want to do.
So the plan was to drill through inside of its chin and bolt it using the remaining mounting plate.
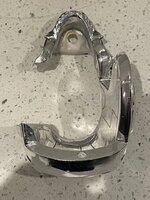
I temporarily installed both plastics that go around the skull as these were need to check alignment and general fitment.
This is where the challenge was . I could see straight away, In order for the bracket to work, and for the skull to sit at the right angle, I needed to move the bracket a lot closer to the wire form. This then brought on more issues.
When I re-drilled and fixed the bracket in place, it was catching on the inside of the skull so it wouldn’t sit at the right angle. It was also catching on the little swing gate that’s behind the pop up target. So more surgery was needed to the inside of the skull as well as the metal bracket.
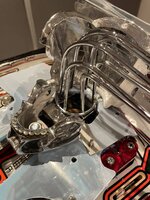
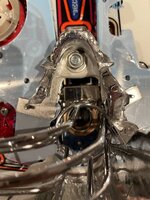
In total this process took nearly 4 hours of more cutting, checking fitment followed by more cutting and grinding until I got it so everything fitted together perfectly.
Once I’ve painted the inside of the skull and fitted the lights I can move onto the Hunter Killer ship, cannon mod and refit the ramps.
In the meantime I still need to decide on on the final choice for the colour of the rubbers and star posts. I’m leaning more on clear star posts and red titans.
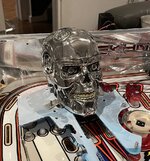
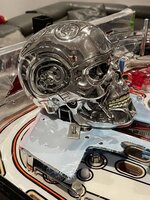
The original flimsy plastic skull was held in place by 2 small L brackets and another bracket under it’s chin. The L brackets couldn’t be used as I would have to fix them somehow to outside which I didn’t want to do.
So the plan was to drill through inside of its chin and bolt it using the remaining mounting plate.

I temporarily installed both plastics that go around the skull as these were need to check alignment and general fitment.
This is where the challenge was
When I re-drilled and fixed the bracket in place, it was catching on the inside of the skull so it wouldn’t sit at the right angle. It was also catching on the little swing gate that’s behind the pop up target. So more surgery was needed to the inside of the skull as well as the metal bracket.


In total this process took nearly 4 hours of more cutting, checking fitment followed by more cutting and grinding until I got it so everything fitted together perfectly.
Once I’ve painted the inside of the skull and fitted the lights I can move onto the Hunter Killer ship, cannon mod and refit the ramps.
In the meantime I still need to decide on on the final choice for the colour of the rubbers and star posts. I’m leaning more on clear star posts and red titans.


Last edited:
That's amazing workThinking of a way to mount the skull was a real head scratcher and at times very frustrating.
The original flimsy plastic skull was held in place by 2 small L brackets and another bracket under it’s chin. The L brackets couldn’t be used as I would have to fix them somehow to outside which I didn’t want to do.
So the plan was to drill through inside of its chin and bolt it using the remaining mounting plate.
View attachment 157800
I temporarily installed both plastics that go around the skull as these were need to check alignment and general fitment.
This is where the challenge was. I could see straight away, In order for the bracket to work, and for the skull to sit at the right angle, I needed to move the bracket a lot closer to the wire form. This then brought on more issues.
When I re-drilled and fixed the bracket in place, it was catching on the inside of the skull so it wouldn’t sit at the right angle. It was also catching on the little swing gate that’s behind the pop up target. So more surgery was needed to the inside of the skull as well as the metal bracket.
View attachment 157801View attachment 157802View attachment 157803
In total this process took nearly 4 hours of more cutting, checking fitment followed by more cutting and grinding until I got it so everything fitted together perfectly.
Once I’ve painted the inside of the skull and fitted the lights I can move onto the Hunter Killer ship, cannon mod and refit the ramps.
In the meantime I still need to decide on on the final choice for the colour of the rubbers and star posts. I’m leaning more on clear star posts and red titans.
View attachment 157806View attachment 157807
That's amazing work
The attention to detail astounding.
The attention to detail astounding.
Attention to detail is exactly what I say to my wife about it……………however she calls it something else
That's amazing work
Thanks mate.
It’s taken abit longer than I expected, which if fine as I’m really enjoying the whole process of the project. I’m already starting to think about the next one once T2 is finished.
It's a machine for your chinwag, outside of t2 chrome edition it the best T2 I've seen. Although I think this one might top that.The attention to detail astounding.
Thanks mate.
It’s taken abit longer than I expected, which if fine as I’m really enjoying the whole process of the project. I’m already starting to think about the next one once T2 is finished.
These things always do, well this type of restoring is definitely a labour of love as there's no money in it
Are you thinking of doing another custom one or just a restore?
It's a machine for your chinwag, outside of t2 chrome edition it the best T2 I've seen. Although I think this one might top that.
These things always do, well this type of restoring is definitely a labour of love as there's no money in it
Are you thinking of doing another custom one or just a restore?
Yes mate, Ant has already kindly agreed to me intruding and filming it.
I need to get some more restorations on the channel this year because I only have Chris's fantastic Whitewater so far.
I'm blown away by this T2 and the love that's gone into it.
Are you thinking of doing another custom one or just a restore?
At this stage it will be just a full restore, but saying that, that’s how T2 started out.
Plus Its going to be my SOF I recently got from @Fubar, and I absolutely love the game. The music is so addictive, and it’s the game that any non pinhead that comes round always wants to play.
This one on here is looking great
Just seen this on pinside, mirror decals
Just seen this on pinside, mirror decals
Last edited:
Yeah I also saw this on a FB group. I believe he’s based in Italy. The cabinet is a bit to much for me.
I had a similar idea to his topper. It’s something Id like to play around with by using some servos to see if I can get it to work.
I had a similar idea to his topper. It’s something Id like to play around with by using some servos to see if I can get it to work.

