As promised here's the build-up / restore of my Scared Stiff cabinet. Now this was bought as an empty cabinet so I knew I'd need EVERYTHING! Is it do-able? Dunno, but a guy over on Pinside built one from scratch so it's worth a go.
Ideally if a parts machine turns up then I'll be OK, otherwise in the meantime I'll see how far I can get with this. I bought the cabinet a couple of years ago from Tony on here, the cab is OK here and there and I knew what I was getting so there was no nasty surprises as he'd described it well. This October I put the cab up on sawhorses and started to appraise quite what it needed.
The art is all there but it is tired. I was going to redecal it but thought, let me see how much I can tidy it up and see if I can save the original silk screened decals.

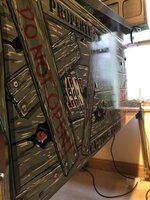
Here's it is in all it's gory glory, red faded to hell like they all are, with usual knocked about corners.

Other side as bad, slightly worse....


Some grey touch-up's from a previous owner. Booze - schmutz in brown!

Rear left, more of the same....

Front more of the same, amazing the way the red ink fades, innit?

Remnants of side rail adhesive still there.

Security brackets to keep the coin door secure are still there for now.

More red fade-age! The side rail adhesive took some of the top decal when it was pulled off... ouch.

Here's one of the black upper edge touched-up. Gotta start somewhere!

Well, I'm going to be doing some touch-up's so these brackets can go, granted it was how it left the factory but they're an eye-sore, no two ways about it.
Glued some dowels in place, trimmed and sanded juuuuuust below the surface.

Same over here. Work tight. Always use a sanding block. Protect the existing art with tape.

A couple of dabs of plastic filler, again keep it tight, you really don't want to make work for yourself if you don't need to.

Mixed up some grey and started touching up the repair areas. I didn't get the grey quite right on the first pass, 2nd or 3rd it was about right!

Grey, black and red paint applied at this point on the front corners...

Left as well.

Many hours spent searching for touch-up spots to paint! The grey's looking OK though so far!

I went with small enamels for the red here... fine and time consuming but it feels worth it...

Wow! That red is how faded! Still it's easy to see where the paint needs to be!

More hours later, almost half of this side is done in red. It might turn out OK after all!

Almost all the red done here. Hopefully the red will cover OK on the "STIFF" area, won't it? Dunno.....

It looks like it will! Almost all the red here needed 2 coats, red never covers well - no matter what type of red it it.

Some of this fine stuff took AGES! The green had a coat or two. That also felt really thin so it was 2-3 coats.

Onto the other side now!

The area in the pink oval shows the difference the green paint makes. Not a load of difference but you can tell. The hand and everything left isn't touched yet.

Back. Yeah, iffy but they all are! I can sort that....

Could be worse, it's only black so not rocket science to put right, just time consuming..

Now this is a tricky repair. The area in the centre has got to be filled as it's been gouged (and touched-up).
Nothing for it but to sand and fill... Yikes. Time for the brave pills son, it won't do it itself!

Right through the faux decal. Bloody 'ell...

Filled sanded and ready for paint.
Ideally if a parts machine turns up then I'll be OK, otherwise in the meantime I'll see how far I can get with this. I bought the cabinet a couple of years ago from Tony on here, the cab is OK here and there and I knew what I was getting so there was no nasty surprises as he'd described it well. This October I put the cab up on sawhorses and started to appraise quite what it needed.
The art is all there but it is tired. I was going to redecal it but thought, let me see how much I can tidy it up and see if I can save the original silk screened decals.
Here's it is in all it's gory glory, red faded to hell like they all are, with usual knocked about corners.
Other side as bad, slightly worse....
Some grey touch-up's from a previous owner. Booze - schmutz in brown!
Rear left, more of the same....
Front more of the same, amazing the way the red ink fades, innit?
Remnants of side rail adhesive still there.
Security brackets to keep the coin door secure are still there for now.
More red fade-age! The side rail adhesive took some of the top decal when it was pulled off... ouch.
Here's one of the black upper edge touched-up. Gotta start somewhere!
Well, I'm going to be doing some touch-up's so these brackets can go, granted it was how it left the factory but they're an eye-sore, no two ways about it.
Glued some dowels in place, trimmed and sanded juuuuuust below the surface.
Same over here. Work tight. Always use a sanding block. Protect the existing art with tape.
A couple of dabs of plastic filler, again keep it tight, you really don't want to make work for yourself if you don't need to.
Mixed up some grey and started touching up the repair areas. I didn't get the grey quite right on the first pass, 2nd or 3rd it was about right!
Grey, black and red paint applied at this point on the front corners...
Left as well.
Many hours spent searching for touch-up spots to paint! The grey's looking OK though so far!
I went with small enamels for the red here... fine and time consuming but it feels worth it...
Wow! That red is how faded! Still it's easy to see where the paint needs to be!
More hours later, almost half of this side is done in red. It might turn out OK after all!
Almost all the red done here. Hopefully the red will cover OK on the "STIFF" area, won't it? Dunno.....
It looks like it will! Almost all the red here needed 2 coats, red never covers well - no matter what type of red it it.
Some of this fine stuff took AGES! The green had a coat or two. That also felt really thin so it was 2-3 coats.
Onto the other side now!
The area in the pink oval shows the difference the green paint makes. Not a load of difference but you can tell. The hand and everything left isn't touched yet.
Back. Yeah, iffy but they all are! I can sort that....
Could be worse, it's only black so not rocket science to put right, just time consuming..
Now this is a tricky repair. The area in the centre has got to be filled as it's been gouged (and touched-up).
Nothing for it but to sand and fill... Yikes. Time for the brave pills son, it won't do it itself!
Right through the faux decal. Bloody 'ell...
Filled sanded and ready for paint.

")