What's new
Pinball info

Register a free account today to become a member! Once signed in, you'll be able to participate on this site by adding your own topics and posts, as well as connect with other members through your own private inbox!

In Progress PnP Homebrew build topic

meesterpieter

Registered
Joined
Jul 7, 2019
Messages
92
Location
The Netherlands
Hey Guys,

Since there aren't that many DIY pinball topics here yet, i'd thought it might be nice to share mine here as well.
I hope it can inspire some of you :)

I've started with this project over a year ago.
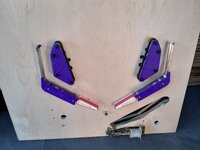
My first goal was to make a simple working playfield with 2 flippers and 2 slingshots, using an arduino.
By now i've already made a working playfield, here's an impression:

*edit*

small update for those new to the topic, first impression with everything working on MPF with Cobrapin

 
Last edited:
Hey Guys,

Since there aren't that many DIY pinball topics here yet, i'd thought it might be nice to share mine here as well.
I hope it can inspire some of you :)

I've started with this project over a year ago.
My first goal was to make a simple working playfield with 2 flippers and 2 slingshots, using an arduino.
By now i've already made a working playfield, here's an impression:

Wow!!! Love your work...did you make the ramps and habitrails or are they salvaged?
 
The idea for the project was actually that I needed a project to challenge myself and to learn new skills

I wanted to start with small, achievable, steps. Small achievements give me the necessary boost to keep the project going.

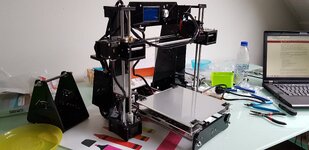
first stop, building a 3d printer, im gonna need that for this project anyways, better start with that:

psAxn9SvbKHvnVsgrXgCtJFv.jpg
A cheap anet A6, it needs a bit of work now and then but it works for making some pinball parts
Then, to start with my pinball project, I wanted to start with just doing the flippers and slingshots and getting them functional, nothing too fancy.
First i want to get there, then i'll see about actually building a real machine

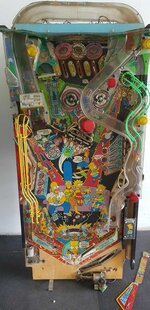
I found a largly populated simpsons playfield, that will be used as a basis for now

evJzVCFw6BcoFdH4tsOCxVGi.jpg

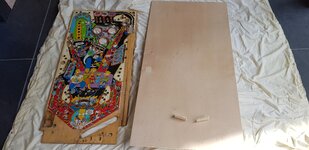
the playfield will be stripped and the parts will be used on a new blank playfield that i'll make myself.

h8QqgclUTu60d9oAyC0R1mOL.jpg

the playfield will be made from a 12mm birch plywood , the original is 13mm so this is close enough for now
 
I'm using the bottom layout from the old playfield since i need a good working example and will be cutting this into the new playfield.

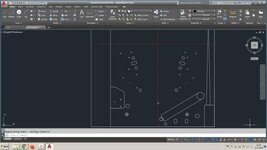
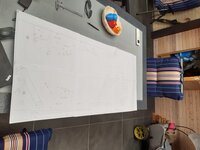
i've measured everything and drawn it in autocad so i can print a nice stencil to start cutting and routing


6RYlGrcfsd7EAsXYa7ecXH6F.jpg

mQLkPgkChWAtNKOxDiwJqvOC.jpg

3R5JxI25qkMaB7zIvCfokJGL.jpg

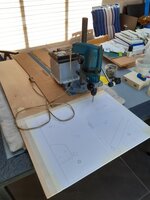
bought a drill stand and inverted it so i can drill nice straight holes, since it wont fit under a drill column

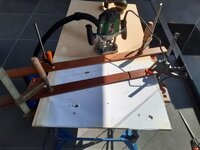
to make the slots i used the router

IA8zXa2jgDUIXh6y0srivoCb.jpg

OPYsFXXpIaLnNNiK5ElDguJF.jpg

VusfNhPvSKOn0keyyEM7jtBV.jpg

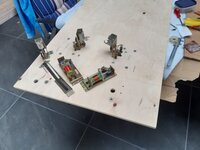
and printing some parts and mounting it all
 
next step is im trying to learn myself to make some coding to control the solenoids and sensors.

after quite some fiddeling i found out that there's a decent arduino simulator on the web ; tinkercad
for those interested, here is a link to one of my concepts: https://www.tinkercad.com/things/3Z0Opq2tRS4

that's been quite an improvement, especially since im just starting on this stuff. makes it much easier and faster to test a circuit and coding.
also learned that the basic stuff isn't going to cut it, since working with these heavy solenoids can lead to some easy coil burning.

after analysing the original DE schematics, i found that the flippers work on different voltages, around 48v and 20v i believe. this to prevent the coil from burning when you keep pressing the flipper.
I've thought up 2 ways to cover that in my setup, first i need to program the arduino so that i can switch from 1 power source to another after a certain length of time, and second i want to implement a fail safe in case my program is buggy. that would be with a programmable timer switch.

for switching the solenoids with the arduino i will be using a separate 5v power source, a mosfet driver and a timer board

driving the solenoids will be a +-40v power source, for testing purposes i made a simple setup without the arduino and with an old train transformer for a lower voltage

the 5v power source will also be used to power all the lighting and such as that also runs on 5v

here's my first simple test with a 5v switch, that uses a mosfet driver to switch on the higher (+-12v) voltage
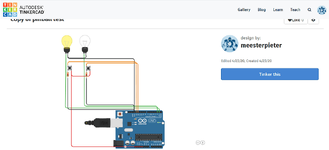

MpmfmExokCeQ2SoC8qU06arl.png

After putting the bottom assemblies on my playfield im already noticing it is getting heavier and bulkier to work with without damaging stuff.
So i guess i'll need a playfield tipper a bit sooner than i expected!

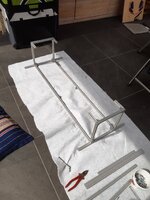
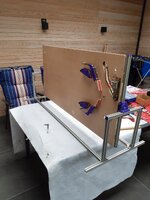
I wanted a lightweight demountable tipper, since i only have a very limited amount of workspace, and i expect the project to be shelved for at least several weeks every now and then.
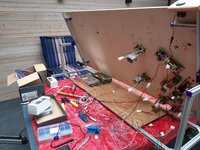
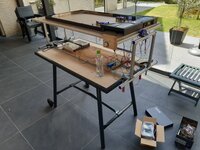
I've seen a lot of sturdy 3d printers made with aluminium extruded frames, which are easy to build yourself
after checking the weight it should be able to handle, i decided to build a tipper from 2020 aluminium profiles
the only thing i couldn't really find for an affordable price was a pivoting housing that i could easily screw down at different angles.
so i designed that in 3d and printed it. its not really state of the art, but it works fine for now
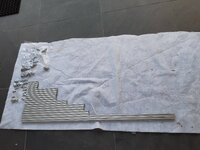
97sH1WjOZwj3ZSbi5U9DwHy6.jpg

made a rotating mechanism with my 3d printer
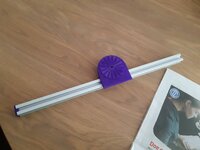
DoWreZ4AqewNq15txsPe4A9P.jpg

u1k4eNyqJoZWae55vWH6LuPA.jpgnJVGW8eaCGNkh04gASbN8N4W.jpgKqPQ6pclc4ADGFE9vCsaVwNC.jpg
 
Last edited:
My first goal being just some simple flipper+slingshot action i thought it would be easiest to skip the arduino for now and just wire it up with simple switches and mosfetts.
making some wiring

PMWbf1hNxzg0INj3p8vNRgcx.jpg

offcourse even though you measure a few times some things always end up crooked, so the ball didnt pass through the outlane but we're getting somewhere


well, for me this is my first milestone reached as i had it mapped out in my mind.

next up wiring switches and coils for the ballthrough


it didnt take me long to burn through some mosfetts. (in hindsight the time it took me to press a switch is way longer then the time needed for a normal activation)

i used some heavier mosfetts for the flippers after this which i had lying around from my 3d printer (30A heatbed version) , they held up much better.
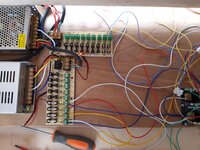
also tuned down the voltage to 30v and used some relais to wire the rest up since i didn't have enough mosfetts left, and the relais could take max 30v

9rQ05T8dWnGwuJvPpnii1B46.jpg

 
with the basic features working next step is making a playfield design

after a lot of variations, which i'll spare you, i decided not to make it to complex and just keep the basic outlines of the donor playfield.

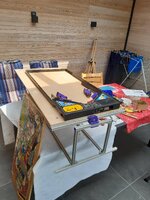
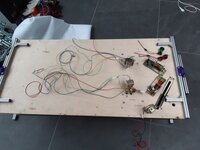
ive mounted the rotisserie on a workbench (also demountable) which makes working on the playfield easier

TOlYdnwmmaQ7nG1pU05Wm7W5.jpg
I've been drawing the rest of the holes from the simpsons playfield in autocad, printed those so i can use that as a template. not yet sure about the changes i'm going to make but probably moving the 3-bank a bit farther up and the bumpers a little closer together. maybe the 5-bank a bit further down and still doubting whether to shorten the inlane.

onqgfKjIB8Z79F3u50qYK7jO.jpg

I've rewired the powersupplies to add some fuses and a fuseboard. Wiring is still a complete mess but i'll be removing it all soon since i'll be cutting some more holes. also i've wired up the slingshots. everything is still powered down to 30v because of the relays, but even op 30v the slingshots seem to be firing too strong. so i'll have to set a short duration on them when i'm controlling it through the arduino later in the project. for now they work and because the mosfets are heavy duty they can take the heat
vXZi5V38R2l9h0VP5noZr3qF.jpg
aHR0cHM6Ly9vLnBpbnNpZGUuY29tLzgvN2YvNmEvODdmNmFiNTJkZjM5NjJiYmRkYjdjZTc1MTRiZGM4N2ZiYmU1NzE1YS5qcGc
aHR0cHM6Ly9vLnBpbnNpZGUuY29tLzUvNmYvODUvNTZmODVlOWEwYTQ0MmE5ZGYyMWU3NWJiMjBkYTY1YTQ1M2JjZDI3NC5qcGc
 
it was time to disassemble and get ready for the next phase, getting all of the playfield holes in and start on getting the game elements in.

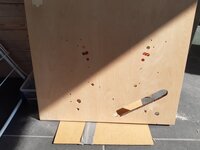
took everything off untill the bare wood, and i've been busy on making all the holes in the board with a router. i've made some slight changes , mostly to the popbumper layout and the target bank in front of it because i didn't like the original dynamic, so i've put those a little closer together and the target bank at a slightly different angle.

i know it would've been easier to sand the simpsons board but i really wanted to learn how to make my own board, since i'm hoping there will be more after this first version. i did make some slight errors while routing but nothing serious. also i didn't make the holes for the lighting yet since im not doing those (yet) and before i'm drilling all the holes for mounting all the parts and screws i'll first be checking fitment and how things work out with my changes.

making the shooter lane took a few tries with a normal straight milling jig, put some small blocks under it to give it a slight angle since the start is about 6mm lower then the end, and it came out pretty nice.

so next up is sanding the board to get some smoother edges, making some corrections to the small errors i made, and then fitting all the parts so i can start drilling some more holes


aHR0cHM6Ly9vLnBpbnNpZGUuY29tL2UvMzYvYjgvZTM2Yjg5YjQ4YzQyNGI0NGU5MmQwNzJiZTg1MTBlYWVlMThkZWVkMS5qcGc
aHR0cHM6Ly9vLnBpbnNpZGUuY29tLzEvNTUvZTUvMTU1ZTUyYjI3YTQ3Yjg1ZmQ3MTdkZGExMTk5ZmVmNTk4NTdlNmFmZS5qcGc
aHR0cHM6Ly9vLnBpbnNpZGUuY29tL2YvZDQvMzIvZmQ0MzI1ZjZiNzQ5MmQzZTk5MGJlNmViMzMyMzI4MzRjODY4ZGEzYy5qcGc


after that i've been busy mounting some ballguides and stuff, making it fit nicely looks easier than it actually is icon_lol.gif

also picked up a nice empty maverick cabinet to fit my project in, i'll need to source some more parts to make it complete but that'll come later

aHR0cHM6Ly9vLnBpbnNpZGUuY29tLzkvMjAvMzgvOTIwMzgzOGU0MDM2OTBhYmYyOTU0YjU4OTk4ZjZmNGQ5NmQzYTUwYi5qcGc


aHR0cHM6Ly9vLnBpbnNpZGUuY29tLzAvN2MvYmMvMDdjYmNhNDNkMTcwNDI5ZDBlYjNkOTZlMTVjYThjMjU5Yjg0N2UyOS5qcGc


my cabinet didn't have hinges, and late data east / early sega hinges are apparently unobtanium, so ive made a cardboard model so i can cut make my own sometime. also repainted the rusty old coin door i already had, so i can use that on my cabinet

aHR0cHM6Ly9vLnBpbnNpZGUuY29tL2YvODAvNmMvZjgwNmM1ZGE0NzZmN2E4Njg2NThmNGUyNzBhNTg4YWRmZjM3MDNmZC5qcGc


and been busy building up the playfield, i already regret some of the adjustments i've made to the popbumbers, because now i'll have to make all sort of changes to the mounting of the ramps, ballguides etc

also found out that sometimes the location of a part on top of the playfield doesnt have to be precise, but is has to be to fit it all right on the bottom icon_rolleyes.gif

anyways, sometimes im thinking "why didn't i just sand off the simpsons playfield" and offcourse i still can, but i'm learning a lot and im not planning on this first playfield to be the final version for my game.

aHR0cHM6Ly9vLnBpbnNpZGUuY29tLzMvOTAvOTEvMzkwOTE3MTIzNjQ0MzhiMzNkZmIzYTAxMGNlN2NiNjMzNGE2NWY1OC5qcGc


aHR0cHM6Ly9vLnBpbnNpZGUuY29tLzQvOTIvZGIvNDkyZGJjZDQyYmNhNTJjYmM5NDhlMWRmYjMyZjU5ODc1YzViNDRmZi5qcGc
 
nice progress. those relay boards with the blue relays. they will fail soon as they cannot handle the power of a pinball solenoid. i know as i first tried using them and they failed quickly. so now i use mosfets. they only need powering on for a few milli seconds. for my flippers i have double wound coils and an eos switch, so they will not burn out or burn out the mosfets.
 
nice progress. those relay boards with the blue relays. they will fail soon as they cannot handle the power of a pinball solenoid. i know as i first tried using them and they failed quickly. so now i use mosfets. they only need powering on for a few milli seconds. for my flippers i have double wound coils and an eos switch, so they will not burn out or burn out the mosfets.
Well yeah i only used em because i had blown to many weaker mosfetts, but i just had to tune the voltage back to 30volt, the relays handled that well, i blew up some first on higher voltages, so any more then 30v and they also blow
 
i made a few prototype popbumpercaps, first a copy of the simpsons towers and then i made one resembling a ZPM for the stargate theme.
I also made a plastic for the kickouthole as i've drilled a 30mm hole instead of an 31mm and offcourse the original one doesn't fit anymore icon_lol.gif

aHR0cHM6Ly9vLnBpbnNpZGUuY29tL2MvYjAvNTMvY2IwNTNiM2MyZjk2YzExN2UxNmY1Y2NkOGU5MjgyMGZhMGU3YmI4ZC5qcGc
aHR0cHM6Ly9vLnBpbnNpZGUuY29tLzEvZmIvNzEvMWZiNzEzOTFiMzZhYTU1NjgxMDc0MTkwYTY0M2M4MDhjNzYwOThiOS5qcGc
aHR0cHM6Ly9vLnBpbnNpZGUuY29tLzQvOGEvNjgvNDhhNjhmMjU1MzY4M2NiMzdhZGZiNmFmMGFjNWJlZjUwNDBmZDhmYi5qcGc


starting to look like something

aHR0cHM6Ly9vLnBpbnNpZGUuY29tLzUvMzUvZWIvNTM1ZWJjZjAxMzJhOGNjZTYxODA2YzNmZGFlODc5ZTFlOGVjYjU1Yy5qcGc
aHR0cHM6Ly9vLnBpbnNpZGUuY29tLzcvMzYvNjYvNzM2NjZjMTU5YWY3YzY3M2MzN2QzZWVhMzA2MGE5MmU2NjQ4ZjAxOC5qcGc
 
making some more wiring

im using 18gauge wiring for the coils and 22 gauge for the sensors, and im making connectors between everywhere since i need to take parts of regularly.

im not using a switch matrix yet but i'm leaving the diodes on the switches so i can do that later on

aHR0cHM6Ly9vLnBpbnNpZGUuY29tLzAvNWUvOGUvMDVlOGVhYzZmMTc5MzkzOTk4NTI5YjI4NjI0ZDBjODEyYmM4OWNhYS5qcGc

aHR0cHM6Ly9vLnBpbnNpZGUuY29tL2MvYTAvZDQvY2EwZDRiYWRlMTYyYTMyMzliZGE1YzY3NjBhMzlhZGFkM2QxY2Y4MC5qcGc
aHR0cHM6Ly9vLnBpbnNpZGUuY29tLzUvZGIvNTEvNWRiNTE1OWRhY2Y1YTJmNThlOTgwNDQ4OGIyMTYzZjA1Y2E3MDU4MC5qcGc
aHR0cHM6Ly9vLnBpbnNpZGUuY29tL2QvZWIvZGMvZGViZGMyNzQwZjFhYTEyOTgwMzhjN2Q3ZTFhMWI1MTY5MDQ1YjRlZi5qcGc


now that the wiring is done i needed to make a backboard to keep the ramp level, so made a nice wooden board that fits nicely.

i've tested the function of all the solenoids and switches by hooking them up to a single mosfet, so i'm sure everything is functioning now.

i hoped to wire everything first without using the arduino to coordinate switches and activation time on the solenoids but that didn't work very well.
when i wired the popbumpers and VUK's with their switches they kept clacking the solenoids, so i really have to work on the arduino software so i can give all the solenoids an exacter activation time and a little cooldown so it won't keep clacking.

A buddy is going to help me get my arduino programmed a bit better so i hope to get the playfield basics working soon


aHR0cHM6Ly9vLnBpbnNpZGUuY29tL2QvZjEvYzMvZGYxYzM1MmIzYWNjNGM5YzVlYWE3OTUzM2I1YTk2MWZjNmJiN2Y3Ni5qcGc
 
Been to my buddy to work on the arduino coding, we already made a basis for it a little while ago but now we had time to adjust the coding to the actual thing.

couldn't work in my regular workshop due to covid, so disassembled everything and hauled the whole project to my buddy.

first thing to get going are the flippers, since i've already burnt through some mosfett's we started out with a dual function coding for the flippers, a regular pulse for primary activation (set on approx. 40milliseconds) and after thet the coil starts pulsing to prevent it from becoming too hot. originally the data east coils i'm using were switched from around 50volts on primary to around 20volts on secondary. Since i've read somewhere that it is also possible to pulse solenoids to simulate a lower voltage we tried how that would work out. All the coils are powered with circa 45volts at the moment

for the primary power 40ms seemed pretty well after a few tests (on full power at circa 45volts). then after that 40ms the coding switches the coil to a pulsing mode, we tried some different delays, 1ms on, 10ms off, then 1/5 and 1/4. 1ms on 4ms off seemed to work well enough for now, it did make a bit of an irritating noise however. we tested some faster and slower pulsing rhytems and settled on 2ms/8ms for now.

i thought it would be interesting to show the effect of the different delay settings, here's a video on the testing of the settings mentioned above


aHR0cHM6Ly9vLnBpbnNpZGUuY29tL2QvNTcvZWMvZDU3ZWM1ZmMwMjZiMWJlZWRkYTczOGNjNzAyNDI2N2U2Yjg0OGUzOC5qcGc
aHR0cHM6Ly9vLnBpbnNpZGUuY29tLzYvNmQvNGQvNjZkNGQ3MDZiNDI5Njk1ZWJjYTkxNjIyMGQ5MWRkYWRjYjA0YzQzNi5qcGc


testing the flippers:


after we got the flippers tweaked right, started hooking up the three turbobumpers.

had some ghosting issue's which were solved with some resistors placed between the switches and the arduino, after that they seemed to work well enough for now. I still have to tweak the pulse time better, and for that i'll need to have to populate the playfield some more around the bumpers, but for now they work and i have a basic setting that will be easily adjusted later on.


at this point the wiring is getting messy quite fast, so maybe i should start to make a temporary prototype PCB to keep it a bit more reliable icon_lol.gif everything from the switches to the arduino to the mosfet controller is very flimsy at the moment.

well anyways another large step forward, mostly thanks to my buddy doing the programming on the arduino

aHR0cHM6Ly9vLnBpbnNpZGUuY29tLzEvMzcvZWMvMTM3ZWM2Yjg0NTljMGI2ODFkZjYwNWJlYzgxNzI1NTRmMTEwMThhNy5qcGc
 
tried building a little prototype PCB today, used a simple empty board with some traces and made some connectors on it

basicly it just makes the wiring a little more straightforward, a connector for the switches, the resistors fitted on the board, al the grounds connected to each other on the board, 1 connector going to the mosfet controllers, and 2 connectors for the pins and ground on the arduino.

got enough spare room so i can add some more connectors later for the other solenoids, and at some point ill probably need to redo the whole thing to a larger PCB but for now it'll do.

anyways, i edited the pinlayout on the software since i chose some more clustered pins on the arduino, connected everything, and it even worked on the first try for once icon_twisted.gif

aHR0cHM6Ly9vLnBpbnNpZGUuY29tLzIvYTIvMjAvMmEyMjA4M2Y5MzcyOTc2Yjc2ZTBmNmU0YjI4YTg0ZGNhM2M1NjlhNS5qcGc
aHR0cHM6Ly9vLnBpbnNpZGUuY29tL2YvZGYvMTgvZmRmMTg5YmU5ODFkZTU0MzExYWJlYzZmZjkyNTg3MWY3YjE2NjgwZC5qcGc


made some slight software changes and started with adding the turbobumpers on the PCB


aHR0cHM6Ly9vLnBpbnNpZGUuY29tLzEvYjEvMTkvMWIxMTk2MGYxMmY3MDRhODM1YmVhZjUzNjJkYTI5MTEyNzNjNjZkNy5qcGc


added a switch for the kickback and connected the wiring for the kickback. still need to get another plunger for it as its too short at the moment.
added some more wiring on the playfield and also added a start button.
i still need to add the switches for both droptarget assy's , but apart from that all the switches and solenoids are ready for the next phase.

wired up all the solenoids to my power supply board, i split them up in sets of 2 or 3 coils which each then have their own fuse

aHR0cHM6Ly9vLnBpbnNpZGUuY29tLzEvOWIvZTcvMTliZTc3YzBjZTgwZDMzMjMxZTI3NGRkZmQ1YTQzZjgwYjg1OTFhYi5qcGc


aHR0cHM6Ly9vLnBpbnNpZGUuY29tLzgvNGIvM2IvODRiM2JkMmZjZjI1ZjcxZmVlZTExZDQxYWY3OWNhNWM4MTg1Y2ZjZi5qcGc
aHR0cHM6Ly9vLnBpbnNpZGUuY29tL2EvZjMvY2MvYWYzY2M4MzQzMjYyNzk5NDU2ODQ0MWM3Njg1MjQxODUzZTEyMzNiYy5qcGc

aHR0cHM6Ly9vLnBpbnNpZGUuY29tLzEvN2EvOTMvMTdhOTNlZjRjYmY3YWNkOWJkYmNhODE4Zjc5ZTViNzQ3N2ZhZGU5NS5qcGc
 
more wiring..

aHR0cHM6Ly9vLnBpbnNpZGUuY29tLzIvNjMvYmYvMjYzYmY1OWYxZmYyZTA2YjJhYTdmMDRkNzhlZWQ1ZTI4YWMwMGYwYS5qcGc
aHR0cHM6Ly9vLnBpbnNpZGUuY29tLzEvNjUvNjAvMTY1NjBiNmVkODJlODY2YzNhZDg3YWY5MmE5N2E3ZTk2M2NmODMwOC5qcGc


aHR0cHM6Ly9vLnBpbnNpZGUuY29tL2MvMDcvNTgvYzA3NThiNDk0YjA1ZmNkNjUyNTk1ZmE2ZDljYTRlM2Y5MDMyOGFjZS5qcGc


made a new rampflap from 0.2mm stainless steel, its not as springy as the original blue steel but ill see how it works out

i just cut it with some scissors, drilled the holes, sanded it, and looks ok now, first one ive made so its not great but will do fine for now
aHR0cHM6Ly9vLnBpbnNpZGUuY29tLzIvMmYvMGMvMjJmMGM4NWUyNWU4OThkZTU0MmFiZjE1ZDFhYTgwMDM3MTZmMTQwNS5qcGc
aHR0cHM6Ly9vLnBpbnNpZGUuY29tLzkvMzQvYTUvOTM0YTU0ZDgwYjhmMGY5ZGYyYzJlZTVhOTRlZmZmOGFiOTRmNjEyYS5qcGc


aHR0cHM6Ly9vLnBpbnNpZGUuY29tLzkvZDYvYzcvOWQ2YzdiY2M1OGYxYjI4MjViNDAyZGFkNzE4NjkzMDRjNDNmNmZhNS5qcGc


and on with the wiring..

first made the wiring for both the droptarget assy's , re-used the old connectors since it seemed in order, though i do still need to check all the diodes.

then wiring all the switches to the arduino, resistor PCB and the mosfetts, its getting quite a mess.

next some more programming to make the software ready. Except for the droptarget switches all switches and coils have been tested and are working, so when i got the software updated i can start testing everything with the new wiring.

aHR0cHM6Ly9vLnBpbnNpZGUuY29tL2YvYjgvMmYvZmI4MmY5NDBhYzM5OGRhOTc5MGVhMzJlY2UwYTZkNjhjNTJiM2VjOS5qcGc
aHR0cHM6Ly9vLnBpbnNpZGUuY29tLzgvZTcvZWMvOGU3ZWNmMmRlNTM0OGM0YzhiMDBmZTFhZjE1MTFiNmRiZWFjYzA3OS5qcGc
aHR0cHM6Ly9vLnBpbnNpZGUuY29tLzYvYTAvODEvNmEwODFkMjMyYzc4NDc4OWY1MzcyNjA5YzE2M2NlYWE0NTYyZjcxYS5qcGc


with the pcb ready i wanted to start adding the other coils to the software and see what works.

offcourse the pcb had some small errors which i adjusted, after that i really got caught up in all the nasty wiring, so i first bundled that together to make it more workable.

after some tweaking the kickouthole,kickback,ballthrough, ball eject and vuks seem to work. need to check the wiring for the vuks since either sensor for the left or right vuk seems to be triggering them both, should not be the software..

further the slingshots and droptargets are not working yet, havent had time yet to start on those.


aHR0cHM6Ly9vLnBpbnNpZGUuY29tLzgvNTQvZjcvODU0ZjdmNjFkODNkNWVlMTE3ZGE5MDhmYmZjMTRhNjljNGU4NGZhNy5qcGc
aHR0cHM6Ly9vLnBpbnNpZGUuY29tLzAvMWUvMzEvMDFlMzFiYjBlMDNmNTQ3MmFjYTFlNWM1MzM0Y2EwMjk4NDc4Mzg4Zi5qcGc
 
the foam on the standup targets needed replacing, also i needed some foam at the end of the clear ramp, just bought some door strip foam of 5mmx10mm that seems to be a nice fit and similar in type of foam.

aHR0cHM6Ly9vLnBpbnNpZGUuY29tLzAvODUvZjcvMDg1ZjcyNzQ2MzVjZDZlYjg0NjEwNTJhNjU2MTI5ODFkM2YyNjg4Yy5qcGc
aHR0cHM6Ly9vLnBpbnNpZGUuY29tLzkvYzIvYzEvOWMyYzE3NjJiOWQzODU5OTEyZTA3Zjc3MmNhMDFjZmQ1Y2I1YzZlNC5qcGc
aHR0cHM6Ly9vLnBpbnNpZGUuY29tLzcvYTMvOTkvN2EzOTk3YjM5NzY1NTljYjRhMDIzMjM2OWU5MTBhMzFlYTExYjRkNi5qcGc
aHR0cHM6Ly9vLnBpbnNpZGUuY29tLzcvZWYvYzgvN2VmYzhjZTNkMTkyYmQyMTEzOTljMTAxMThmY2MzNzZjNDJjMDQ4My5qcGc


I still needed to mount the spinner, i was missing a piece of wire between the spinner and the switcharm, made that from a small piece of hard wire.

aHR0cHM6Ly9vLnBpbnNpZGUuY29tL2IvMzMvMDEvYjMzMDExZWQyM2IzZjVhYTY2MTRjMDQ4YzE1Y2NkYWIwMThlMjgwYi5qcGc
aHR0cHM6Ly9vLnBpbnNpZGUuY29tLzEvMzgvNDcvMTM4NDc4NTZkM2I3OWUzMjNhZDFlMTViNDE5ZDM5YWQ5MTU0NDdiNi5qcGc


after connecting my prototype PCB about half of the solenoids worked, well could be worse icon_lol.gif

after adjusting some ports, remaking some connectors and editing some of the software i got most of it working, all except for some switches i'm not really using at the moment so i'll leave it here for now.

only thing not working right is the kickback because i haven't replaced the too short plunger yet for a longer version, but the switch and coil work.


coil activation times are somewhere between 8-30ms , i've build in a cooloff period so i wont overheat the coils, and the flippers are going in pulsing mode after 30ms like shown earlier

with all coils working it is really starting to look like an actual pinball.

next up populating more of the playfield to make it a bit more playable.

i've also made another video (in dutch icon_twisted.gif) explaining a bit more on video:

 
drilling some holes, adding some more posts and stuff

aHR0cHM6Ly9vLnBpbnNpZGUuY29tLzYvOWEvYjQvNjlhYjQ4MTgzYWVmZjk2NzdiZDhjMDE5NGM0ZGEwYWU0NTU0NGE5MS5qcGc

aHR0cHM6Ly9vLnBpbnNpZGUuY29tL2MvYTkvODkvY2E5ODk4MWZjZjVkYzc5N2JlN2ZkZGFmY2YwMzRjYjUzZWJmODAwNi5qcGc
aHR0cHM6Ly9vLnBpbnNpZGUuY29tLzAvMjUvZjkvMDI1ZjkxOTdjY2UzNjFiM2YzZjA0OGE5NDZmZGFjMDg5MWQ4NDg1Ni5qcGc
aHR0cHM6Ly9vLnBpbnNpZGUuY29tL2IvMjEvYjgvYjIxYjhiMGRmMDgxOTAyYjkyMTEwOTQ5M2RkMjY5YTgyNmU2NmU4MC5qcGc

aHR0cHM6Ly9vLnBpbnNpZGUuY29tL2EvZWQvZjIvYWVkZjI1MzU3ZTNmYmVlZWMzYjI0ODQxYjkwN2U1MjUwYTk5YjlmZS5qcGc
aHR0cHM6Ly9vLnBpbnNpZGUuY29tLzUvN2UvYzUvNTdlYzU2ZjMxN2MyZjE3M2RkZTYyNDQyMGQwYmUxMTc3Njc3MzM1Yy5qcGc
aHR0cHM6Ly9vLnBpbnNpZGUuY29tL2YvNjMvMzgvZjYzMzgwZjM5NTA5ODIwNGNiMTJmYWIxODA2ZjlkOTgxMDI0N2Y5ZS5qcGc


more post and rubbers, i'm just using some rubbers i still had laying around, need to order some more but it will do for now

aHR0cHM6Ly9vLnBpbnNpZGUuY29tLzgvZTIvNjQvOGUyNjQ5ZTI0NGEyMDk0OWFhYWI1YzMzMDZmNzk2NTVkOWMzMmZlZC5qcGc


aHR0cHM6Ly9vLnBpbnNpZGUuY29tLzYvOWQvYTYvNjlkYTYzNTZhZTZkMzFkMDkxMzRjZWEzYzIxYjM3OTVhY2RkY2E0OS5qcGc
aHR0cHM6Ly9vLnBpbnNpZGUuY29tL2IvNjIvNDEvYjYyNDEzNGM0OGNiZGJhYTViNTVjZGYyNDBmODM1YWQzMTY1ZDkxOC5qcGc
aHR0cHM6Ly9vLnBpbnNpZGUuY29tLzcvZDIvOTgvN2QyOThkY2QwZTUyMTRkYWQyOWFkOGJlMmRlMDBmMjI4NTY5NjhmNS5qcGc
aHR0cHM6Ly9vLnBpbnNpZGUuY29tL2QvYmQvM2EvZGJkM2EyZmYzNDU2MDc3OTkwZmIwNGQ2Njc3MDdjZGIxMTczNDM0ZS5qcGc


Starting to look like a playfield

 
I have been thinking a lot about the next steps

regarding the arduino controller i'm thinking about leaving it like this for now, the arduino programming stuff isn't really the most fun part about it for me and since it needs alot of work getting some nice game modes in i think it'll be better to start with a MPF setup, still alot of work but i guess it makes it a whole load easier than the arduino route. I need to get read a more info on which system setup would be best though, also following the new OPP CobraPin, might be a good starting point when that one is available.

Playfield and theme.

I recently picked up another playfield which had quite some nice features for the theme i had in mind, integrating them into this one is an option but i'm at the moment still convinced that i shouldn't make it more difficult than it already is. So at the moment i'm more inclined to keep working on my current playfield as a more simple startup game, and when i get it all up and running to make a second playfield which is a bit more challenging. Making playfields swappable shouldn't be a problem. The second playfield is going to be the theme i started with for my plan, this simpeler first playfield will get another theme. Which will be revealed later

Graphics and lighting
I'll need to make some tests with drilling some insert holes and printing some brackets for the WS2812 lights, then i can start to make a lighting plan/layout and start thinking about artwork and game modes.

Sound/LCD screen/cabinet will come when i've proceeded further with the control boards

aHR0cHM6Ly9vLnBpbnNpZGUuY29tLzgvNmQvODQvODZkODQ2ZWNmMGM5Zjc2ZmFmMzRlOTZmZjU4NzNlZWY0MGIxY2I1Ny5wbmc


I started with the MPF tutorial and have made a very basic setup for my game. I'm really impressed by the MPF framework.

i'm lacking interface hardware to wire my machine to a mpf setup, will start with cobrapin when those will become available for sale
But for now i can start building the game more and test it virtually


I've drawn some inserts as well , i made them as close to the original dimensions as possible, so its easy to switch from the printed ones to original ones when my prototype is finished.

aHR0cHM6Ly9vLnBpbnNpZGUuY29tLzkvZGIvYzEvOWRiYzE1NzZjZTJkZWU3ZDBkOGFiYWRkNDkzMmZlZDBmYzIwM2Y0MC5qcGc


made some test pieces of wood for the inserts and to try different colours.

to make the round holes i used 2 different sized forstner drills, works for now.

the other shaped inserts i'm trying to find a decent way to use a router of dremel to make decent fitting holes. ordered some new shanks since they have to be pretty small sized to make the small rounded corners of the inserts.


aHR0cHM6Ly9vLnBpbnNpZGUuY29tLzkvYmMvMGIvOWJjMGJkNWUwNzQ3MjgxZWMwZjU0NjI5NWFiOGMzNWUyMTVmMTU3YS5qcGc
aHR0cHM6Ly9vLnBpbnNpZGUuY29tLzMvZDIvOTEvM2QyOTE4M2FiNzA3NWFkMmQ0OTA1YTJjZjgwMDJjMDkxNzAxYzQzYi5qcGc
aHR0cHM6Ly9vLnBpbnNpZGUuY29tLzIvNTMvZmQvMjUzZmRmOTk2ZGFmMWE1Mzk5Zjc3ZDVlYTBiMzIwOGUzOWQ1MzEzNi5qcGc
aHR0cHM6Ly9vLnBpbnNpZGUuY29tLzkvYmMvNWMvOWJjNWNjYjc3NDMwZDFjMGJmYTgzMmQ1MGM0ZDRjMTg5MDVkNjQzYS5qcGc
 
printed some more different inserts and testing some more with the router

aHR0cHM6Ly9vLnBpbnNpZGUuY29tLzkvOWMvMjgvOTljMjg3YTc0NDJkMzcyZDg1M2E3OWQzMzIzY2U5Y2EyYmYzOTgyMS5qcGc
aHR0cHM6Ly9vLnBpbnNpZGUuY29tLzMvYjgvZmQvM2I4ZmQ1ZDJlNzFlOThiNTI4YThjZDczZGE5MTdlZmZhYzkwNDI1NC5qcGc
aHR0cHM6Ly9vLnBpbnNpZGUuY29tLzQvZjgvNDQvNGY4NDQxMTcwMDE0MDQzN2MwYjNiOTE5YTQzODUzMjE0MzVlNzQ1NC5qcGc


the guide i made:
aHR0cHM6Ly9vLnBpbnNpZGUuY29tLzAvM2UvMGMvMDNlMGNkYTE4NGE2ZTZlNGQzMDg2ZmRiYmMzZmI4NWEzNWFlOTQxZi5qcGc


the test piece has some clear space under it to make cutting easier, also some clear space between the guide since i cant use a router with a bearing and i need to be able to adjust the height for the outer edge

aHR0cHM6Ly9vLnBpbnNpZGUuY29tL2IvZWIvNTMvYmViNTM1Njc1YjUwMmY0MWI3MjEzNmNmMTFmMGQ4MWFmN2MwN2ZmNy5qcGc


starting with a hole because the small 4x6mm router doesnt like to cut holes

aHR0cHM6Ly9vLnBpbnNpZGUuY29tL2MvN2QvMTIvYzdkMTI2YzE5OTU4MTFlZWU5NDVlOWNlNmJlNDAwNWE1NmE2NWQyMC5qcGc


the 4x6mm goes fully through

aHR0cHM6Ly9vLnBpbnNpZGUuY29tL2YvZjQvNzYvZmY0NzY5NDZhOWM1YjU2OGZhYzJlNWU3NGI3YWUzMDdjOTBkODRjNS5qcGc


first hole about 2mm smaller than the guide

aHR0cHM6Ly9vLnBpbnNpZGUuY29tL2MvZDAvYzYvY2QwYzY5MGQzMzQ2MDc1N2ZlZjY0OTU5NzQ5YjZkYTllODFmOTA1NS5qcGc


then switching the router to 6x6mm and setting the correct depth (about 6mm)

aHR0cHM6Ly9vLnBpbnNpZGUuY29tL2QvYTEvYjUvZGExYjUxNjZhZWZkNTgxYzE4YjVkNjdmN2FlYmVkY2VmNzk0ZmM1Mi5qcGc


this makes the hole same shape as the guide at the set depth, and the result

aHR0cHM6Ly9vLnBpbnNpZGUuY29tL2EvZDUvNGEvYWQ1NGFhMjBjNWI5YzRlMmQzOTkwYjg3MGMwNjZlNDc1ZjhiN2IwMy5qcGc
aHR0cHM6Ly9vLnBpbnNpZGUuY29tL2YvMGEvNTQvZjBhNTQ3MWI5ZTI3OWJjYzI2MTZkNDhkN2RjOGNiOTA2MjI4NzNkNy5qcGc


it would be even better to make the guide from a metal plate or something, but thats a bit much fur me, and it works like this as well

i just set the machine on the lowest speed setting because the shank does get hot, and when going along the edges at to high rpm or to long in 1 place, the guide starts to damage. On the low speed that goes much easier without damaging it.

once you've made a hole and its not perfect or anything its very hard to correct your mistake, so i think i'll still use the dremel with the router attachment for those mistakes
 
tried a different method with a guiding bush on the router. mounted the hole thingy on the router, and made a precise template for the rectangle piece to fit with it. 2nd try did fit very well. i will be using only 1 template and switch out the 6mm and 4mm shanks as i did on the other. but as long as i can make a nice template it seems to be working better this way. Just making the template is a bit harder to account for the offset.

aHR0cHM6Ly9vLnBpbnNpZGUuY29tL2IvNDAvNmUvYjQwNmU1OTA0ZWFlMWM5Mzc2ZDUwNzViZGM0N2Q4YTY5NGJkMDZlNS5qcGc
aHR0cHM6Ly9vLnBpbnNpZGUuY29tLzcvYjIvOTQvN2IyOTRkNDdjOTg2MGYxMmJkNzdiZjM1NGE3ODgyZGY3YmQwNGYzYy5qcGc
 
aHR0cHM6Ly9vLnBpbnNpZGUuY29tLzYvZmMvZDUvNmZjZDVlYmM5YTc5YjlhNDJiNTgzMzY3YzA4ZjFiMTZmM2YxZGFhZi5qcGc


Unfortunately my playfield got a bit wet due to some water leak in my storage. the wood is a bit stained but still straight,i will need to restore lots of metal parts though. I'll still have to test my transformers though, i hope those didnt get damaged.

aHR0cHM6Ly9vLnBpbnNpZGUuY29tLzMvOWUvZGEvMzllZGE5ZjZhM2FmNDljZWI5MWFmYjJhZWI0ZjUxY2RmZTIxNjE3OS5qcGc
aHR0cHM6Ly9vLnBpbnNpZGUuY29tLzAvNDAvNDkvMDQwNDllODQzOTE1NDk3YmRlZTk0ZTMxNDk3ZDczZjc1Y2Q2NmU0NS5qcGc


anyways, i was almost ready to start with the inserts, but i didn't want to take the whole playfield apart for it, well now i had to anyways so i'm busy making a first layout for the inserts, and since the playfield already has some damage now i wont have to worry as much about being super precise with the routing.

been making a new guide as i will be using the round baseplate adapter since that seems to work nicely

aHR0cHM6Ly9vLnBpbnNpZGUuY29tL2UvZWUvY2YvZWVlY2ZkNzQ2MmY4ZDdiNWJiNWNkZmRjMTY1ZjFmMjRlODIzNjExNS5qcGc


also making a layout where to put inserts.

aHR0cHM6Ly9vLnBpbnNpZGUuY29tLzYvZmMvZDUvNmZjZDVlYmM5YTc5YjlhNDJiNTgzMzY3YzA4ZjFiMTZmM2YxZGFhZi5qcGc


i'm just looking to see what looks nice and i will see later on which ones i will be using

also, my cobrapin has finally arrived, thanks Thomas.

slight issue with customs here but it got fixed (they wanted me to pay 4800 euro custom taxes, but after realising their mistake it was 21 euro)

aHR0cHM6Ly9vLnBpbnNpZGUuY29tLzcvYjMvNjIvN2IzNjI0OTgwNTgxNDcyNjI2YjgwMjFkMDdiZGVlN2IxZDNhZWE2OC5qcGc


routed some inserts, tedious work but it works

aHR0cHM6Ly9vLnBpbnNpZGUuY29tLzgvM2UvNGYvODNlNGY5Mjg3NjhkZjQxNWJkZDlmMDZlOTVkODAzZTVlMmI2OTdkNy5qcGc
aHR0cHM6Ly9vLnBpbnNpZGUuY29tLzQvZTIvNzQvNGUyNzRhNjk4OThiNDM0YTA1YjU1OWViMjViZDYzMjc2ZTZmNzdiZC5qcGc
aHR0cHM6Ly9vLnBpbnNpZGUuY29tLzYvZTQvMTQvNmU0MTRlMTFjYjA0YWI4MmU0MGNkZWI1OTI4ZmY3MDhhODQ0NWU3OS5qcGc
aHR0cHM6Ly9vLnBpbnNpZGUuY29tLzUvMmYvYjAvNTJmYjAzMWNmYmE5MjRjMmQyMWUzYjVhOTJkYWMzZjU5NDA5MGVlOS5qcGc
aHR0cHM6Ly9vLnBpbnNpZGUuY29tLzIvYjgvMTYvMmI4MTY1YWNjMmRjMWVlYTA5MDYzMGRkYzdiNTUwZjE2ZDg0OThiOS5qcGc
aHR0cHM6Ly9vLnBpbnNpZGUuY29tL2QvZjEvMWMvZGYxMWMxNWY3NzEwMTg1ZjRjYjg1MGVjYTIyNDkwZjdmYmRhYzg5NS5qcGc
 
i felt there was something missing in the bottom right so i made a hole for a scoop there earlier.

while testfitting the scoop i thought it might be nice to combine it with the left kickout.

so i made a 3d printed subway that i can mount under the kickout hole.

aHR0cHM6Ly9vLnBpbnNpZGUuY29tL2MvZGEvMmUvY2RhMmVkYWNjYzYxYjMzZWZiZDIyMjllNDJlZDE5NGM1NzNmZmJiYy5qcGc


for those interested, i made the subway out of 2 pieces and welded them together with a 3d pen:

i only welded it (and sanded ) on the outside so the inside stays nice and smooth

aHR0cHM6Ly9vLnBpbnNpZGUuY29tL2EvODgvMDgvYTg4MDhmNTc3MDY5MTFmMjA1ZGY4ZjI4YzQxN2JiMTExOGNhZTg5Zi5qcGc


aHR0cHM6Ly9vLnBpbnNpZGUuY29tLzAvMjMvODkvMDIzODliNjA5ZDU4OTliMTgxMjMyYjlkNTBkNzEwNGIzYjExM2JjMC5qcGc
aHR0cHM6Ly9vLnBpbnNpZGUuY29tLzAvZDQvZWEvMGQ0ZWE0NTM2Zjg2NTgxNTU0MWY1YjI0YTA5NGExMzg5MjY3ZWM1MS5qcGc


the guide is ready for all the inserts, now i can proceed with routing the rest of the inserts

aHR0cHM6Ly9vLnBpbnNpZGUuY29tLzYvNWUvNmUvNjVlNmVjZDU4NDU3N2I2NTRhYzQ4ZmI3OWY4NDE0YTM1MTIwNGUyNi5qcGc

aHR0cHM6Ly9vLnBpbnNpZGUuY29tLzgvNWMvNDEvODVjNDE3OTdiYjM1MjI3NTRiYzBkMzI5ZjllMjFhNzFlYjYyMzgyNS5qcGc
 
finalized the insert layout and routed all holes for the first time, next time i'll be drilling the holes through to create an edge

starting to look like a real playfield now

aHR0cHM6Ly9vLnBpbnNpZGUuY29tLzkvMjUvNWMvOTI1NWMxNDdhZjQ4OWRmNDMwMTA2YTE3Y2ExZTYzZDcwYzQ5ZTA5OS5qcGc


aHR0cHM6Ly9vLnBpbnNpZGUuY29tL2IvNzAvNWIvYjcwNWJlNzEwOGVhMzI1ZGQ4MjdhNDA0YTNjY2YzMjMxNGNmMzBkZS5qcGc


also welded the subway from both sides just to make sure its strong enough, did have to sand it afterwards

aHR0cHM6Ly9vLnBpbnNpZGUuY29tLzgvMmMvNGQvODJjNGRmMDdkOTUwMjJhZjMxNDkyNGFiODIxZWU4Zjc4ZmVjNzI0Yy5qcGc


aHR0cHM6Ly9vLnBpbnNpZGUuY29tLzMvZDIvMmYvM2QyMmY5Njc3ZjNlMmMwMWFlZTJiNmZiY2Q3YzY1OWQyNDBhZTMyOS5qcGc
 
for the next step im first drilling holes everywhere because im using a smaller shank

aHR0cHM6Ly9vLnBpbnNpZGUuY29tL2UvN2YvNGUvZTdmNGUzNTYyNWYwZDY5M2Q5YWNiZjc2MjMyMjk0ZjcwNzM1ODkxNS5qcGc

aHR0cHM6Ly9vLnBpbnNpZGUuY29tL2IvMmEvMDUvYjJhMDVjNWExNmVlOTFkNDE4ODJhMjJjYzliYTUyZDZjZjc3OTBkZS5qcGc


im using a small file with a flat bottom to clear the edges of the holes so the insert will be nice and flat

aHR0cHM6Ly9vLnBpbnNpZGUuY29tL2UvZWQvYjYvZWVkYjZmYWJlNTMyZDFkZWZlZmMyNWY5ZjMwNTcyYTg5MjAwMDBmYS5qcGc


the rest of the holes are ready, made a few mistakes but since ive made a 100+ routings thats not that bad.

the bigges mistake was the guide coming loose, luckily i have been able to fix that by using a large square insert instead of the rectangular one i had planned.

for the rest of the mistakes a little filler or epoxy will be fine.

next up printing some more inserts and glue them in place

aHR0cHM6Ly9vLnBpbnNpZGUuY29tLzUvMzAvYWEvNTMwYWE5ZGZiZjJjNTYxOWY0N2E2MzNkNzNhODQxYzJlNGVmNGEwOS5qcGc


glued in the first insert, this one needed some filling with epoxy because the guide slipped, so i glued the insert in with epoxy as well, worked nicely
 
Back
Top Bottom