What's new
Pinball info

Register a free account today to become a member! Once signed in, you'll be able to participate on this site by adding your own topics and posts, as well as connect with other members through your own private inbox!

Pinshed Build

Looking massive David.... How many pins?
 
12 Ian.

I have got about two thirds of it. The other third is for 'er indoors

The starting point for all this was a warm, quiet detached office for her with a garden view that the dog could wander in and out of.

I have piggybacked my pinshed onto it.
 
Looking amazing. Well done Dave. Can't wait to see the finished product. Thank you for sharing the details. Always useful.
 
Wow, you're moving along fast here, looks great David. :). Have you already got pins to fill it or have spaces left?
 
I am putting in the games I have. This is designed for 12. I think I may keep a thirteenth one in the house so I have access to a machine should 'er indoors be working in her office.

With Dialed-in on the way that will take the last berth in the shed and make it 12. I have dibs on another game that would take me to 13. Any additional incoming games will mean moving one of my existing titles on.

Unfortunately I struggled to get the roof trusses. Usual story. Folk never coming back to quote. Folk taking ages to quote. Folk not interested in quoting. So we bought untreated ones from a responsive and helpful firm that got on with it. Though they could not treat the wood, untreated ones meet building regs. But I want the wood treated. So sadly 'er indoors are manually painting these today with three in one wood preserver (woodworm being my long term concern). I had hoped that we could spray it on, but the trusses are too smooth so the stuff just sheets off

A right PITA
 
@newdos , if only !

My Builder's labourer walked off the job last week. So his brother stepped in to do the roofing on Thursday and Friday.

I am ordering all the outstandings today.

I will find the time to get more involved with this build now to push this along and be a second pair of hands for my Builder.
Don't forget your starter profile and NT3 edge trims when you order the hardiplank ;)

Cheers

kev
 
I aborted the warm roof. Much as I hate ventilating lofts, having a cold roof offered a number of benefits in the round ...

  • Less surface area to lose heat
  • Less celotex required
  • I could use up some old rocksil wool I had in stock to make the roof super insulated. So it will now have 100mm celotex plus 170mm rocksil
  • Neater soffits
  • Smaller internal volume to keep warm
There is a madness to building regs. I am meant to use polythene membranes on the internal surfaces underneath the plasterboard to kep the celotex free from moisture. Then I have to get trickle vents for the windows !!!!!!

Anyway. The roof is now boarded with tongue and grooved osb3, which has a temporary tarp over it ..

image.jpeg

75mm celotex in the walls. 100mm celotex in the ceiling. Aluminium tape over the joins ...

image.jpeg

First fix wiring is done, together with burglar alarm wiring. Three ceiling mounted led strip lights plus high level horizontal leds behind the backboxes ...

image.jpeg image.jpeg
First fix outside wiring too ...
image.jpeg

Now the wiring is done the rocksil wool is going up. This is a truly HORRENDOUS job. I have done it before, hooded overalls, taped gloves and boots, mask, goggles. But once it is up it lasts forever and does not catch fire

The rubber roof materials are here.

The hardieplank arrives on monday.

The windows and door are ordered - there is a new Secure by Design standard for plastic windows and doors called PAS24. It involves upgraded locks, cylinders, reinforced frames, dog bolts and laminated glass. It might add about 20 per cent or so to their cost.

Bought this water heater. Rather than the old fashioned wall mounted electric units, this fella can go in the cupboard underneath the sink so that you use normal taps ...

image.jpeg
 
The Hardieplank arrived yesterday. The teleporter came into its own again. Unloading would have been a major headache without it

IMG_20170911_1516133.jpg

I painted the corner pieces this morning. The fat corners only come in three colours, none of which was mine. The standard metal corner pieces come ready painted but my wall length made the fat corners the right decision. My walls are 7.5m long. The planks are 3.6m long and I just wanted one join in the back wall.

IMG_20170912_0859027.jpg

We got the long back wall up today.
IMG_20170912_1245301.jpg

I have never used this stuff before but to be honest I am not 100 per cent convinced with it. It scratches very easily. And if you tap a wall made of it, it can rattle a bit

Time will tell as to whether this was the right cladding. Initially I wanted cedar, but that is far from straightforward to source and install too.

The 170mm of rocksil wool is now up too. A foul, filthy job.

One downside to my 20 degree pitch is that the loft space will be like a prison escape tunnel should I ever need to enter it in the future. But like everything, this is a trade off. 20 degrees looks right, and is cheaper than a higher pitched roof.

I am being advised that Screeding the floor is the last job, which seems odd to me. But I am going with it for now. The screed will take 90 days to fully dry. Or I could pay more and get it dry in 2 weeks. I will sleep on it.
 
90 days will feel like forever if you are waiting to move pins in...

I think it goes off enough to walk on after a few days though, so you can continue finishing the inside. Electrics / decorating etc.
 
The Hardieplank arrived yesterday. The teleporter came into its own again. Unloading would have been a major headache without it

View attachment 51432

I painted the corner pieces this morning. The fat corners only come in three colours, none of which was mine. The standard metal corner pieces come ready painted but my wall length made the fat corners the right decision. My walls are 7.5m long. The planks are 3.6m long and I just wanted one join in the back wall.

View attachment 51433

We got the long back wall up today.
View attachment 51434

I have never used this stuff before but to be honest I am not 100 per cent convinced with it. It scratches very easily. And if you tap a wall made of it, it can rattle a bit

Time will tell as to whether this was the right cladding. Initially I wanted cedar, but that is far from straightforward to source and install too.

The 170mm of rocksil wool is now up too. A foul, filthy job.

One downside to my 20 degree pitch is that the loft space will be like a prison escape tunnel should I ever need to enter it in the future. But like everything, this is a trade off. 20 degrees looks right, and is cheaper than a higher pitched roof.

I am being advised that Screeding the floor is the last job, which seems odd to me. But I am going with it for now. The screed will take 90 days to fully dry. Or I could pay more and get it dry in 2 weeks. I will sleep on it.
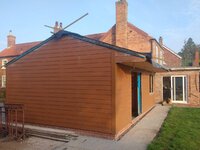
so what the probs with the hardieplank Dave - my looks fab and had no issues with it - I did leave the corners white on mine which sets the building off esepcially with it all fitted around the windows and doors as well

Cheers

Kev
 
I love the concept of hardieplank but the actual reality of it has left me worried

Minor issues:
  • Not many folk stock it so getting it cost effectively is tricky. This also makes for tricky logistics, problems sending stuff back, ordering extra etc etc
  • The planks are not all the same length. It may only me a mm here or there, but we ended up having to trim them to length
  • The dust is toxic so grinding and cutting it is unpleasant
More serious issues:
  • It takes ages to cut and install it if you are doing an apex roof. Mine needed 20 degree cuts which meant hand held grinders due to the length of the cuts
  • The hardie plank paint says it is only good for 6mm diameter touch ups
  • The whole instruction guide is full of caveats, get out clauses etc so I just get the vibe that this stuff fails a lot so the manufacturer is paranoid about warranty claims
  • Noone is familiar with it - your Builder has never used it. Your electrician has never been involved with it (attaching lights, burglar alarm box etc etc) So the risk is there for cock ups.
The big one:
  • All of the above just adds to cost/ hassle/ general uneasiness. But the Killer issue is this..
1506236041529-1918611173.jpg
The above photo is where my double door is going. We will run the grinder down here to get the edge straight. Then paint the ends.

The planks are not designed to lay flat on the wooden lats. They lay at a slight angle caused by the overlap pattern. So where the boards end you run the risk of cracking them if you over tighten the screw or over hit the nail. Yet you are supposed to insert your fixing flush with the face of the plank so the overlapping plank sits flush. This is playing Russian roulette.

This has to put a permanent strain on the boards. If you are clumsy it cracks straight away. If you are more careful it doesn't. But with the inevitable movement in a wood structure, the impact of winds, temperature changes .... I feel very confident that a number of boards will crack over time and fail.

These boards have no flex in them. They are also quite brittle. Wood has a natural flex so you can overlap wooden boards in this pattern without this issue.

It looks great....

IMG_20170920_1229320.jpg

It might last without failing in multiple places, but I do not believe it will. I expect the fixings to cause several ends to crack each year, so I expect to be conducting periodic patching to this. Worst case I will reclad the whole building.

I am fixing my windows, doors, soffits with a future recladding in mind.

Knowing what I now know, next time I would use cedar or similar. Cedar has been used for decades. Wood is naturally quite forgiving. Its behaviour is predictable. It does not just suddenly shear or fail like this hardieplank does.
 

Attachments

  • 1506237298570-6056926.jpg
    1506237298570-6056926.jpg
    130.1 KB · Views: 11
Last edited:
Hi Dave,

here what you are saying but to be honest I am a DIY man and no issues with it as didn't @Jsyjay. You do need a nail gun to install - nightmare with out one as it is so hard and dense. Screwing to it for electrical fixings etc is a doddle. As for the door sorround it is much easier if you use the NT3 trim as I showed you in the earlier photos of mine I sent you. I didn't like the idea of the bare hardiplank at door and window interfaces.

have a bit of faith in it dave and see how it goes and remember the one big reason I HAD to use hardiplank is it is totally fireproof - as far as I am aware nothing else will give you that element of protection. Also wood lives and shrinks - my friend has just built a shed with tanalised loglap as cladding. Within a month gaps have opened all around it - another benefit of hardiplank

Cheers

kev
 
We put the windows and doors in yesterday. The building inspector wanted trickle vents. I could not be bothered arguing so got them. They look ugly. But given how sealed this building is, it probably makes sense. It would have been considerably cheaper not to seal it in the first place, but there we are.

image.jpg

An idea for folk specifying windows is a "floating mullion". This means you do not end up with a line down the middle of your open window. So they work like French doors. They cost a little bit more and the only real downside is that you must always open one side before the other - you specify this when ordering
image.jpeg

image.jpeg

Patio doors are not remotely secure and you can only half open them. So I went for full pane french doors to maximise light and ventilation. I ordered the lowest possible door threshold to make getting games in as easy as possible. I have a 1m roof overhang so am not worried about water getting in underneath it. For the wind to be blowing that hard, the hardieplank would fly off anyway.


image.jpeg

image.jpeg
The 75mm insulation and 75mm screed floor will be level with the top of the engineering bricks
 
So how are you now finishing off around your door and window frames dave ???

cheers

kev
 
Can't remember if I sent you this pic but this is how I did it with the NT3 trim and I left the corners of the building white which I think sets it all of nicely with the white upvc

IMG_2256.JPG
you can see in this shot how the hardiplank sits behind the NT3 giving a neat finish with no shown cut edge
IMG_2326.JPG

Cheers

kev
 
We went down the edges of the hardie yesterday with a small grinder to square them off in line with the wood framing that the windows and doors sit in, we will now paint the ends

We are either going to put slithers of hardi perpendicular to the window frame to cover over these, or use short bits of nt3 to do the same. we are not going the picture frame route that worked so well on yours. I didn't think that it looked right with the brown paint, so we will have much skinnier window surrounds

I am so sick of hardieplank that I want to eradicate thoughts of it from my mind. i have to order more as it is. The supplier got the quantity wrong despite me adding extra planks to his suggested amount

I also have to get on to the security door company today as it is faulty. Even with the door open, the locking mechanism is so stiff that you feel like the key will break. I have already gone the teflon route and tried another lock barrel. It is the mechanisms inside the door that do the multi point locking. I expect to get fobbed off and end up getting my credit card company involved.

I am not yet at the "wish I hadn't started phase" of this, but I can understand those prepared to pay a hefty premium to get a turnkey solution as opposed to ordering all the bits themselves
Chin up dave the good news is you are getting there very quickly!!!!

Cheers

kev
 
Yeah, nearly there Dave, soon it will be filled with cool lights and pins and with a beer in your hand it will be well worth the effort......like childbirth, sh1t at the time but well worth the effort!
 
Indeed- I’m still waiting on a ****ing ack from the council on planning the ****ers!!!!
 
@Tombyrne , you are a soothsayer of note.

The MIL lives abroad but is over right now for a fortnight. I will view her interest in my build in a different light .......
 
Back
Top Bottom