What's new
Pinball info

Register a free account today to become a member! Once signed in, you'll be able to participate on this site by adding your own topics and posts, as well as connect with other members through your own private inbox!

My Life With An Ex-Arcade TAF

Nice work mate, where did you get the molex crimping tool from and how much was it?
After a lot of debating about the sizes I would need, I got this one:
http://www.ebay.co.uk/itm/300824568531
It was £28.75 and doesn't do the wire and insulator at the same time but does appear to do the main sizes I have played with on the pinball machine. I did some molex backbox connectors and it worked for those pins too.
 
I forgot to mention if you dont have a molex crimping tool, you can always remove the pins and solder directly to the top of them and simply re-insert the pins into the plastic block when done. Looks good once completed too.
 
Looks like you are well on your way to pinball fixing mastery. Perhaps we should arrange badges? hehe. Anything you feel you could offer here would always be accepted with the best kudos, so dont feel like you would be stepping on anyones toes by offering ideas on anything at all. Good job sir!

I know that some people make a living from these mods so wouldn't want to step on their toes. I know that many of us enjoy the making/fixing part almost as much as the playing and it is not about saving money but the fun of doing it. When I started to look at what parts were required, I didn't find anywhere saying what the connectors and pin size was. It was Elrikos', Theatre of Magic Shop Log that shared what the connector and pin sizes were for standard connectors that helped me go find the parts. Putting them together is simple, posting the pictures and words probably took longer. ;)
 
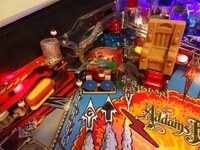
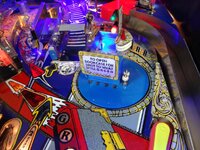
The solid blue plastic base of the Bookcase seems a little cheap with all the other detailed art on the playfield. There are several decal options available to cover the blue mass and the forums very own Judge Dreads sells an option. I bought mine via a group buy Andy "The Legend" was doing from the States so is a slightly different design from JD's.

This was the before shot:
DSC03567_zps1dfdc6b3-1.jpg

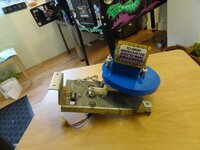
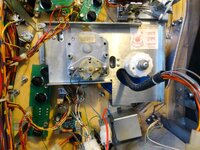
Five screws hold it on and all are easily accessible so removal of the complete unit is very easy but before you start know that the hardest part is making sure the bookcase is level when you re-attach it.

NOTE: It has been pointed out on the next page that you don't have to remove the whole mechanism. Jump to the motor removal process if you want to leave the metal base in the machine.

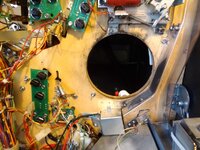
I have to undo the top right flipper to gain access to the top bracket screw.
DSC03568_zps29a43f79-1.jpg

DSC03569_zpsb402727d-1.jpg

DSC03570_zps5adaf983-1.jpg

The lower arm that moves the turntable is broken on mine but two cable ties ensures it still works, if anyone has one I might be interested though.
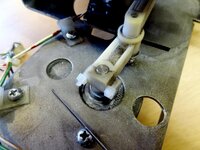
DSC03571_zps06d78ec6-1.jpg

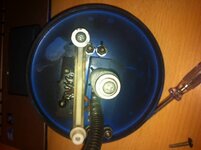
The breakage was caused because someone didn't know how to safely take apart the table. First remove the motor held on by the two flat head screws.
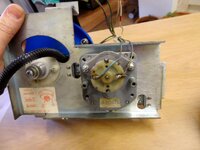
DSC03572_zpscbe889d0-1.jpg

Then you can gentle move the gears and linkage to line up the screw under the linkage.
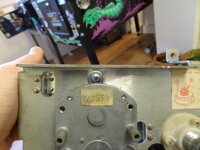
DSC03573_zps71fc0bb0-1.jpg

DSC03574_zpse87bfb2e-1.jpg

Once undone, the larger linkage arm is now free to move from the smaller arm and you just undo the retainer plastic nut from and unscrew the top part.
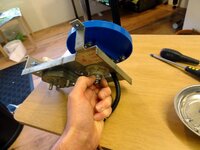
DSC03576_zps8533d2de-1.jpg

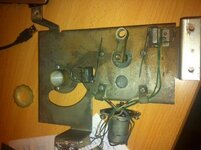
Now we have the main blue plastic part separated from the metal and ready to be torn apart. The large nuts (11/32") hold on the metal posts and can be quickly removed. So can the longer linkage but the centre large metal screw can't be undone yet.
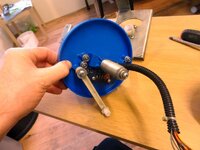
DSC03578_zps240e7d56-1.jpg

Top side, undo the two nuts that hold on the top of the bookcase and hopefully hold on a blue bug. This will review the top half of the optics.
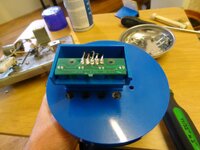
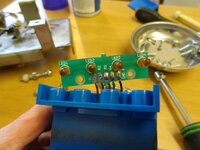
DSC03579_zps9892a1ea-1.jpg

DSC03580_zpsdda2eccf-1.jpg

DSC03581_zps9e17ad65-1.jpg

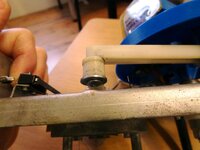
The last shot above is trying to show you that inside the bookcase are two screws, that need to be held whilst you undo the other end as demonstrated badly in the next picture.
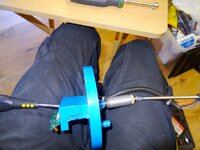
DSC03585_zpsb5966034-1.jpg

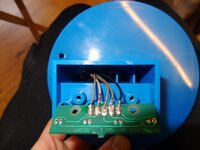
The opto card will not slide through the body on my bookcase, not just because the wires are soldered on the outer side but also due to the other soldering points. So the opto card has to be unsoldered to take the upper part of the bookcase off the table part.
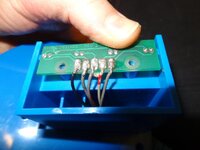
DSC03586_zps7865c65d-1.jpg

Now we have the base table free and ready for the new decal. I gave it a quick clean with IPA cleaner to remove any greasy residue.
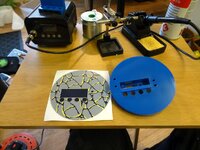
DSC03588_zpsd62dd53b-1.jpg

I am not great at this sort of thing so lined the decal up on with the right side post holes as a reference. Whilst the decal is lined up in some places, by the top it was slightly off as are the lower optic holes. I am not sure if this is a defect in the decal or my method.
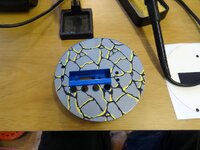
DSC03589_zps282601ee-1.jpg

Now reverse the process and put it all back together.
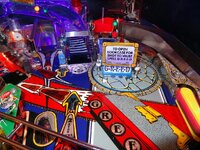
DSC03590_zps550af58b-1.jpg

The colour match is not perfect, the yellow is a bit different but it is now really noticeable, neither is any mistakes from where the decal was stuck. It certainly does soften the blue. This decal is more patio than castle floor but there is enough choice for people to choose what they prefer.

The hard part is now balancing the top of the bookcase table. The table itself is held onto the metal plate from that large centre cylinder screw (and the long bolt that goes through it) which means the only adjustment is the five screws on the metal plate which are in three locations. Left, top, bottom.
I use bits of card, under these three mount points to pull that corner of the bookcase table lower. This has worked before but this time I got to a point where the top mount was so far out that the flipper plate could not be reattached. I have got it to a stage where I am happy with it but will be taking it apart and rethinking the solution next time I do some maintainance.
 
Geoff,

You are Da man! I'm just about to do this, and after a cursory glance i voted to leave it for a bit. However You've just given me a step-by-step, which I shall try tonight whilst in front of the TV :)

Cheers!
Paul
 
Yours is decidedly cleaner than mine...(ooer!!)

bookcase1.jpg
bookcase2.jpg

Hmm the plate is too big to go in the tumbler... time to get the wire wool out ;)

I nearly ended up like "dirty faced Dave" when i took the bookcase off!!

Paul
 
jesus, what a palaver for a new sticker. i wouldn't have the patience or the nerve to try that, especially as there seem to be so many places to slip up. i don't mind the original bright blue bookcase, and would worry that i wouldn't be able to get it all back on properly.

let's hope Paul doesn't come in and tell us it has a snag

doggy ride.jpg
 
I replaced the main blue part earlier in this thread so it has been cleaned in the last 8 months.
Glad to have shown the way on this one Paul, not a time consuming job really.
Thanks Replica, I might well buy one.
 
I replaced the main blue part earlier in this thread so it has been cleaned in the last 8 months.
Glad to have shown the way on this one Paul, not a time consuming job really.
Thanks Replica, I might well buy one.

Ahh thats where we differ. My base is lightly cracked around the pillars on each side of the back of the bookcase, along with a fair few scratches. Not worth spending on a replacement since i was going to stick a decal on anyhow :)

Anyhow it needed to be ripped apart for cleaning. Not that you'd have noticed from the pics above :)

Paul
 
Pretty sure when I did mine I did it with the base in situ ?? Its not necessary to pull the *whole* mech out is it ? I could be wrong, the old GrizZ noggin sometimes forgets stuff :rolleyez: Obviously I still had to remove the upper part .
 
Thinking about it. The metal base could be left on the table, remove the motor and undo that screw and the bookcase unit will come out through the top. I will give it a go when I rebalance it over the week.

But I am thinking that disturbing the metal base is not the reason they are unbalance, it is the way the unit resides on a single centre cylinder screw. I reserve the right to reconsider that when I have had a another look. ;)
 
Do standard plastic targets bore you? Don't worry, there are decals for these too.

Old boring targets:

DSC03592_zpsb5fac7db-1.jpg

DSC03593_zpsd6870b4b-1.jpg

New stickers applied on them:

DSC03595_zps45d20f1a-1.jpg

Now how to do it.
Buy stickers, take off back to reveal sticky bits and stick them on. Don't forget to clean the targets first with IPA. Hurrah. :D
 
Pretty sure when I did mine I did it with the base in situ ?? Its not necessary to pull the *whole* mech out is it ? I could be wrong, the old GrizZ noggin sometimes forgets stuff :rolleyez: Obviously I still had to remove the upper part .

Thats what I was thinking, surely if you remove the bookcase sign and the posts you can slip the decal onto the base then remove the backing and apply (you would need to rip/cut the backing paper to remove it obviously)

Maybe its just my lazy nature but seems simple enough.
 
The sign is only a very top cover and the top of the bookcase overhangs, I didn't consider trying to get it over that top lip.

DSC03585_zpsb5966034-1.jpg

Not saying someone else wouldn't want to try doing it but I saw it as pretty easy to desolder the board and undo two screws. Then very easy access to the plate plate of the bookcase.
I don't think the entire process, stopping for pictures, took an hour.
 
Phew, I was expecting the next person to say I didn't need to even unscrew anything, I could just throw it on the table and it would be fine. :boink:

I know people have cut theirs out and fitted it not removing anything but I was looking to do it once and do it properly.

That centre screw I am undoing in the picture above must be the place it can be also levelled/aligned. I am going to see if it is straight or bent later.
 
Apparently the levelling is done by a combination of the large plastic Nut and shims (if fitted) under the bookcase base between the bracket and the PF.

Seems some had "shims" in there, Mine didnt....i think :)

Failing shims, I recon some small washers should do the job ☮️
 
Apparently the levelling is done by a combination of the large plastic Nut and shims (if fitted) under the bookcase base between the bracket and the PF.

Seems some had "shims" in there, Mine didnt....i think :)

Failing shims, I recon some small washers should do the job ☮️


Unfortunately my Addams had served many years on the mean streets of Brighton , and clearly the bookcase had not been level judging by the wear around the rear edge 😢 Oh well .....I have it levelled(ish) now and suppose if I could ever really be bothered I could touch up the wear. But I doubt I will. Some machines are players games, rather than museum pieces :smokin:
 
The large plastic nut just seems to lock the mechanism that lets you raise and lower the relative level to the playfield, rather than the pitch. Mine is very much completely pitched wrong.
If there was a shim, it is not there now and I don't know where it went. :(
 
Back
Top Bottom