What's new
Pinball info

Register a free account today to become a member! Once signed in, you'll be able to participate on this site by adding your own topics and posts, as well as connect with other members through your own private inbox!

In Progress Alien Poker - full restoration

VeeMonroe

Registered
Joined
Aug 4, 2021
Messages
2,394
Location
London
Okay, I’m now the very proud owner of a minor disaster of an Alien Poker that I got off Gumtree.

Thank you again to @Ashbo for pointing me in the direction of this pin, and to @AlanJ for verifying the seller. Also to @Neil McRae for putting his Alien Poker onsite at Pinball Republic, which spurred our enthusiasm for this title.

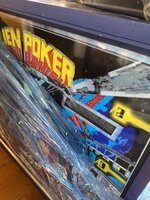
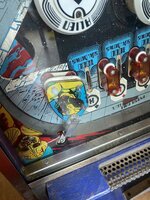
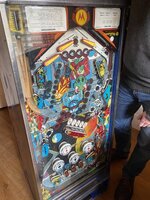
I’m fortunate that it (mostly) works as @AlanJ had previously worked on the boards. So, it plays very nicely. However, cosmetically, it is a mess…

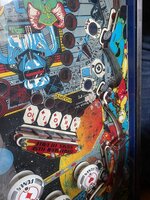
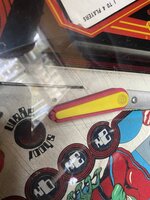
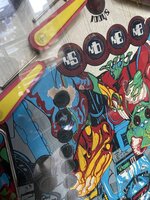
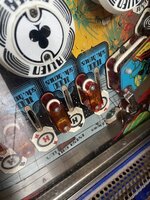
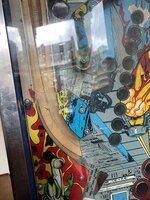
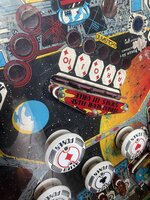
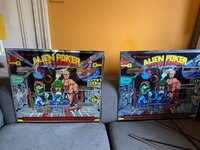
Multiple plastics are broken, the rubbers are cracked, the playfield is largely worn out, the legs are rusty, and it arrived with a replica non-mirrored backglass that looked like it had been replicated off a very low-resolution image. Someone, at some point, had restencilled and repainted the cab… in patches. So, in the wrong light, it’s two shades of blue. They didn’t bother painting the top of the backbox at all.

I was told the sound board wasn’t working. Bizarrely, the voice started working again shortly after the pin arrived, but the GI and one of the inserts has now gone out. So, it needs a LOT of cosmetic work and probably some playfield tinkering as well.

As such, I’ve ordered new stuff - plastics, a new playfield, a Comet LED kit, new Titan rubbers, apron cards, a backglass off eBay…

I’m going to attempt a full restoration of this pin, including playfield replacement, which is a little daunting…

0EA5329E-648E-4436-9A26-289C9D38C32D.jpeg
 

Attachments

  • C245D3FC-D083-4AD5-97FE-3011C50097F0.jpeg
    C245D3FC-D083-4AD5-97FE-3011C50097F0.jpeg
    94.3 KB · Views: 49
  • 5EAA0C56-D59D-4E8D-96BE-38E8F444D7FC.jpeg
    5EAA0C56-D59D-4E8D-96BE-38E8F444D7FC.jpeg
    132.5 KB · Views: 43
  • 86B3AD06-2E36-4BCA-A30F-186C6506AEBB.jpeg
    86B3AD06-2E36-4BCA-A30F-186C6506AEBB.jpeg
    88.1 KB · Views: 40
  • E7BB5696-A488-4A89-98BC-20F51354216D.jpeg
    E7BB5696-A488-4A89-98BC-20F51354216D.jpeg
    155.5 KB · Views: 38
  • 0A8162AD-4881-4ED5-88DA-5A74563FD7C7.jpeg
    0A8162AD-4881-4ED5-88DA-5A74563FD7C7.jpeg
    167.8 KB · Views: 38
  • A3DF7297-F44E-4DBD-8831-3D8E59E05C95.jpeg
    A3DF7297-F44E-4DBD-8831-3D8E59E05C95.jpeg
    181.6 KB · Views: 38
  • F6EEB711-E5A4-4003-A996-2D5EBAEF0E16.jpeg
    F6EEB711-E5A4-4003-A996-2D5EBAEF0E16.jpeg
    106.7 KB · Views: 38
  • 00F43073-7186-4F56-93DF-0849A8FDA48B.jpeg
    00F43073-7186-4F56-93DF-0849A8FDA48B.jpeg
    151.1 KB · Views: 34
  • F6E74BC9-BEC2-4EE6-B029-99E66D44E430.jpeg
    F6E74BC9-BEC2-4EE6-B029-99E66D44E430.jpeg
    150.8 KB · Views: 34
  • FAA07E97-6176-4793-94CC-1784B3522484.jpeg
    FAA07E97-6176-4793-94CC-1784B3522484.jpeg
    149.5 KB · Views: 35
  • 494F9193-92B2-4E97-B801-799B4ABA43BD.jpeg
    494F9193-92B2-4E97-B801-799B4ABA43BD.jpeg
    177.3 KB · Views: 44
Very sad story behind this pin.

The gentleman who sold it to me, Phil, had always wanted a pinball machine. He bought this pin for £1,000 from a guy who switched it on for ten seconds to let him see the lights go on. He got it home, switched it on, and - of course, you guessed it - the boards fried within seconds. Literally, magic smoke escaping the components… Poor chap.

So, he found a local guy to send the boards off for repair. He paid £200, boards came back, pinball machine still didn’t work. He bought some fuses and coils, but couldn’t get it working himself either. Fortunately, he then found @AlanJ who kindly took the pin away and got it all working. Phil, of course, knew nothing about pinball collection and recounted to me, with great excitement, the size of both Alan’s conservatory (and the playfields hung on the wall) and his collection of pins.

Anyway, after this distressing experience, he was really scared to play the Alien Poker again. He forbid his grown-up kids from playing it and barely switched it on incase it broke down. When he did come to switch it on again, the sound board had stopped working. Devastated and scarred by his experience of pinball ownership, he listed it on Gumtree, trying to cover the costs of the pin and work he’d done.

He expected someone local to buy it and was very surprised to receive text messages from someone in London (aka me). In fact, he thought it was a scam and, eventually, called me to check I was a real person. Fortunately, I was. I talked him gently, and kindly, through the process of Martin collecting his pin, which he was very very nervous about as I think he’d expected someone from down the road to arrive with a van.

He eventually gave me a discount on his pin as the advert hadn’t mentioned the replica backglass he’d gotten made at some point. I probably could have really pushed him down on price, as he was desperate to offload it, but I didn’t want to - first, because I really wanted an Alien Poker and they don’t come up that often, and, second, because it would be a really s***y thing to do. Poor bloke had been scammed to start with and then he’d just struggled with the upkeep costs of a really old pinball machine.

I just felt really sorry for him :(
 
DA05CDDB-4190-4B59-BA02-55C9170D1B74.jpeg

This is small fry compared to actually swapping the playfield, but I sourced a good-ish condition second-hand mirrored backglass from eBay, from a German seller of military memorabilia (!) who described it as a ‘disc’.

He didn‘t sell anything similar to the backglass, so our guess is that it came from an Alien Poker brought by US troops stationed on a base in Germany, and the pin got dismantled and the bits sold on when the troops left the base.

I was bricking myself about a sheet of glass arriving safely in the UK from Germany and sent the chap the packaging instructions from the website of the Netherlands company who touch up backglass ink. He followed them exactly. Yay!

The pin also now has new apron cards from @johng2611, as well. Thank you John, they look great 😍
 

Attachments

  • 823702DD-5B17-44D6-949F-983D8E13B72A.jpeg
    823702DD-5B17-44D6-949F-983D8E13B72A.jpeg
    173.8 KB · Views: 23
Hmmm interestingly, when he brought the game to me for repair, he didn’t bring the backglass as he didn’t want to risk breaking it again. he said he’d broken the original but managed to get another made. sounds like it wasn’t a proper job though.

there are two sound / speech cards that are connected together in that game. neither was working when I got it, so I did some repairs and it was all fully working when he picked it back up. However, I believe the rom sockets really need replacing on the left hand board.

Many of the coils had been disconnected as they were locking on and the right flipper wasn’t working. I replaced a load of power transistors and some ic’s to get all the coils working, then reconnected them all up. The flipper not working was a bad connection in one of the backbox connectors.

Some of the lamps were out/not working. so i fixed/replaced all those.

One of drop targets wasn’t registering. again fixed that.

Yep it needs cab refurb/ restencil and eventually a new pf or overlay etc.

Will be a nice project to work on. Looking fwd to seeing the progress.
 
He forbid his grown-up kids from playing it and barely switched it on incase it broke down.

This is definitely the sad part! When I have a pin playing up I can't resist tinkering and switching it on - it ends up being the most used pin.

I'm glad someone picked this up and is investing some serious time and cash to make it right.

I'll definitely be following the restoration. If it wasn't for the Whirlwind and JP I have in pieces then I'd have gone for this.

Good luck.
 
Hmmm interestingly, when he brought the game to me for repair, he didn’t bring the backglass as he didn’t want to risk breaking it again. he said he’d broken the original but managed to get another made. sounds like it wasn’t a proper job though.
It wasn’t…

The blurring here isn‘t the camera - it’s the actual artwork!

4D9EDDE7-26CA-4D09-A055-111FE1A5BF0B.jpeg

This is definitely the sad part! When I have a pin playing up I can't resist tinkering and switching it on - it ends up being the most used pin.

I'm glad someone picked this up and is investing some serious time and cash to make it right.

I'll definitely be following the restoration. If it wasn't for the Whirlwind and JP I have in pieces then I'd have gone for this.

Good luck.
Thanks 🥰

It’s not going to be a particularly fast restoration as we’ve got young kids. I’m going to move it into the back room for restoration once the front room is full of pins, which won’t be for a few months yet.

At the moment, it’s seeing extremely frequent play and I’m just doing minor repairs/servicing.

4A2B6BE1-B173-48D4-A635-50EC48DF4605.jpeg
 
So... as of today, I have a replacement playfield for Alien Poker.

Apparently, the next step is to build a homemade rotisserie, which apparently needs a miter saw bench and various Lazy Susan turnstile bits. As it's pretty close to Xmas, and I have no formal childcare tomorrow, I may end up jetting around south London on my trike trying to pull some bits together.
tempImageaN3VMO.jpg
 
Rotisserie isn’t strictly needed. you can strip nearly all the topside with the pf in the cab. then remove and place face down on a table. (if pop bumpers or other things still on, support on a couple of pieces of wood, then you can strip the underside mechs. you can build up the new pf in the same manner.
 
So… kicked off this morning starting the playfield swap. I’m starting slow, as I don’t know what I’m doing, taking lots of photos.

I’m putting stuff on the playfield, screwing in where I can. I realise I’m going to have to lift the original playfield at some point, and try to secure some of these starposts working on my back under the new playfield…! Otherwise, I’m going to have to baggie and label everything from the top of the playfield before starting on stripping the underside.

14C5993B-F195-4EB0-BC32-1A280D9FFCF3.jpegF62810AA-B079-4C57-818C-07C1CED98270.jpeg
The components on top of the playfield are in quite good condition, but filthy. So I’ve got a little pot of warm soapy water and a j-cloth I’m using to clean the starposts as they come off the pin.
C47570C4-41A3-4251-A438-A3D00C120910.jpeg
 
My biggest concern right now is completely off topic…

I’m hoping to restencil the cab over the summer, when it’s drier on the patio. The cab has been restencilled at some point, but is two different glossinesses of blue, and they didn’t bother with the top of the backbox. And I was going to chrome the coin door, side rails, etc. when I did that.

Trouble is, I’ve no idea how to get the side rails off as they look riveted on. All advice welcome.

F6D094A3-27C2-450B-8DD2-28579C69ED11.jpeg
 
the side rails are nailed on with spiral nails. you have to get something thin under the side rail. paint scraper (i use a variety of narrow and wide) and gently ease them out a little, then once the head is exposed, pull out with pliers. sometimes the nails are stuck into the wood very firmly and can be difficult to budge. a spot of easing oil might help. Take it slow and steady. you can hammer the side rail straight if it gets a little bent during the process.
 

Attachments

  • A83E81F8-48E6-4707-8D5F-69F5D43EFFFF.jpeg
    A83E81F8-48E6-4707-8D5F-69F5D43EFFFF.jpeg
    15.5 KB · Views: 1
So, I’ve got to the apron. The metalwork is absolutely filthy. There’s some tarnishing of some type, but the ball guides are too big to fit in the tumbler.

I have Evaporust (mostly bought for Fish Tales - Alien Poker isn’t especially rusty), powdered citric acid, and Brasso. The trough guides are not visible during play, so this may not be important, but it’s the thought that counts…

[Yes, I know it’s Xmas Day, but this is literally one of only two occasions in a year - the other being summer hols - when I’m not getting emails about client work AND I have my mum here providing childcare… so I’m getting on with it 🎄 🤶]

06E312E2-36DA-4629-A956-CC7F3E2DA64D.jpeg
 
Looks like I need a Dremel with a buffing attachment and a zinc spray:


So, I’ll need to stop until ToolStation reopens…
 
So, I’ve got to the apron. The metalwork is absolutely filthy. There’s some tarnishing of some type, but the ball guides are too big to fit in the tumbler.

I have Evaporust (mostly bought for Fish Tales - Alien Poker isn’t especially rusty), powdered citric acid, and Brasso. The trough guides are not visible during play, so this may not be important, but it’s the thought that counts…

[Yes, I know it’s Xmas Day, but this is literally one of only two occasions in a year - the other being summer hols - when I’m not getting emails about client work AND I have my mum here providing childcare… so I’m getting on with it 🎄 🤶]

View attachment 189643

Give that lockdown bar receiver a dose of citric acid when you eventually take it off. Much more economical than anything else.
 
Slight problem arisen. Advice needed! :)

So, my plan was to remove everything from the top of the playfield, screw in the screws on the (screw) starposts, and fit the locknuts from the underside of the playfield to hold the (tee nut) starposts in place (see pictures). And, then I can flip the playfield and solder everything on.

Problem is that the tee nuts that have come off the original playfield don’t fit through the holes on the underside of the new playfield.

Any advice?
Should I drill guideholes on the underside of the playfield?

831C3266-75B8-4EEF-B4C1-B96CCC0A0289.jpeg

DAFB517D-9759-4EC5-9F77-FD5632FE1055.jpeg
 
Use tape around the drill bit to set the correct depth of drilling. The tape will stop the drill bit going in too far. Check regularly that tape edge not damaged and of so re-tape.
 
Well, I’ve temporarily parked the drilling in favour of using my new Dremel multi-tool to clean up the tarnished trough guides. As that doubtless removes the zinc coating, I’ve used a galvanising spray to re-protect the components.

I’ve also done (not especially professional) touch-up job on the apron. It looks okay, mostly, but had a couple of places where the paint had worn off and there was rust. I sanded that off and touched up with the small job paint I’d used for my Fish Tales topper. It would have been better to do a full respray and re-decal, I think, but it didn’t seem bad enough and the damage is invisible from the top of the pin.

1F727752-7250-4187-99B0-5D18AC6B2E97.jpeg

C83751D5-18C3-4370-B8F6-700146C60DA3.jpeg
 

Attachments

  • D2B1D1B1-66D1-4BEE-B5F7-8831A887EBAD.jpeg
    D2B1D1B1-66D1-4BEE-B5F7-8831A887EBAD.jpeg
    262.4 KB · Views: 16
Well, I've been doing some taking the occasional part off the Alien Poker for a few weeks now, but I had a good straight few hours working on it today.

I'm on a bit of a deadline, to be honest, which I didn't intend to be. I'm hosting the London & SE League on 18th June and need five pins. We have currently four in the front room (Godzilla, Attack from Mars, Fish Tales and PinBot) and the Alien Poker being restored in the back room.

I've got a Total Nuclear Annihilation CE arriving in a few weeks, but we don't really have room for five in the front room - so, the ideal is to sell the PinBot and then get the Alien Poker playfield swap finished by June 18th. If I can't get the Alien Poker playfield swap finished, I'm going to have to leave the PinBot inconveniently in the fireplace from when TNA arrives until 18th June.

Alien Poker top view 25.02.23.jpg

Alien Poker new playfield.jpg
 
Today, it was mostly unscrewing, photographing and cataloguing the playfield, with a bit of dremel cleaning/polishing, and some ordering of replacement parts.

I spent a LOT of time having to order equipment early on (e.g. zinc coating spray, Dremel, box spanners), but seems to - cross fingers - have most of the kit I need now. I have a load of little baggies for board game pieces that I'm using to bag up parts.

I wish I knew how to re-chrome parts (without sending them off)...


Alien Poker metals.jpg
Bits and bobs.jpg
 
Back
Top Bottom