OP
OP
That looks, erm... Delicious?
Shooter handle looks great!
Shooter handle looks great!


")


 0)
0)


 be continued.......


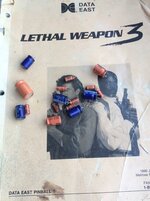
Don't suppose you made a list of the caps values did you? Been looking everywhere and stubbled across this thread.Sound board removed for capacitor replacement.
View attachment 37594
No parts list in the manual, need to read all the values off of the schematics...how tardy is that! Lazy ole data east!
View attachment 37595
Here are the replacements from RS let you know what happens when they are replaced.....
View attachment 37596
To be continued.....
Sure did it's in one of the photos if you got keen eyes...Don't suppose you made a list of the caps values did you? Been looking everywhere and stubbled across this thread.