What's new
Pinball info

Register a free account today to become a member! Once signed in, you'll be able to participate on this site by adding your own topics and posts, as well as connect with other members through your own private inbox!

CENTAUR II won't boot

I've also noticed that the music isn't playing so need to look into that if you have any ideas?

There is likely a game setting using the dip switches for music level.
 
You most definitely WILL know how to fix everything @Blake7 because even after you've got it all working it'll keep going wrong and require constant maintenance! Welcome to world of classic pinball machines. Be brave though... you've bagged yourself one of THE classic games of all time at bargain price, so be persistent and carry on, it'll all be good in the end.
 
if your coil is bad,all is not lost pinballmania will be able to sell you a replacement,and it's usually under £20
 
The options for background sounds are done in the self test options using the red button inside the door. I think from memory it is option 18 and set to number 3 using the start button (1-3)... it defaults to number 1 after a power reset.

even after you've got it all working it'll keep going wrong and require constant maintenance!
Tell me about it.... :rofl:
 
Don't get me wrong I'm enjoying getting it fixed and half the reason I got one was to keep me busy now I've finished renovating the house. It's just I'm desperate to have a go lol.

The coil has no-26-1000 marked on it, is this the model number because I can't find one online? It also has c-815-11 marked on the end.
 
^^^ Ruk is right re setting sound. The battery (on the original MPU) saves your settings thereafter.

For the shorted coil double check the driving components per Nedrueds post above, you don't want to fit a new coil only for it to lock on again.
 
The coil has no-26-1000

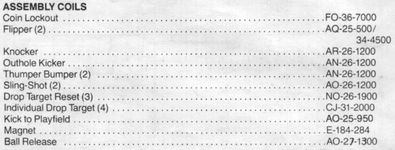
The coils are listed on page 20 of the manual - are you sure it's not NO-26-1900? That's the big chunky one that resets the target bank. 26 is wire gauge, 1900 is number of turns btw.
 
The coils are listed on page 20 of the manual - are you sure it's not NO-26-1900? That's the big chunky one that resets the target bank. 26 is wire gauge, 1900 is number of turns btw.
That's the one it's all burnt out so hard to see the numbers
 
The options for background sounds are done in the self test options using the red button inside the door. I think from memory it is option 18 and set to number 3 using the start button (1-3)... it defaults to number 1 after a power reset.


Tell me about it.... :rofl:
That worked thanks, it's so much better with sound
 
As @astyy said the coil numbers tell you the gauge (wire thickness) and number of turns, so NO-26-1000 is 1,000 turns of 26 gauge. I don't see a 26-1000 listed in the manual?

upload_2017-8-18_14-19-40.png

The 2-letter prefix is a code that indicates the positions of the coil lugs. Often you can use coils with different lug codes with the same gauge-winding code as long as the position of the lugs doesn't get in the way when installed.

AL = Lugs left and middle
AE = Lugs left and right
AR = Lugs right and middle

Other codes will be for double wound coils such as those for flippers (AQ) or where the bobbin includes 3 lugs for extra wiring on a single coil. Also some coils have the lugs at right angles to normal or at either end, but I'll be buggered if I can find a reliable source of information as to all the different variations!

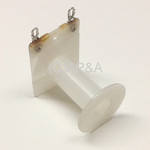
The code C-815-1 is the Bally part number for the bobbin that makes up the core of several different coils when wound:

upload_2017-8-18_14-36-16.png
 
As @astyy said the coil numbers tell you the gauge (wire thickness) and number of turns, so NO-26-1000 is 1,000 turns of 26 gauge. I don't see a 26-1000 listed in the manual?

View attachment 50512

The 2-letter prefix is a code that indicates the positions of the coil lugs. Often you can use coils with different lug codes with the same gauge-winding code as long as the position of the lugs doesn't get in the way when installed.

AL = Lugs left and middle
AE = Lugs left and right
AR = Lugs right and middle

Other codes will be for double wound coils such as those for flippers (AQ) or where the bobbin includes 3 lugs for extra wiring on a single coil. Also some coils have the lugs at right angles to normal or at either end, but I'll be buggered if I can find a reliable source of information as to all the different variations!

The code C-815-1 is the Bally part number for the bobbin that makes up the core of several different coils when wound:

View attachment 50513
Thanks for that @astyy was correct, it was hard to read because it was burnt out. I've got a new 1 ordered and some new rubbers.

I've had a little play without out the drop targets working to get my fix, should do me till the replacement arrives lol.
 
So apart from the drop targets not resetting all seems ok and you got sound and echo?

Not bad going.

Get the old MPU working when you have time as it is a life lesson in pinball and I reckon you could sell it for a few quid or keep it as a donor for your next project
 
So @Blake7, what have you got planned in terms of restoration for the hardware in this truly classic Bally game? Are you going to restore the cabinet and backbox, or stick with faded original glory? Playfield, mechs, plastics, etc.? Don't know if you've looked at my shoplogs (linked in my footer below) but I'm a "try to keep it original but make it super shiny" type of restorer. The restoration of the playfield on my GOLD BALL may be of most interest to you, but there are lots of shiny things and other repairs on PARAGON too. VECTOR was working when I got it, and MR & MRS PAC-MAN is my latest aquisition awaiting restoration (although I couldn't resist a quick fiddle!)
 
Nice one @Blake7 it's rewarding getting it to a playable albeit restricted state for the first game.

Don't forget to check on the solendoid pcb the driver components for that locked coil, the t/shooting procedure is described here;
http://techniek.flipperwinkel.nl/ballyss/rep/index3.htm#driver
I've found the coil I've removed it for now untill the new one comes.
So apart from the drop targets not resetting all seems ok and you got sound and echo?

Not bad going.

Get the old MPU working when you have time as it is a life lesson in pinball and I reckon you could sell it for a few quid or keep it as a donor for your next project

Yep just one set of drop targets not working, I've removed the coil for now because it was blowing the fuse on start up.

The sound is all working and I'm not sure if I'm getting as much echo as I should but the say it again board is definitely working and it sounds lots better connected than not.

And thanks for all your help
 
If it was me...As long as the playfield looks clean and sound and the balls are clean, I would give them a wax and play for a few days to get a feel for the machine.
 
If it was me...As long as the playfield looks clean and sound and the balls are clean, I would give them a wax and play for a few days to get a feel for the machine.
I was going to ask the playfield is worn to the wood in a few spots. Am I best trying to get these touched up or leave them be. If I touch it up or not what would I be best to use to seal it for protection?
 
I was going to ask the playfield is worn to the wood in a few spots. Am I best trying to get these touched up or leave them be. If I touch it up or not what would I be best to use to seal it for protection?

Are you able to add photos yet?

Don't stress stick anything over the wood as when it comes to fixing it removing the stuck on protection may remove more paint.

Ultimately it all comes down to what you can live with.

There may be a drop in playfield protector available from Europe. Or make your own.

In the long run I would recommend stripping the playfield and clear-coating it.
 
I don't feel brave enough to strip the playfield yet to many bits lol if I were to just clear coat where it's worn would it effect play?

i63.tinypic.com_20idv7p.jpg
 
I've just noticed another little problem, a bunch of lights aren't working they all seem to be connected together and are mostly the ones on the edge of the playfield under the plastics. The reason I noticed is because they have flashed on once or twice. Where would be the best place to start looking to fix this?
 
I've just noticed another little problem, a bunch of lights aren't working they all seem to be connected together and are mostly the ones on the edge of the playfield under the plastics. The reason I noticed is because they have flashed on once or twice. Where would be the best place to start looking to fix this?

That's seems to be on the GI lighting. And it can flash on and off as the MPU requests.

If other GI lights under plastics are working we can assume the GI circuit is working.

Check the bulbs again.
Check the wire ground braid attached to all those lights and make sure the braid is attached to the main bunch of wires under the playfield.
Check the wires going to all the bases of the lamp sockets and make sure these connect to the other GI lamps or the main wire harness.
 
Have you run the lamp tests on the self diagnostics too (coin door button). You want to be well familiar with those self tests whilst bringing this machine back to life.
 
A quick test if you have a multimeter with a continuity (buzz) test.

Put one probe on the braid of the faulty part and the other probe on the braid of a working GI section.

Do the same with the wire soldered to the base of the bad sockets to wires on good GI sockets.
 
check the lamp sockets,they are known to go bad on ballys of this age,you can sometimes wiggle the bulb and it will light up but as soon as you let go it will go out or the vibrations during play,stop it working.it's probably worth checking all the scr's are working on the lamp driver board as well
 
If none of the GI lamps are working, even in test mode it may be the Triac in the bottom cabinet.

Forgive me if any wire colours are wrong in this, working from memory but you should get the idea.

From J1 on the rectifier board 2 cables (green and white I think) go into a 4 pin plug. The other side of this plug is connected to the Triac, a 3 pin device mounted in the metal plate between the rectifier board and the transformer.

From the Triac there are 3 cables (green, white, brown) that connect via another 4 pin connector to the playfield wire harness.

The Triac is used by the MPU to switch the GI lamps on and off. If the Triac is faulty the lights will either stay on or off.

To bypass the triac for the point of testing, plug the 4 pin plug from the playfield wire harness into the 4 pin plug from J1 on the rectifier. On power up all the GI lamps should be on.
 
Back
Top Bottom