What's new
Pinball info

Register a free account today to become a member! Once signed in, you'll be able to participate on this site by adding your own topics and posts, as well as connect with other members through your own private inbox!

In Progress 1983 Bally GOLD BALL - Further Adventures in Budget Restoration

March 2015
OUTHOLE KICKER REBUILD


Time to start working on the mechs that sit under apron and first up is the outhole kicker. Although it seemed to move freely this was really struggling to get the ball up the ramp that leads to the shooter lane. Not sure why? But in my limited experience giving any solenoid mechanism a ruddy good clean always improves matters.

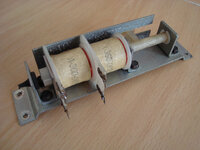
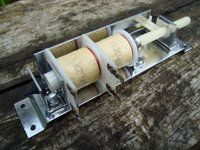
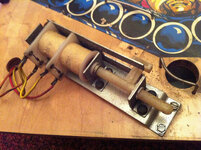
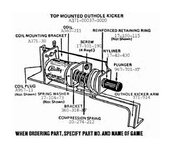
So, what we're dealing with here is the A371-00037-0000 TOP MOUNTED OUTHOLE KICKER:
farm8.staticflickr.com_7598_16752618679_b37473befe_z.jpg

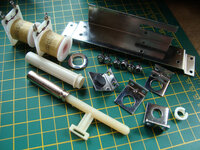
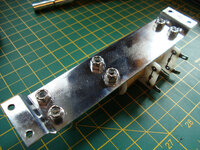
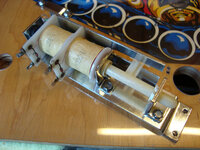
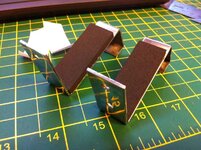
As you can see, like the flippers and slingshots, Bally also decided to "linearise" the design of the outhole kicker and stick in a big wodge of plastic. To prevent this chafing on the metal chassis they also riveted on plastic guides. Here's what I started with:
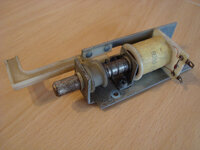
farm8.staticflickr.com_7310_16372506328_02d99cc7f9_c.jpg

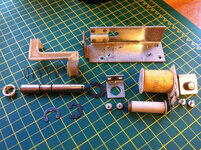
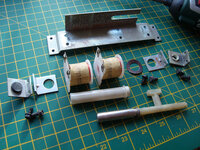
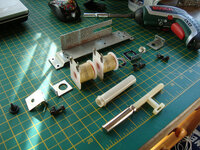
And then again stripped down:

farm9.staticflickr.com_8701_16311335893_20deab73f3_c.jpg

During polishing the main chassis I realised the plastic guides were going to get all messed up. Polishing with the Dremel creates nasty black cack that marks plastic and also gets hot enough to melt it. So I popped out the four little aluminium rivets with a 3" nail. After an hour or so I ended up with a pile of clean stuff:
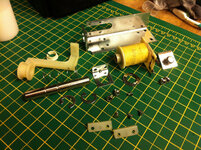
farm9.staticflickr.com_8723_16311335623_dba10078ca_c.jpg

To reassemble, the guides were fitted back onto the chassis by reforming the original rivets using the bench vice to apply pressure with a punch:
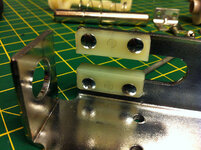
farm8.staticflickr.com_7622_16930399561_0547c5abed_c.jpg

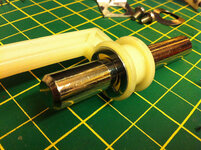
The the big C-clips were used to hold the plastic kicker arm onto the plunger:
farm9.staticflickr.com_8734_16724049557_e538bbd0d6_c.jpg

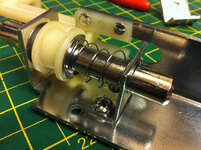
The nyliner for the plunger was fitted back into the hole at the end of the chassis, and the kicker arm slid through the gap in the corner so that it went into the slot with the plunger through the nyliner. The spring was slipped onto the plunger and both held in place with the bracket:
farm9.staticflickr.com_8734_16930401331_5161c60b41_c.jpg

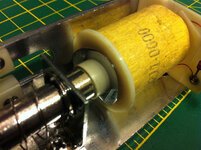
A new sleeve was fitted in the coil and the sprung washer popped on the end before offering the coil up to the plunger:
farm8.staticflickr.com_7596_16930401971_b04449bf03_c.jpg

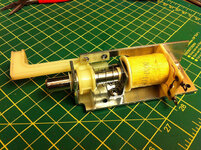
The end-stop bracket was then fitted. The bracket was pressed firmly up against the coil whilst tightening the screws to squeeze the sprung washer. Job done:
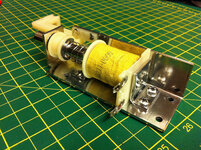
farm8.staticflickr.com_7286_16743939030_559acca452_c.jpg

farm8.staticflickr.com_7615_16743940420_56dde2a9a4_c.jpg

As a finishing touch I might give it a new coil wrapper with Bally logos :)
 
you are truly the king of shiny. i bought myself a dremel the other day, and those felt disc things you linked us to on ebay - do you put the object in a vice, or the dremel in a vice, or keep the object on a table, or what?
 
do you put the object in a vice, or the dremel in a vice, or keep the object on a table, or what?

All the bits for the outhole kicker I held the part in one hand and the Dremel in the other. I wear light cotton gloves, the really really cheap ones from eBay, to keep my hands clean(ish). Also helps as smaller parts tend to get a bit hot! For very small parts, such as the rivets, screws and C-clips, I hold those in a small pair of flat pliers. Springs I slide onto something round that's just slightly smaller, like a drill bit or screwdriver.

Only if I'm doing a larger part do I use the full size bench polisher, mine being a drill clamped in a bench vice with polishing kit. For the kicker the only part I might have done with this would have the main chassis, but the inside was quite fiddly and the bench polisher wasn't set up so did the whole thing with the Dremel.

And I almost exclusively use only white compound. This is for final finish buffing but I've found its just as good as cutting through grot, tarnish, corrosion and even light rust as the green or black, but it leaves a shiny finish almost immediately. Only on the worst rust or scratches do I now use gren or black because they leave a dull finish that then needs polishing. This is why I bought such a huge block of white compound last week!

Most important thing though. Even though you're using a little tiddly "hobby" tool make sure you WEAR EYE PROTECTION!!! Those little felt wheels spin off bits of compound and **** everywhere. My glasses end up covered! But I've also had little screws whipped out my fingers and flung across the room. I don't want anyone ending up in A&E with a C-clip in their eye.
 
Ooh! One thing I didn't mentioned is that immediately after each part is polished I clean it with Vienna Lime to remove the compound wax and then give it a quick wipe over with AUTOSOL as this inhibits tarnishing/corrosion.
 
April 2015
OUTHOLE GATE COIL ASSEMBLY REBUILD


Here's what I started with, a Bally A371-00014-000 OUTHOLE GATE COIL ASSEMBLY. This little gizmo opens and closes a small sprung-load flap in the drain hole to capture the special gold in my err... GOLD BALL!

farm8.staticflickr.com_7301_16374257787_467b0bc9fd_c.jpg

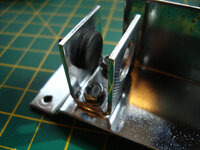
Stripped to bits there's some nasty patches of rust all over, particularly on the fold in the main chassis:

farm9.staticflickr.com_8729_16820957418_8e33c6781f_c.jpg

Sleeve, plunger, spring washer and 3 of the 4 brackets done. You can see the rust on the main chassis clearly in this photo:

farm8.staticflickr.com_7586_16820957208_458dcb46d1_c.jpg

All done:

farm8.staticflickr.com_7616_17008699255_62bafa7436_c.jpg

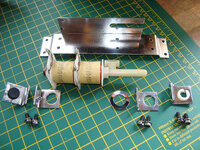
Laid out on assembly order with both coils on the extra long sleeve and plunger inserted:

farm8.staticflickr.com_7632_16820956588_bdef79af5f_c.jpg

Rubber end stop and coil bracket mounted with 2 machine screws:

farm9.staticflickr.com_8750_16821196560_a1e9762180_c.jpg

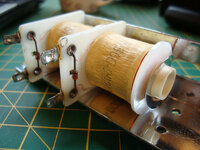
Next fitted the coils and remember to pop on the spring washer:

farm8.staticflickr.com_7633_16821196350_2b475d6971_c.jpg

Hold the coils in place with another bracker squeezing the washer tightly as the screws are tightened down:

farm9.staticflickr.com_8685_16982725056_0ca200c884_c.jpg

Insert plunger with plastic armature located in slot:

farm8.staticflickr.com_7652_16820955648_7a67ab56bb_c.jpg

And fit final support bracket with Nyliner:

farm9.staticflickr.com_8724_16822492269_288c991f73_c.jpg

So, after a few hours getting jiggy with the Dremel, Autosol and Novus we have this:

farm8.staticflickr.com_7597_16821195460_5151e6f0e6_c.jpg

farm8.staticflickr.com_7648_16386295174_e32f483f26_c.jpg

I even made a little improvement by adding UNC A2 8-32 NYLOC nuts to the bracket screws so that they don't work loose. Ever.

farm9.staticflickr.com_8696_16822508429_64a80cbda0_c.jpg

And here it is in its place on the playfield. The super shiny plunger and polished inside of the coil sleeve means is glides back and forth easily:

farm8.staticflickr.com_7616_16982723716_5f20a96525_c.jpg

LOVELY JUBBLY :p
 
Nice work as always Peter.

You should be on commission with Dremel because as a result of this i've gone out and bought one. I've already got a fair few fitments from the cabinet i'm restoring and as the weather has been terrible lately I figured I might as well get the polishing on the go and clean up what bits have been stripped.

Any chance of a link again to the bits and pieces you use along with your Dremel when polishing up?

Keep up the awesome work :)
 
I bought my Dremel based on Peters work too but I haven't quite got the nack of it yet other than spraying compound around the garage.

@Nedreud aren't you using your nice little coil labels anymore? I liked that touch.

Also, have you tested that new sound card yet?
 
Thanks, guys. I think @cooldan went for a Dremel too recently!

I use 1" felt buffing wheels. Widely available on eBay. You can get about two dozen for £12 delivered including a couple of mandrels. But if you can wait get them from China direct (also via eBay) as you only pay about £6 for 100! http://www.ebay.co.uk/itm/161430544305 As for compound I pretty much only use white. I get mine from http://www.metalpolishingsupplies.co.uk/steel-stainless-steel/ but they also trade on eBay too. I ordered a 750g bar a couple of weeks ago but when I popped it on the scales it was nearer 1kg as it weighed 920g! Don't forget some Vienna Lime too which quickly cleans off the grease after polishing.

@astyy I did think about the coil labels but decided to just get on with it. This is supposed to be a reasonably quick fix, not a full on mega-restoration like PARAGON. Sometimes I get carried away and end up making everything very shiny because if a jobs worth doing it's worth doing right... yada, yada, etc., etc. ;) If I like GOLD BALL (and I think I'm really going to) then I'm going to do a full restore, but I want the playfield done and electronics/electrics all working so I can play it for a while first! I will then finish PARAGON and come back to GOLD BALL.

Haven't tested the sound card. Trying to stay focussed and finish the playfield! I've also got to go back to SWL and pick up my MPU as it's currently in SPACE HAWKS. Might go tomorrow night...
 
Thanks Peter. :)

What's the deal with vienna lime? Do you just apply it to a felt buffing wheel and apply it that way or is there some other way to use it?

The dremel will hopefully get plenty of use soon. I've just taken delivery of a industrial quantity of ziploc bags in readiness for commencing the playfield tear down. So i'm going to have more than a few bits to polish up over the next few months.
 
What's the deal with vienna lime? Do you just apply it to a felt buffing wheel and apply it that way or is there some other way to use it?
The Vienna Lime is a fine white powder. Comes in a little baggy so it looks like you got a coke habit when you use it! The polishing kits from that company come with a micro fibre cloth. Just dab the cloth in the powder and rub the piece clean. Don't need much. The polishing compounds are waxy so tend to leave grease behind, but the lime will clean that all off. Remove finger prints too leaving the metal really clean. I then do a final polish with a cotton rag using AUTOSOL as that gives a great final shine but more importantly leaves a coating on the metal to keep it shiny longer.

Good idea on the baggies for parts. I did exactly the same thing for PARAGON. Break it down into sections like all the parts for a slightshot or pop bumper. I didn't do this for GOLD BALL as I took what I thought were good reference photos but it still took me ages to sort out the 6 different types of screw post used to hold the star posts in place!
 
Good idea on the baggies for parts. I did exactly the same thing for PARAGON. Break it down into sections like all the parts for a slightshot or pop bumper. I didn't do this for GOLD BALL as I took what I thought were good reference photos but it still took me ages to sort out the 6 different types of screw post used to hold the star posts in place!
I've already stripped it down once and getting it back together even with photos was a lot of fun.

This time around i'll be taking photos and also documenting the teardown on the laptop whilst I bag the parts up. Hopefully it'll make life much easier when it goes back together. Seeing as it's going to be a full strip down then it could be a while before I need to put it all back. The more info I have the better I think.
 
Ooh! Thanks @Moonraker! Maybe next Friday then... :)

@Wiredworm you can never take too many photos. I thought I took enough of GOLD BALL (currently 722 photos on Flickr: https://www.flickr.com/photos/peterduerden/sets/72157645868034086/) but when I look back I keep finding that they don't contain enough information. Like exactly which screws goes in this post? Threaded or wood screw? Philips head or nut? If you've got a digital camera take LOADS of photos. Hundreds, of every single post, nut, screw, wire, guide, ramp, lamp, spring, bracket and rubber. And then take some more. And then upload them all onto Flickr so we can look at them ;)
 
I've got a Dremel 300 which is good for 10,000 - 33,000 with settings OFF-2-4-6-8-10. With a fresh felt wheel I'll start on 6 and as it gets smaller increase to 8 and then 10. I've found that if you start on 10 with a new wheel and then press too hard the screw-thread mandrel rips through the felt - the wheel is no longer fixed and just spins on the end. As the wheels wear down they tend to get a bit cone shaped which can then be handy for getting right into tight edges if you flip it over. I find it's best to keep putting just a little compound on the wheel often. This means a lot of back and forth between item and compound but this is just like using bigger cloth mops on a bench polisher. If you put too much compound (which is mostly wax) onto the mop it'll just over heat leaving a lot of sticky black mess. Over heating the felt wheels is double bad because when they start to burn it smells terrible! After a while you get the hang of what works best. Moving the wheel against the direction of rotation cuts through the dirt but moving with the direction of rotation leaves the best shine. But whatever you do it makes a cacking mess everywhere. I have to hoover my summerhouse after each polishing session and can't wait till it's warm enough to sit outside and do it!
 
April 2015
PLAYFIELD REBUILD TIMELAPSE

Thought I'd have a little fun and do a timelapse film as I refitted all the playfield posts, etc. I'd removed everything to do three things:
  1. Make all the holes for star posts slightly larger as there was slight horizontal tension when they were fitted.
  2. Give the Lexan one final clean one both sides, ensuring no dust or dirt trapped between it and the playfield.
  3. Warm the Lexan using a fan heater on low setting. This is to make sure that it won't pucker if fitted cold and then warms up during play.

More to come later...
 
Thanks @JT.!!! Love the vinyl! And that they centred it up without the large hole adapter!

I've only got the free version of the timelapse app. It's pretty good. Might go Pro for £1.99. One of the features is adding audio along with 1080p, etc.
 
Awesome video. And the vinyl is a dead giveaway as to which of us on here are, ahem, in the older age bracket.

I still remember listening to vinyl and using one of those adapters when the record had an oversized hole. I also still recall marvelling at the first time I heard audio from a CD and downloading my first MP3. My how times have changed..... :)
 
I still have a turntable for playing all my acid-trance classics from the 90s that were only ever released on white label vinyl!
 
April 2015
RE-POPULATING THE PLAYFIELD PT.6

Just a quickie ;) Spent even more time polishing fiddly little bits you'll hardly ever see! After pulling off the old, crumbly black foam I cleaned up the playfield hangers (not sure what the proper name is for these hooks, but there's a pair of them at the bottom of the playfield that hook into the lockdown bar assembly) and gave them a ruddy good buffing with the new 1" felt wheels from China. They were really grotty; covered in rust and gunge. Once they were clean I fitted some 5mm self-adhesive neoprene foam rubber:

IMG_2804.JPG

And then popped them back on the playfield. Only problem is now that they're super-shiny they make the lockdown bar assembly look super-sh*t :eek::

IMG_2806.JPG

After the timelapse video above I also:
  • Fitted the last 4 star posts on the left-hand side. Stangely I had 3 tall and 1 short post left over, but needed 4 tall. Looking back at all the reference photos everything is in the right place and I just can't work out what got mixed up? Luckily I have a big bag of spares.
  • The spray-painted black wooden side-rails fitted.
  • Pop-bumper caps fitted.
  • Shooter rod cover fitted with polished dome-head screws.
  • Polished and re-fitted top arch rod.
  • Fitted left out-lane wall including 4 small nails into wooden side-rail.
IMG_2811.JPG

Only thing other than rubber and plastics left to fit on the topside are the wires guides, but I'll be leaving all those until all the bits on the underside are done: switches, slingshot, stand-up targets and rollovers.

Nearly done... :)
 
I forgot to mentioned that I just couldn't resist popping in a brand new polished pinball and firing it up the shooter lane! :p OMG! How what a difference the Lexan polycarbonate makes! So quiet, smooth and fast. I'm happy to report that the slot I cut for the shooter lane seems to work flawlessly and the ball transitions from the wooden groove onto the Lexan perfectly. I wish I could have heated moulded it into the groove but didn't want to risk all the cutting work I'd completed. Next time I'll do the heat moulding first! Touch wood - the Lexan is still perfectly flat and tight between all the fixings that it clamping it down. Remember, unlike the loose fitting commercial protectors that only partially cover the playfield mine is a complete sheet that overlays the entire playfield. Holes are cut to match those in the playfield and all the hardware is bolted on top to hold it down. It's like a giant sheet of clear coat on a roll!
 
April 2015
RE-POPULATING THE PLAYFIELD PT.7

A little bit out of order here but I wanted to post a pic of how I warmed up the Lexan with a fan heater before finally fixing it in place by bolting all the hardware back down:

farm8.staticflickr.com_7586_16957144170_8372573ee5_c.jpg

farm9.staticflickr.com_8759_16957144940_fb5d3988fa_c.jpg

Just before I started the timelapse filming:

farm8.staticflickr.com_7702_16956910418_1a26d6aede_c.jpg

I left it upside-down like that for a good half hour with the fan running constantly on a low heat. It got rather hot in my summerhouse! The Lexan was held loosely in place with 4 white plastic posts (they all happened to be in the corners) and left to droop as it warmed through. The playfield was then flipped back over and I started fitting star posts as quickly as possible around the edges pulling the lexan tight as I went. This trick seems to have worked as it's stayed in place for about a week. Also, you can just see around the edges that it's still ever so slightly larger than when I originally cut the edges with the Dremel router. Less than 1mm but still larger none-the-less.

Next on the to-do list was the SLINGSHOT KICKER. This was really grotty. I thought the coil had burnt out as it was dark brown, but after taking apart I quickly realised that the the whole mech must have been oiled and/or WD40'd at some point in the past. The plunger was sticky and the brown wrapper was just slowly baked oil and dirt. Polished everything with the Dremel and used Novus on the plastic parts. I need to get some new Nylon "buttons" for the linear armatures and I've started a separate thread as I'm going to have a bash at making my own!

farm9.staticflickr.com_8820_16937281337_a1cbd3bc1d_c.jpg

However, the new AE-2600-1200 coil I got from @pinballmania is about 2.5-3.0mm too long and once I'd managed to squeeze it in between the brackets (the sprung washer was squashed flat) it must have become slightly distorted because the plunger kept sticking. I removed the coil and the plunger moved freely again (I'd fitted a new sleeve too). So I tested the old coil and it seemed good, so I pulled off the grotty paper and wrapped it in some fresh masking tape:

farm8.staticflickr.com_7725_17143098062_ce7c38ca33_c.jpg

Much better! Plunger sliding back and forth effortlessly! That picture also shows the next thing got done: the pair of slingshot switches. I pulled the switch stacks apart (one at a time so I could reference the other when rebuilding) and polished the blades and spring arm with the Dremel, paying particular attention to the contacts:

farm8.staticflickr.com_7702_16524516773_78db76fdec_c.jpg

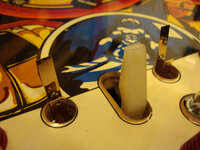
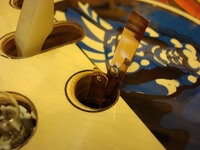
And here they are top-side, the bit you can see nice and shiny:

farm8.staticflickr.com_7723_16524516033_9b2a5a00d2_c.jpg

And in this close-up you can make out the thin layer of Lexan polycarbonate where the hole is cut for the switch. It's pretty much unnoticeable all the visible edges match the playfield holes exactly and because it's a complete sheet covering the entire playfield there's no cut-outs around bits like the slingshots or lane guides. For me, the only giveaway is the two star rollovers but their location at the top and mid level means you have to look closely to notice:

farm9.staticflickr.com_8696_17144042281_b3c67fcc8e_c.jpg
 
Last edited:
May 2015
FIRST PLAY!!!


I've got loads of updates to post on here about all sorts of stuff that got restored or repaired, but I couldn't resist posting a video of one of my first plays after completing the playfield restoration! There's still loads to do: two lamps out on the playfield, warped plastics need flattening, kicker plunger is stucky and not firing, replace the gold button plastic (mine's snapped in half - temporarily reinforced with some 3mm Lexan), the entire backbox GI is dead (suspect it's one of unobtanium high-current TRIACs used to flash the GI), slightly flickery #1 display (improved after reseating connector) and worst of all no sound! I've got a spare sound module, condition unknown, ten spare of each chip and a fresh U4 EEPROM from @myPinballs, so I should be able to get something going, otherwise I may be the first customer for Jim's latest project!


First impressions are.... Woah! Fast!

I was right about the Lexan playfield protector. It's quiet, smooth and fast. No more slow balls changing direction due to cupped inserts. And the rebuilt pop bumpers are like lightning! The flippers are also very good - my home-made Nylon "buttons" for the linear plungers seem to be working great and the new sleeves, new Nyliners, new EOS switches, Nyloc nuts, machine bolts, and polished plungers have all combined to make them probably about a good as they're ever going to be.
 
Great work - and I'm interested to know if the sound card works!

the entire backbox GI is dead
This happened on mine (you helped me t/shoot) and I had to replace the MOC3011 on the GI Flasher PCB.

Thinking back, it's easy to check if this is the case by swapping over the GI flasher PCBs and seeing if the problem moves with the PCB to the playfield GI.
 
Last edited:
Great work - and I'm interested to know if the sound card works!

This happened on mine (you helped me t/shoot) and I had to replace the MOC3011 on the GI Flasher PCB.

Thinking back, it's easy to check if this is the case by swapping over the GI flasher PCBs and seeing if the problem moves with the PCB to the playfield GI.

Good point, @astyy. I will swap the flasher PCBs but the reason I'm suspecting the TRIAC first is because a) there was a wiring hack on the playfield GI so that it was on permanently (the hack is to simply bypass the TRIAC and connect the GI permanently to ground to complete the circuit) and b) I think I re-connected the TRIACs the other way around. The backbox GI is now dead whereas it was working originally. I hope though it is a dead MOC3011 as that will be a lot easier to fix. The TRIACs are almost unobtanium and although I've found several discussions around suitable alternatives I haven't found anyone citing a tested equivalent.

The good news though is that I managed to fix the extra sound module! I bought it condition unknown as it came in a job lot and the seller didn't have a way of testing it. It didn't work when I dropped it in but I did notice a faint "pop" through the amp each time I thought a sound should be triggered, e.g., on a rollover or bumper switch press. I'd already got a stack of replacement chips so popped in a new sound generator (AY-3-8910), CPU (MC6802) and PIA (MC6821), and ditched the MC6810 RAM as this is built-in to the MC6802 (there is jumper option A or B on these boards to switch between 6808 and 6802 processors). I also swapped the U4 chips, which turned out to also be Bally Part No. E-781-05, the sound ROM from a FUTURE SPA. Popped it back in and went straight to self-test #3 for the sound tests. I assumed it still wasn't working as nothing happened but decided to play a couple of games. Imagine my surprise when the ball hit a switch and I got some sounds! The wrong sounds, of course, but sounds none-the-less!

I seem to recall that some sound ROMs don't have the ability to self-test, but I can't find that info now so maybe I was just dreaming it?

And in another small triumph I realised I'd got the red and orange wires back to front on the double solenoid that opens and closes the gold ball outhole door:

c1.staticflickr.com_9_8588_15698989764_0e543e73a5_c.jpg

A-ha! I found that info on the sound ROM self-tests: http://www.twobits.com/ballysoundu4s.html

Bally 2518-51 Sound board U4 ROMs

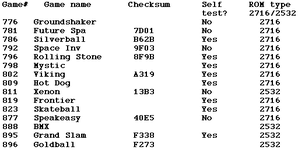
This series of games uses the 2518-51 series sound board which, while better than the early board which only made tones, is a far cry from the 'Squalk & Talk' board introduced later. The 2518-51 board can be identified by the single SOUND ROM which is labeled U4. This board has a single pushbutton which causes the board to 'self-test' and play either a tone or a series of sounds. Pushing the test button with some SOUND ROMs will make the board beep only once. Other ROMs will repeat the test sound. Still others do not respond to the test button. This does not mean the board won't work when the MPU sends signal to them during normal game play.


BallyU4s.gif
 
In my experience, other than in test, the GI only flashes to announce the Gold Ball being ejected so not a biggy if permanently on (but is pretty cool in a dark room). BUT I know you will fix it because you are the @Nedreud and its what you do.

On the sound front, I'm pretty sure mine sounds a tone using the test button on door, and nothing from the test button on the Sound PCB itself.

I need to get back to Gold Ball soon think I spotted a feature lamp SCR out on last play session. Also have some nice yellow super bands to fit - not sure where I got that idea ;)
 
I've just been having a stonking paddy for the last 45 minutes swearing like a trooper trying to find those custom EEPROMs I had made by @myPinballs. Finally found them indoors up on the shelf... I wonder how they got there? :rolleyes:

Thanks for the sound module test info @astyy. You'll note in that table above that there's no value for the Self Test? column.

If I ever get the kids in bed tonight I'll do the mod on the sound module so it can use the new 2732 EEPROM.
 
Back
Top Bottom