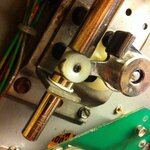
Now don't all just tell me the "new style" Bally LINEAR flippers are sh*t and that I should replace them with the "old style" ones because a) I don't have £50 for a pair of replacements and b) I haven't got anything against the linear design because they seem to play just fine to me in my VECTOR.
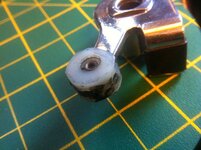
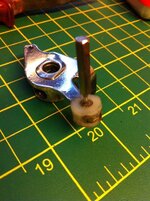
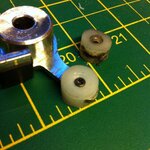
However... I think that the nylon "buttons" in my GOLD BALL flippers need replacing as they're very worn and flat on both sides:

I'm aware that Pin-Logic.com have what they call "Bally Black Buttons" that are replacements for these, but at $4 each I think that's a bit pricey and you know what it's like ordering anything from the US. Also, it says they're made out of Nylon 6 which is the type of nylon used for textiles, furnishings, etc., whereas mechanical parts are generally made out of the tougher Nylon 6,6 formulation.
![BBB_button_Installed_l[1].jpg BBB_button_Installed_l[1].jpg](https://www.pinballinfo.com/community/data/attachments/15/15585-820950bba464841aae49635e98b9eb39.jpg)
I'm also up for a bit of DIY
Measuring the somewhat knackered parts I'm left with (using my digital Vernier callipers) I'm assuming that in inches the original specification was 15/32-inch diameter by 9/32-inch thick. That is approximately 11.9mm by 7.1mm.
So, with that in mind I've order some 12mm diameter Nylon 6,6 rod. It's "natural" which is that sort of off-white colour of nylon plastic so a direct match for the originals. It's also 500mm long so allowing for a 1mm wastage for each cut I should be able to make just over 60 - enough to last several lifetimes. And it only cost £2.42 including postage ordered direct from https://www.trentplastics.co.uk/.
I'll update this thread with the results of my manufacturing skills and experiments...
However... I think that the nylon "buttons" in my GOLD BALL flippers need replacing as they're very worn and flat on both sides:

I'm aware that Pin-Logic.com have what they call "Bally Black Buttons" that are replacements for these, but at $4 each I think that's a bit pricey and you know what it's like ordering anything from the US. Also, it says they're made out of Nylon 6 which is the type of nylon used for textiles, furnishings, etc., whereas mechanical parts are generally made out of the tougher Nylon 6,6 formulation.
![BBB_button_Installed_l[1].jpg BBB_button_Installed_l[1].jpg](https://www.pinballinfo.com/community/data/attachments/15/15585-820950bba464841aae49635e98b9eb39.jpg)
I'm also up for a bit of DIY
Measuring the somewhat knackered parts I'm left with (using my digital Vernier callipers) I'm assuming that in inches the original specification was 15/32-inch diameter by 9/32-inch thick. That is approximately 11.9mm by 7.1mm.
So, with that in mind I've order some 12mm diameter Nylon 6,6 rod. It's "natural" which is that sort of off-white colour of nylon plastic so a direct match for the originals. It's also 500mm long so allowing for a 1mm wastage for each cut I should be able to make just over 60 - enough to last several lifetimes. And it only cost £2.42 including postage ordered direct from https://www.trentplastics.co.uk/.
I'll update this thread with the results of my manufacturing skills and experiments...


