Pinball info
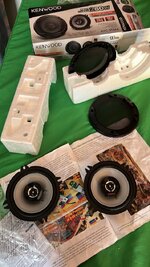
You are using an out of date browser. It may not display this or other websites correctly.
You should upgrade or use an alternative browser.
You should upgrade or use an alternative browser.
Today I worked on......
- Thread starter kevlar
- Start date


Wow looking greatThanks @astyy

Just realised, phone 2nd up on left has my Deliveroo App left on it - can you order my normal Chicken Buhna for 8pm delivery please

Great, that saves me cooking will have it delivered here. Oh wait a minute we can only dream of getting Deliveroo hereWow looking great
Just realised, phone 2nd up on left has my Deliveroo App left on it - can you order my normal Chicken Buhna for 8pm delivery please

One turned on while I was fitting it, went into pics and nothing


Attachments

paulg100
Site Supporter
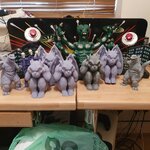
Busy working on Elvira but at some point ill actually get a mod/topper finished! breeding gargoyles at the minute but the "office" is starting to look like a toy shop ")
Design, print, iterate...
Not sure stern topper prices are justified but its not quite as easy as it seems.
Design, print, iterate...
Not sure stern topper prices are justified but its not quite as easy as it seems.
Attachments
Elvira topper being re-run… again.
paulg100
Site Supporter
yeah but learning loads and enjoying the maker thing on the way
topper prices just got silly. especially Godzilla.
topper prices just got silly. especially Godzilla.
Williams STTNG shield inserts repair.......
This was a right pain in the artichoke! The glue was, well very sticky.......
Overall though, very pleased with the end results.....
BEFORE:

DURING, INCLUDING ART TOUCH INS.....


AFTER:

ILLUMINATED WITH SPOTLIGHT LED’S (not sure on this effect.....yet(?) !.....

This was a right pain in the artichoke! The glue was, well very sticky.......
Overall though, very pleased with the end results.....
BEFORE:
DURING, INCLUDING ART TOUCH INS.....
AFTER:
ILLUMINATED WITH SPOTLIGHT LED’S (not sure on this effect.....yet(?) !.....
Controlled lights was only getting about 2.6 volts and dim, put a 35a bridge rectifier topside in BR1 and all good. Was waiting for a bang as couldn’t unplug from game due to wires soldered on pins, got all the bits for that. One day maybe. Bit nippy in my room

 taken me 4hrs, but finally


@Dave Bishop where did you hear this from ?Elvira topper being re-run… again.
paulg100
Site Supporter
US distros are taking pre-orders for i think an august run@Dave Bishop where did you hear this from ?
Had a busy Saturday re-finishing a load of metal parts. Firstly I tried out my new tool on some ball guides for someone and re-grained them back to a factory finish.


I also polished up a few bits for a T2 as well.


I also polished up a few bits for a T2 as well.
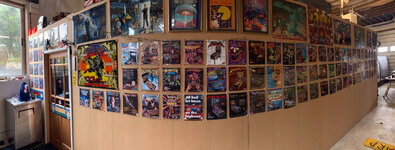
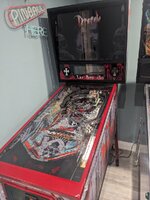
I made these two illuminated and scoring backglass projects over two years ago. Finally got around to putting them up in the pin room


nice work, is that from using a polishing wheel?Had a busy Saturday re-finishing a load of metal parts. Firstly I tried out my new tool on some ball guides for someone and re-grained them back to a factory finish.
View attachment 224011
View attachment 224002View attachment 224003View attachment 224006View attachment 224007View attachment 224008View attachment 224009View attachment 224012
I also polished up a few bits for a T2 as well.
View attachment 224016View attachment 224017View attachment 224018View attachment 224019View attachment 224020
View attachment 224004View attachment 224005
View attachment 224024
The get the mirror finish, I use my bench polisher with different grades of polishing wheels for the final few stages. But before I start on that, I use a large drum sander with various grades at the the start.nice work, is that from using a polishing wheel?
I also used that to re-grain the other ball guides, followed by a light wax to finish them off.
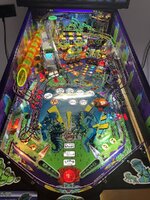
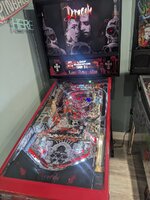
So basically after nearly 1 year I finally got around to testing my theory with my custom BSD. Since I've had it the game has always had its quirks.
The coffin ramp would sometimes on startup release. The village VUK would have some serious back spin on it, causing the ball to sometimes roll up and into the outline. The rat VUK would fire out so hard you couldn't just cradle catch the ball.
The main issue though was always the shooter lane skill shot at the start.
A lot of trouble shooting involving a new shooter lane ramp, post adjustments and adding washers etc, adjusting the solenoid position, changing sleeves etc and it still never made the skill shot reliably.
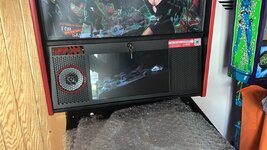
Well today I put in an original WPC power driver board to replace the rottendog board. I always suspected it was the issue. Now I have proof.
All the above issues are gone!
It's been quite a journey getting this dialled in.
I also finally installed the powder coated hinges.
The coffin ramp would sometimes on startup release. The village VUK would have some serious back spin on it, causing the ball to sometimes roll up and into the outline. The rat VUK would fire out so hard you couldn't just cradle catch the ball.
The main issue though was always the shooter lane skill shot at the start.
A lot of trouble shooting involving a new shooter lane ramp, post adjustments and adding washers etc, adjusting the solenoid position, changing sleeves etc and it still never made the skill shot reliably.
Well today I put in an original WPC power driver board to replace the rottendog board. I always suspected it was the issue. Now I have proof.
All the above issues are gone!
It's been quite a journey getting this dialled in.
I also finally installed the powder coated hinges.
Attachments
Erm did I not say a while back the reason WPC boards still command the money was due to this very thingSo basically after nearly 1 year I finally got around to testing my theory with my custom BSD. Since I've had it the game has always had its quirks.
The coffin ramp would sometimes on startup release. The village VUK would have some serious back spin on it, causing the ball to sometimes roll up and into the outline. The rat VUK would fire out so hard you couldn't just cradle catch the ball.
The main issue though was always the shooter lane skill shot at the start.
A lot of trouble shooting involving a new shooter lane ramp, post adjustments and adding washers etc, adjusting the solenoid position, changing sleeves etc and it still never made the skill shot reliably.
Well today I put in an original WPC power driver board to replace the rottendog board. I always suspected it was the issue. Now I have proof.
All the above issues are gone!
It's been quite a journey getting this dialled in.
I also finally installed the powder coated hinges.

Just goes to show, Rottondog boards are utter crap.
Just ask Phil at Pinball Heaven what he thinks of Rottondog boards.
Just ask Phil at Pinball Heaven what he thinks of Rottondog boards.
A bit of a play here .just thinking how the top of the cow lamp not to tip over on top of a machine , so I used a coat hanger and bent it a bit . It will probably do the job, but not really happy with the result 

Okay now I have a way of fixing it to the head so it shouldn’t fall off the head !

 just now need a clear cylinder to go over it to keep the dust off
Okay now I have a way of fixing it to the head so it shouldn’t fall off the head !
just now need a clear cylinder to go over it to keep the dust off
Last edited:
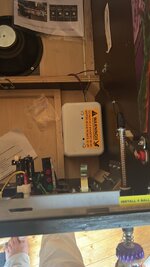
Thanks @stumblor, Afterglow board came yesterday morning and just fitted.
Nice and smooth now
View attachment trim.7EBDEC4E-B7CC-4D34-B3E7-6F83E1F2906E.MOV
Nice and smooth now
View attachment trim.7EBDEC4E-B7CC-4D34-B3E7-6F83E1F2906E.MOV
Thanks @stumblor, Afterglow board came yesterday morning and just fitted.
Nice and smooth now
View attachment 226311
Genuinely never get tired of seeing Afterglowed games. Super satisfying.
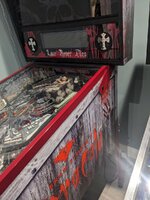
Finished this yesterday. Another forum member sent me this ramp from their WWF Royal Rumble as they seem to be unobtainable and unfortunately this one had been “fixed” in the past, so he asked if I could take a look at it 


First thing I did was to give a hot bath in the ultra sonic to remove the paint so I could actually see what needed doing.


I basically had to grind down the butchered welds and re-weld it. I also added a few more tack welds so it should never break again.


Overall I’m pleased with how it came out as I wasn’t actually sure it could saved due to when it was originally “fixed” the welds were so hot, they burnet straight through the ramp.


First thing I did was to give a hot bath in the ultra sonic to remove the paint so I could actually see what needed doing.
I basically had to grind down the butchered welds and re-weld it. I also added a few more tack welds so it should never break again.
Overall I’m pleased with how it came out as I wasn’t actually sure it could saved due to when it was originally “fixed” the welds were so hot, they burnet straight through the ramp.
I know a ramp on my T.Z needs your touch when I start work on it in a few weeks time.Finished this yesterday. Another forum member sent me this ramp from their WWF Royal Rumble as they seem to be unobtainable and unfortunately this one had been “fixed” in the past, so he asked if I could take a look at it
View attachment 226350View attachment 226351
First thing I did was to give a hot bath in the ultra sonic to remove the paint so I could actually see what needed doing.
View attachment 226353View attachment 226354
I basically had to grind down the butchered welds and re-weld it. I also added a few more tack welds so it should never break again.
View attachment 226355View attachment 226356
Overall I’m pleased with how it came out as I wasn’t actually sure it could saved due to when it was originally “fixed” the welds were so hot, they burnet straight through the ramp.
View attachment 226358View attachment 226359View attachment 226361View attachment 226362View attachment 226363View attachment 226364View attachment 226365View attachment 226367
View attachment 226366
This is my ramp, and what an absolute peach of a job Ant has done here. Looks brand new if you ask me. I only sent it with speculation as to whether anything can be done with it.Finished this yesterday. Another forum member sent me this ramp from their WWF Royal Rumble as they seem to be unobtainable and unfortunately this one had been “fixed” in the past, so he asked if I could take a look at it
View attachment 226350View attachment 226351
First thing I did was to give a hot bath in the ultra sonic to remove the paint so I could actually see what needed doing.
View attachment 226353View attachment 226354
I basically had to grind down the butchered welds and re-weld it. I also added a few more tack welds so it should never break again.
View attachment 226355View attachment 226356
Overall I’m pleased with how it came out as I wasn’t actually sure it could saved due to when it was originally “fixed” the welds were so hot, they burnet straight through the ramp.
View attachment 226358View attachment 226359View attachment 226361View attachment 226362View attachment 226363View attachment 226364View attachment 226365View attachment 226367
View attachment 226366
I'm convinced this man is a magician!
Thanks again Ant!
Looking forward to helping you with your TZ mateI know a ramp on my T.Z needs your touch when I start work on it in a few weeks time.

Cheers mate.Looking forward to helping you with your TZ mate