Pinball info
You are using an out of date browser. It may not display this or other websites correctly.
You should upgrade or use an alternative browser.
You should upgrade or use an alternative browser.
Today I worked on......
- Thread starter kevlar
- Start date
OP
OP
I've been spending the odd hour or 2 here and there on the xenon playfield swap over last 2 weeks as I'm back in work. Underside probably at about 90% now after a few hours today. Hit a snag re-using the pop bumper nail/screws, so easy to shear them when tightening. Managed to shear 6 out of 12, could probably shear them all if I tightened them as much as I'd like to. Luckily have a local source for a lot of spares in @PinballDaze who has some.


Color DMD went into SM tonight!!

Color DMD went into SM tonight!!
View attachment 64868
Oh man that looks gorgeous... looks like they've done such a good job on the artwork for that.
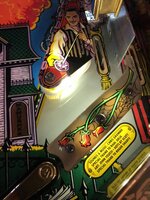
For me today, I had an issue with the NF single drop target getting stuck mid way down. I was thinking of putting an order in for the sticker as it looked ghastly, but knew there would be a wait on it arriving so thought... no, I cannot continue like this. So out it came.

This plate needed adjusting as it was sticking on the drop target itself and holding up, this was also catching on a bit of the damaged sticker, so I covered that and again adjusted it through again.
I then gave the sticker and the drop target a good clean and I think the whole thing came up quite well.

Popped it back in, quick test and all OK, looks good too and seems to be working well (reminded me of @DRD saying how bulletproof these games are and generally easy to fix, compared to getting anything done on LB, that's ringing very true). I think the next thing I will do is take the light boards out and give under the inserts a clean too. This machine has had a lot of cosmetic work done by me since I have had it, but it still needs more cleaning.

D
Deleted member 2463
Worked on this ******* thing...
But now it’s up I’ve regained the love for it!

Sent from my iPhone using Tapatalk Pro
But now it’s up I’ve regained the love for it!
Sent from my iPhone using Tapatalk Pro
OP
OP
T
That looks awesome Neil.Worked on this ******* thing...
But now it’s up I’ve regained the love for it!
Sent from my iPhone using Tapatalk Pro

So another thing that has been bothering me is the inserts on the game, I know it had been LED'd, but it didn't "pop" to use the American term as it should do... So all of the light boards came off and the cleaner came out. Here is some before and after shots of some of them.


Didn't snap an after of this unfortunately.


There was quite a bit of dirt that came off of it...

I then waxed the playfield again, if I ever say I am going to do that again, someone slap me, the game becomes almost unplayable with the ball spinning and swirling like a magnet into the outlane. Unreal.
Didn't snap an after of this unfortunately.
There was quite a bit of dirt that came off of it...
I then waxed the playfield again, if I ever say I am going to do that again, someone slap me, the game becomes almost unplayable with the ball spinning and swirling like a magnet into the outlane. Unreal.
Attachments
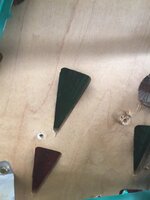
A can of compressed air helps with that too.So another thing that has been bothering me is the inserts on the game, I know it had been LED'd, but it didn't "pop" to use the American term as it should do... So all of the light boards came off and the cleaner came out. Here is some before and after shots of some of them.
View attachment 64903
View attachment 64904
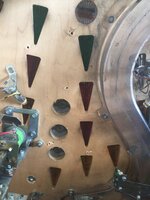
Didn't snap an after of this unfortunately.
View attachment 64911
View attachment 64908
View attachment 64910
There was quite a bit of dirt that came off of it...
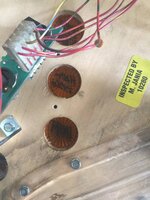
View attachment 64905
I then waxed the playfield again, if I ever say I am going to do that again, someone slap me, the game becomes almost unplayable with the ball spinning and swirling like a magnet into the outlane. Unreal.
A can of compressed air helps with that too.
Where does the dirt go then though?

I breathe it in, smells like nostalgia.Where does the dirt go then though?
This plate needed adjusting as it was sticking on the drop target itself and holding up, this was also catching on a bit of the damaged sticker, so I covered that and again adjusted it through again.
The picture above shows a common problem with the Williams single target 'dropper' mechanism. The dropping finger shouldn't be able to catch on the bracket, as this one looks to be doing. The metal armature plate that the dropping finger is attached to should be held closer to the small dropper coil by a bent-around retaining finger (missing from this unit, as on so many) which also stops the plate from simply falling off if the return spring for the plate (also not visible in the picture) is detached. The broken-off stub of the securing finger can just be seen in the picture below, at the bottom of the dark rectangular opening in the plate
The affected part is listed in the parts diagrams as "Frame & Eyelet" - AIR it's mounted to the horizontal bracket (extending behind the reset coil in the 2nd picture), with the dropper coil held in place by a brass screw and washer. I'm not sure if Williams had a bad batch of these, whether they were just cost-cuttingly cheap, or someone on the production line was ham-fisted installing them, but I saw a few of these broken on Star Trek Next Gen, and have heard of it on Fish Tales
Pictures originally posted by 'Adajam4' (James)
Additional - The dropping finger seems slightly twisted in order to reach the correct aiming point. Would it be better attached to the plate using the lower pair of holes (assuming they're threaded)?
Last edited:

Mmmmm TAFG.
This weekend I thought I'd disassemble the TZ clock again, to apply more lube and some sewing machine oil to the fixed shafts. I also replaced the minute hand that I had accidentally sanded down too much (see earlier in thread) and the pin that was slightly bent. The clock is much quieter now, just makes a low pitched whirring sound. Very pleased with the result.
Also encountered the infamous "Check proximity switch 26" error which reared its ugly head after a few games. Think the trough balls are bumping the metal detector, a little wiggle of the cable resolved it.
Still umming and ahhing about installing the LED and GI OCD boards I bought for the game, they've been sat in the box for months pondering saving them for a TAF if I can ever find one.
This weekend I thought I'd disassemble the TZ clock again, to apply more lube and some sewing machine oil to the fixed shafts. I also replaced the minute hand that I had accidentally sanded down too much (see earlier in thread) and the pin that was slightly bent. The clock is much quieter now, just makes a low pitched whirring sound. Very pleased with the result.
Also encountered the infamous "Check proximity switch 26" error which reared its ugly head after a few games. Think the trough balls are bumping the metal detector, a little wiggle of the cable resolved it.
Still umming and ahhing about installing the LED and GI OCD boards I bought for the game, they've been sat in the box for months
pondering saving them for a TAF if I can ever find one.Still umming and ahhing about installing the LED and GI OCD boards I bought for the game, they've been sat in the box for months
Install them, then remove then again!? Or buy another set. TAF needs them both if you LED it. You could get away with just the LEDOCD board in TZ, if pushed.
They're easily removable.
For me at the moment it's a mixture of not being bothered enough by the digital-ness of LEDs on TZ (I guess if I actually saw a TZ with both boards I might hold a different opinion) and also worrying about ballsing up the wiring somehow.
One man's easy is another man's hard too... you've removed the mini playfield AND the gumball machine recently, which is pretty damn intimidating to me
One man's easy is another man's hard too... you've removed the mini playfield AND the gumball machine recently, which is pretty damn intimidating to me
For me at the moment it's a mixture of not being bothered enough by the digital-ness of LEDs on TZ (I guess if I actually saw a TZ with both boards I might hold a different opinion) and also worrying about ballsing up the wiring somehow.
One man's easy is another man's hard too... you've removed the mini playfield AND the gumball machine recently, which is pretty damn intimidating to me
Led-OCD, looks so much smoother- no on/off strobing.
Your’e not joking. It was quicker to just seal the coin door and fill it with warm, soapy water.That rct is going to need a bath too
Cleaned me at the same time so that’s a bonus.
Last edited:

Most of it. I took the ramps off the other day.@stoptap you've stripped and cleaned that all today?
D
Deleted member 2463
Turd polishing at its finest
")
Sent from my iPhone using Tapatalk Pro
Have you played it ?Turd polishing at its finest
Sent from my iPhone using Tapatalk Pro
Thanks to Neil McRae
Received the LED OCD Board today
Put it in. Haven’t got a clue how to configure it. Does anyone have the settings they use to hand so I can copy that?
Received the LED OCD Board today
Put it in. Haven’t got a clue how to configure it. Does anyone have the settings they use to hand so I can copy that?
D
Deleted member 2463
Have you played it ?
Yup. Terrible game. But I believe Pat Lawlor was involved.
Nowhere near as bad as many think. Like a lot of games.Yup. Terrible game. But I believe Pat Lawlor was involved.