Nothing special here, just another strip & clean, re-rubber, plus a few mod installs. Posting in the hope that the photos might help someone who is trying to piece one back together after forgetting to take some crucial pic... ")
Also since many newbies are joining the hobby and may find this kind of stuff daunting (I certainly did the first time!), I hope that this will show that basic maintenance really isn't that hard. Take lots of pictures, put fasteners back in their holes as you go along, and before you know it you will be taking pins to bits even further than I have here!
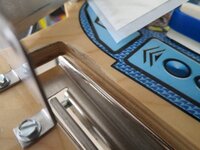
So anyway this is a pretty nice example but it needs a good clean and some of the mechs are a bit tired - in particular the lower right flipper was occasionally sticking up which is a sure sign of a mushrooming plunger. I cleaned up inside its coil/sleeve and that sorted it for a while, but the plunger and stop were definitely worn.
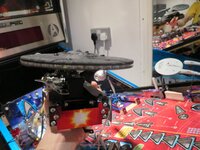
First step: take the ramps out. Also removed the vengeance ship since it blocks part of the pop bumper area.


The vengeance was a pain to remove (and refit), basically there are 4 screws one of which is further down into the playfield wood. All of them are quite hard to reach and a magnetic screwdriver is a must!

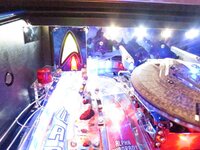
Yo dawg, I heard you like plastics? Not sure why they had to fit so many here!

Took this pic just before I was done - also removed the ball guide plastics but this gives an idea of how far I stripped:

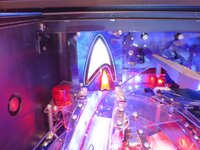
Next step, clean the ramps up. I like to first wipe the crud off with some alcohol, then polish with Novus 2, then some alcohol again. I didn't wax the left (alpha) ramp since it had a tendency to send the ball flying off the wireform at the bend around the VUK already so didn't want it going any faster!

Found a thread on pinside about some DIY mod to diffuse the light in the warp ramp insert - figured I'd give it a try! Not powered it up yet but will report later...


Next gave the playfield lots of wiping with novus 2 .... That's a lot of crap - ick!

Next a re-rubber. The machine was sold as "blue titan rubbers" but evidently that only included the easier to change ones. To be fair, rerubbering the pops requires removing the vengeance ship, which requires removing the left ramp, which requires removing the warp ramp, ... you get the idea.
Before:

After:

(Bonus points if you can spot the incorrect rubber in the before pic!)
Now, everything is scrubbed and cleaned, time to put it back together... This is usually the hardest bit and due to noticing embarrassingly late that I'd forgotten to screw the left pop bumper cap back on... Yeah right it has/will happen to you too!
So the order you want to put thing back in:

Now with the help of my lovely wife (not pictured) I got the playfield out of the cab (leaving everything connected, just needed to unloop it from the cable strap in the bottom of the cab.

This made it muuuuch easier to reconnect everything. The 5 opto boards are rather randomly numbered, so here are some reference pics:


In the meantime I got a delivery from Pinball Mania pinparts.co.uk, yay")

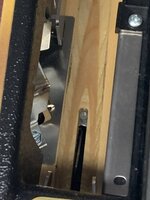
Replaced the flipper plungers and stops, as well as that "stern special" screw which always wears out (although these weren't too bad compared to the ones on my old SM).
Replaced coil sleeves in pops, slings, flippers, trough/autoplunger. The ones I got from pinparts are not like what I've seen before - translucent and not as rigid. Probably a consequence of brexit/covid/putin/inflation or something...

 (sorry didn't take too many pics - it's the same mech as every other stern!)
Can you tell from the picture which coil stop is from the left flipper? Typical SR game lol, right button gets 3x more aggro than the left

Cleaned up inside the cab - a few lost post rubbers found their way to the bin. Otherwise pretty tidy.

Look ma - prehistoric node boards! This game is quite interesting from this perspective - last SAM game and you can see that they were starting to experiment with serial comms.


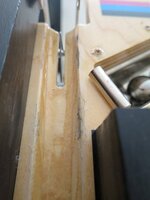
Cleaned up some wear spots around the outhole and shooter lane, the clearcoat is flaking :'(
Put some mylar strips in to halt the damage - someone who knows what they're doing can redo the varnish. (I'm too terrified!)


Anyway that's it for this post, hope it was/will be useful to some. Next post will be the fun stuff - installing naughty mods!
Also since many newbies are joining the hobby and may find this kind of stuff daunting (I certainly did the first time!), I hope that this will show that basic maintenance really isn't that hard. Take lots of pictures, put fasteners back in their holes as you go along, and before you know it you will be taking pins to bits even further than I have here!
So anyway this is a pretty nice example but it needs a good clean and some of the mechs are a bit tired - in particular the lower right flipper was occasionally sticking up which is a sure sign of a mushrooming plunger. I cleaned up inside its coil/sleeve and that sorted it for a while, but the plunger and stop were definitely worn.
First step: take the ramps out. Also removed the vengeance ship since it blocks part of the pop bumper area.
The vengeance was a pain to remove (and refit), basically there are 4 screws one of which is further down into the playfield wood. All of them are quite hard to reach and a magnetic screwdriver is a must!
Yo dawg, I heard you like plastics? Not sure why they had to fit so many here!
Took this pic just before I was done - also removed the ball guide plastics but this gives an idea of how far I stripped:
Next step, clean the ramps up. I like to first wipe the crud off with some alcohol, then polish with Novus 2, then some alcohol again. I didn't wax the left (alpha) ramp since it had a tendency to send the ball flying off the wireform at the bend around the VUK already so didn't want it going any faster!
Found a thread on pinside about some DIY mod to diffuse the light in the warp ramp insert - figured I'd give it a try! Not powered it up yet but will report later...
Next gave the playfield lots of wiping with novus 2 .... That's a lot of crap - ick!
Next a re-rubber. The machine was sold as "blue titan rubbers" but evidently that only included the easier to change ones. To be fair, rerubbering the pops requires removing the vengeance ship, which requires removing the left ramp, which requires removing the warp ramp, ... you get the idea.
Before:
After:
(Bonus points if you can spot the incorrect rubber in the before pic!)
Now, everything is scrubbed and cleaned, time to put it back together... This is usually the hardest bit and due to noticing embarrassingly late that I'd forgotten to screw the left pop bumper cap back on... Yeah right it has/will happen to you too!
So the order you want to put thing back in:
- Thread the left ramp flasher cable through the hole in the back left of the playfield, then fit the plastic back over that (why they offset that hole is beyond me!) Leave the left ramp lying around as out-of-the-way as possible.
- Fit the vengeance back in, screw it.
- Fit the left ramp (no need to screw it yet).
- Thread the left and warp ramp cables through the holes underneath the red explosion plastic which sits beneath them.
- Screw that plastic back on.
- Fit the warp ramp, screw it in as well as the left ramp.
- Notice that you forgot to do something in the left pop bumper area, curse in your favourite language, go play a game of avengers.
- Unscrew everything, fit the damned pop bumper cap back on, repeat steps 1-6.
- Fit the right ramp and both wireforms.
- Result should look roughly like this:
Now with the help of my lovely wife (not pictured) I got the playfield out of the cab (leaving everything connected, just needed to unloop it from the cable strap in the bottom of the cab.
This made it muuuuch easier to reconnect everything. The 5 opto boards are rather randomly numbered, so here are some reference pics:
In the meantime I got a delivery from Pinball Mania pinparts.co.uk, yay
Replaced the flipper plungers and stops, as well as that "stern special" screw which always wears out (although these weren't too bad compared to the ones on my old SM).
Replaced coil sleeves in pops, slings, flippers, trough/autoplunger. The ones I got from pinparts are not like what I've seen before - translucent and not as rigid. Probably a consequence of brexit/covid/putin/inflation or something...
(sorry didn't take too many pics - it's the same mech as every other stern!)Can you tell from the picture which coil stop is from the left flipper? Typical SR game lol, right button gets 3x more aggro than the left
Cleaned up inside the cab - a few lost post rubbers found their way to the bin. Otherwise pretty tidy.
Look ma - prehistoric node boards! This game is quite interesting from this perspective - last SAM game and you can see that they were starting to experiment with serial comms.
Cleaned up some wear spots around the outhole and shooter lane, the clearcoat is flaking :'(
Put some mylar strips in to halt the damage - someone who knows what they're doing can redo the varnish. (I'm too terrified!)
Anyway that's it for this post, hope it was/will be useful to some. Next post will be the fun stuff - installing naughty mods!
Last edited:


 Will try and get something later.