Pinball info
You are using an out of date browser. It may not display this or other websites correctly.
You should upgrade or use an alternative browser.
You should upgrade or use an alternative browser.
In Progress Rocky & Bullwinkle Shop Log
- Thread starter Wiredworm
- Start date
In other news Andy Legend has sent me a price over for the bits I need to put the power connector on the saw motor. I'll be holding off grabbing that just yet as there are still other elements of the Nell Assembly I need to get working and there are other items which are higher up my priority list. I've got the prices though so I know how much I need to put aside for it.
I've also just ordered a couple of playfield supports from Mantis Amusements in the States to replace the ones that are missing from my table. The new ones look like this (they're the ones with 4 holes - the original shown only has two).
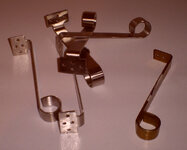
Not sure how long they'll take to arrive. Phil at Pinball Heaven has very kindly allowed me to put them in with his next shipment, thus saving me $20 postage on an item which costs, erm, $20. Nice of him to do that and i'm not in any huge rush as they've been missing since I got the table (and probably well before that).
The holes the original fitted into look to be ok so I don't think the old ones got ripped out, but the new ones have 4 holes anyway so hopefully will be good and sturdy.
I've also just ordered a couple of playfield supports from Mantis Amusements in the States to replace the ones that are missing from my table. The new ones look like this (they're the ones with 4 holes - the original shown only has two).

Not sure how long they'll take to arrive. Phil at Pinball Heaven has very kindly allowed me to put them in with his next shipment, thus saving me $20 postage on an item which costs, erm, $20. Nice of him to do that and i'm not in any huge rush as they've been missing since I got the table (and probably well before that).
The holes the original fitted into look to be ok so I don't think the old ones got ripped out, but the new ones have 4 holes anyway so hopefully will be good and sturdy.
The Lion Plastic is still on is way here. I'll hopefully be ordering my Cliffy Protector tomorrow and I also going to grab a set of mirror finished chrome leg bolts to replace the ones currently fitted.
In other news we had a party last night to celebrate the wife's birthday so I left the pinball fired up on free play. It got a fair bit of use. Is it wrong that seeing it get some use actually put a dirty great big smile on my face? Managed to play a few games myself. High score is still at 235M so still need more practice but I'm slowly learning some of the tricks of the game, and explaining the rule set last night made me realise just how deep the game actually is.
Permission for a gaming room at the next house has been granted. Just got to wait for our foster daughter to get old enough to change schools now.
Is it wrong that seeing it get some use actually put a dirty great big smile on my face? Managed to play a few games myself. High score is still at 235M so still need more practice but I'm slowly learning some of the tricks of the game, and explaining the rule set last night made me realise just how deep the game actually is.
Why would it be wrong to see the machine getting some use? That's really what it's for. And re. the high scores - just persevere with it, you'll get there. Understanding the game is a large part of that.
Cheers Jay.
I was absolutely gutted yesterday. I'd managed to get Bullwinkles Treasure lit which had I managed to collect would have awarded me a cool 100M and would have definately got me on the leaderboard.
Could I nail the ramp to collect?
Nope!!
I tried 3 shots and each time it failed to get to the top of the ramp. Final attempt hit a slingshot and bundled it down the right outlane. Damn!!
Great work on this, I really enjoy these threads where people get stuck in and fix something.
I also enjoy seeing others play and the more machines the more likely you get one left over to play at the end.
I also enjoy seeing others play and the more machines the more likely you get one left over to play at the end.
Still waiting on delivery of a few items.
I put an order in for some of this a couple of days ago: http://www.ebay.co.uk/itm/370624966826?ssPageName=STRK:MEWNX:IT&_trksid=p3984.m1439.l2649
The plan is to cut it to size and fit it below the Lion, Rocky and Rhino plastics because the old padding which was there has all worn away. Hopefully it'll offer a bit of impact protection when they're dropping back down as well.
Felt turned up last night. Woo hoo!!
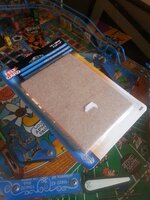
Looking below the plastics you can see what padding was there previously. A meagre three strips of which one has totally worn away and another is almost totally gone. Didn't think that trying to stick the new padding in place with that there would be a brill idea so got to work with some nail polish remover and a brillo pad. I'm guessing Isopropyl would have been a better choice than nail polish remover, but as I didn't have any I made use of what I had.
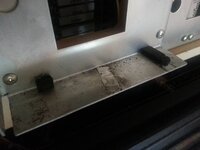
And here it is - all clean!!
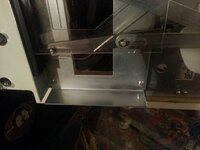
And then it was just a simple case of tracing the profile of the shelf onto the felt, cutting to size and fitting. Voila!!
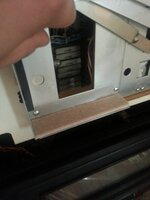
So now we have a nice little landing pad for the plastics. A bit better than just smashing down onto the metal and a little more durable that what was there previously. Thanks to Russ Myers at Pinside for suggesting doing this. Along with the Coil Mod it should hopefully give the plastics a little more longevity.
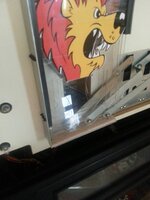
In other news the replacement Lion Plastic was shown as ready for international shipment at New York on 11th July. My guess is that it's probably in the UK already but most likely languishing in Customs & Excise. Hopefully it'll turn up here in the next few days so I can get that fitted.

Looking below the plastics you can see what padding was there previously. A meagre three strips of which one has totally worn away and another is almost totally gone. Didn't think that trying to stick the new padding in place with that there would be a brill idea so got to work with some nail polish remover and a brillo pad. I'm guessing Isopropyl would have been a better choice than nail polish remover, but as I didn't have any I made use of what I had.

And here it is - all clean!!

And then it was just a simple case of tracing the profile of the shelf onto the felt, cutting to size and fitting. Voila!!

So now we have a nice little landing pad for the plastics. A bit better than just smashing down onto the metal and a little more durable that what was there previously. Thanks to Russ Myers at Pinside for suggesting doing this. Along with the Coil Mod it should hopefully give the plastics a little more longevity.

In other news the replacement Lion Plastic was shown as ready for international shipment at New York on 11th July. My guess is that it's probably in the UK already but most likely languishing in Customs & Excise. Hopefully it'll turn up here in the next few days so I can get that fitted.
Had a small delivery today. 8 new nice shiny leg bolts to replace the manky ones i've currently got. Picture below showing the 8 new ones alongside one of the old ones.
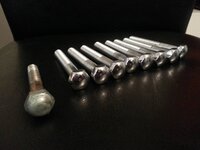
Have fitted one just to make sure they fit ok as the new bolts are slightly longer. No problems at all.
Not fitting the rest just yet as the legs need a bit of TLC. What's the best thing to do here? I'm thinking of sending them away to be shot blasted and then re-powder coated in black. Best way to go?
I'm assuming the primary coloured habitrails on the playfield would benefit from the same process maybe? Same goes for the lockdown bar?
I'd get them re powder coated
Got home from work to find a delivery awaiting me. Hurrah!!! 
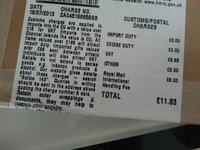
Even better news was that our postie had totally ignored the HMRC label on the package and didn't bother collecting the VAT that was due. Quite how they can justify £8 to collect just over £3 in VAT is beyond me.
Anyway, I ripped open the packaging to see what it was. And low and behold it was the repro Lion Plastic that i'd ordered from Jeff over at Classic Arcades.
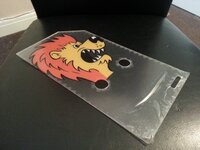
A few minutes later and i'd removed the protective film and swapped out the temporary one i'd made. The new one from Jeff is using PETG and it is much more robust than my effort. The artwork was a perfect match to the original and the colours also match up perfectly, whereas mine were out a little.
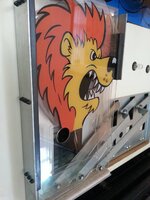
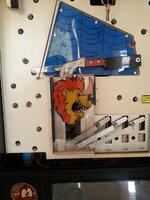
Hopefully the combination of the coil mod and the felt padding will mean that these plastics will have a bit more longevity to them now.
Here's a little video of the new Lion after installation.
As far as the back box goes the next job is to look at patching up the damage to Rockys nose. A common problem here is that the screw supporting the hat trick arm comes into contact with the backglass and leaves a nasty hole in the paintwork. This has happened to mine so I need to look at colour matching a suitable paint to do a touchup. I'll probably look at sourcing a piece of scrap glass that I can paint onto to see how it matches once dry as trying to colour match paints is usually a PITA (at least in my experience).
Comments or suggestions as to what kind of paint to use would be appreciated.
Even better news was that our postie had totally ignored the HMRC label on the package and didn't bother collecting the VAT that was due. Quite how they can justify £8 to collect just over £3 in VAT is beyond me.

Anyway, I ripped open the packaging to see what it was. And low and behold it was the repro Lion Plastic that i'd ordered from Jeff over at Classic Arcades.

A few minutes later and i'd removed the protective film and swapped out the temporary one i'd made. The new one from Jeff is using PETG and it is much more robust than my effort. The artwork was a perfect match to the original and the colours also match up perfectly, whereas mine were out a little.


Hopefully the combination of the coil mod and the felt padding will mean that these plastics will have a bit more longevity to them now.
Here's a little video of the new Lion after installation.
As far as the back box goes the next job is to look at patching up the damage to Rockys nose. A common problem here is that the screw supporting the hat trick arm comes into contact with the backglass and leaves a nasty hole in the paintwork. This has happened to mine so I need to look at colour matching a suitable paint to do a touchup. I'll probably look at sourcing a piece of scrap glass that I can paint onto to see how it matches once dry as trying to colour match paints is usually a PITA (at least in my experience).
Comments or suggestions as to what kind of paint to use would be appreciated.
Treasure Cove Cleaning Kit has turned up today and i'm working from home. You have no idea how hard i'm resisting the temptation to go and start stripping back the playfield so I can get cleaning. 
I'm going to hang fire until tonight.
But the plan is to strip as much as I can from the playfield so I can give it a good clean. Most likely the only thing I won't remove will be the pop bumpers. Whilst i've got the plastics off i'm going to take the chance to scan them and inspect for damage so I can figure which ones need replacing.
One question I do have is this.
It appears Marcos' sells a guard set (http://www.marcospecialties.com/pinball-parts/CA-PS-RB-8PC) and a protector set (http://www.marcospecialties.com/pinball-parts/CA-830-5445) for this machine. I'm not quite sure what the difference between them is (if any), but are these things worth picking up? How do they work? Do they simply fit below or above the plastics? If i'm going to get the plastics all nice and shiny and new then i'm wondering if they're worth investing in?
Thoughts/comments appreciated as always.
Get your self some acetate sheets and mix paint on them, you can then hold the mixture up to the artwork and see if its a close match when dry (handier for playfield but works on backglass too)
Ive a rocky if you need any shots taken or want to ask any questions etc
Looking really good there. You have done more work in the last few weeks to your rocky than I have in the 3 or 4 years ive owned it
Ive a rocky if you need any shots taken or want to ask any questions etc
Looking really good there. You have done more work in the last few weeks to your rocky than I have in the 3 or 4 years ive owned it
Thanks Ian,
I'm only doing so much work to keep me busy and stop me wishing I had another table to be tinkering with. One is all I have room for right now but i'm loving taking the time and effort to make it as good as I can. I'm pretty sure this will be a keeper for me so I have no qualms about throwing some cash at it to get it where I want it to be.
Any suggestions on types of paint? For the backglass do I need specific glass paint or is there something else I should be using? I've no problems with mixing samples up and using an acetate sheet is a good suggestion, so thanks for that.
I think Acrylic
I need to do the same repair on mine
I need to do the same repair on mine
Well tonight I took a couple of hours and stripped the playfield back ready for polishing. Really tempted to grab the LEDs needed to replace the upper-playfield GI whilst i've got all the plastics off.
Here's how it looks now.
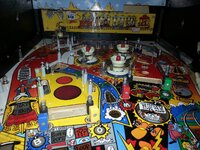
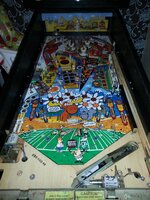
I think that's stripped back sufficiently for polishing. I've got the 2" and 4" kit so the 2" should be able to get between the pop bumpers no problems. I have a feeling it will take me longer to put it back together than it did to strip it. Took plenty of photos along the way to be on the safe side
Here's how it looks now.


I think that's stripped back sufficiently for polishing. I've got the 2" and 4" kit so the 2" should be able to get between the pop bumpers no problems. I have a feeling it will take me longer to put it back together than it did to strip it. Took plenty of photos along the way to be on the safe side
Looking good  Haven't forgotten about the meccano pulley just haven't had time to go round to my son's house to sort through it all.
How have you organised the bits? Plastics + fixings bagged together?
No problems Steve.
I've refitted any fastenings that went to posts so that they didn't go missing. Fittings that were removed I carefully taped together so I know what goes with what.
Lots of photos too so I can recall and reverse the order when putting it back together.
To be fair it will only be stripped for a day or two. Need it back together so i can play. Forgot to get some wax so will need to order that tomorrow. Might as well wax it before putting it all back together.
This the stuff I need Geoff?
I'm assuming it's best just applying with a cloth?
http://www.ebay.co.uk/itm/Clayton-C...eo_Games_Coin_Operated_MJ&hash=item53f88d52e5
I'm assuming it's best just applying with a cloth?
http://www.ebay.co.uk/itm/Clayton-C...eo_Games_Coin_Operated_MJ&hash=item53f88d52e5
I would use those little round yellow foam applicators that you use on cars.
I used my hands to apply it, as I like to be intimate with the things I am cleaning. Also it needed some heat to melt and your hands do that very well. I polished off with a micropolishing cloth.
Guitar wax is what people usually recommend and that is a guitar wax so it should be good for the job.
Guitar wax is what people usually recommend and that is a guitar wax so it should be good for the job.
Thanks for confirming that - i've stuck an order in so I can hopefully apply a coat before reassembling the table.
Next daft question.
In the top of the two shots above you can see some metal guides which stop the ball going into the areas populated by the bulbs. Is it possible to remove these and polish them up? I gave them a gentle pull last night but they seem to be pretty well wedged in there.
Next daft question.
In the top of the two shots above you can see some metal guides which stop the ball going into the areas populated by the bulbs. Is it possible to remove these and polish them up? I gave them a gentle pull last night but they seem to be pretty well wedged in there.
Most likely the only thing I won't remove will be the pop bumpers.
Took me 3 1/2 hours to completely remove 3, strip, clean and replace last night on Wh2o. HATE pops...
If there are no corresponding nuts on the underside then they might be hammered in. Get the autosolve metal polish out and do them before you clean the playfield, I use a small amount on a soft dremel pad, it flies everywhere though so do it first.
