What's new
Pinball info

Register a free account today to become a member! Once signed in, you'll be able to participate on this site by adding your own topics and posts, as well as connect with other members through your own private inbox!

Replacing inserts

jonathan

Site Supporter
Joined
Jul 21, 2011
Messages
3,205
Location
Newcastle
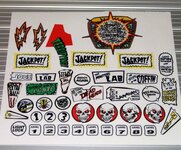
After taking a load of Mylar off my SS its lifted the paint off a couple of inserts. I've ordered some replacement insert decals but does anyone have any tips for levelling them out?

I'm tempted to cut the shape out of Mylar to fill the gap and then apply the decal on top of that to get it flush with the rest of the pf
 
You'll need the whole area to be perfectly flat before applying the decals. The best thing to do is use an eye dropper to fill any depressions with 2 part automotive clearcoat. You'll want to build it up proud and then sand back level.

If you haven't already done so I'd recommend looking at vid1900s guide to playfield restoration on Pinside as his advice is spot on.

https://pinside.com/pinball/forum/topic/vids-guide-to-ultimate-playfield-restoration
 
Sounds like a lot of time and effort for a routed game that's far from perfect already :(
 
If the insert decals are on vinyl they will be quite thick anyway. Removing the inserts is a pita and can cause more damage.by the way, search for 2k varnish to get an idea what Aaron was on about - it's not epoxy, it's varnish, but it often has cyanide in it so is not nice to work with
 
The inserts already up, it came off with the Mylar. It was already clouded over so half of it was hanging off under the Mylar already

I'll have a proper look once everything comes in the post. I just want to play it and avoid any further damage really. It's never going to look mint
 
Epoxy like the one you showed would be good for reseating inserts that have come completely out, but I'd opt for one with either a 15 min or 30 setting time rather than the rapid one in your link, otherwise the glue ends up setting before you get the glue all applied and the insert in place: one of the ones from this place: http://www.hobbyking.com/hobbyking/store/__1394__1389__Adhesives_Lubricants_Tape-Epoxy.html

I've used Hobby King before and the products/service is very good - superglue is very cheap from them too, I think they bottle it themselves and you can get a super-thin version which is ideal for repairing insert decals that are slightly clouded/lifted - the glue is so thin that it will suck under a clouded insert by capillary action, but again doing that risks making it worse, so best to practice on bits you can't really see: http://www.hobbyking.com/hobbyking/store/__7172__HobbyKing_Super_Glue_CA_50g_1_7oz_Super_Thin.html
 
You'll need the whole area to be perfectly flat before applying the decals. The best thing to do is use an eye dropper to fill any depressions with 2 part automotive clearcoat. You'll want to build it up proud and then sand back level.

If you haven't already done so I'd recommend looking at vid1900s guide to playfield restoration on Pinside as his advice is spot on.

https://pinside.com/pinball/forum/topic/vids-guide-to-ultimate-playfield-restoration

@aaronhicksuk - do you know of a supplier of small quantities of 2 pac clearcoat, and a brand you've used?
 
I don't think you can buy it in really small quantities as its normally used for spraying cars. As you've already mentioned its really nasty stuff as the harderner contains isocyonates. Technically you're only really supposed to use it with an air fed mask but I have used it with a good cartridge mask taking great care to get a really good seal.

I used this stuff with good results but you need a decent compressor and an HVLP gun to use it:

http://m.ebay.co.uk/itm/HB-Body-496...-Car-Body-Clear-Coat-/130766689188?nav=SEARCH

If you don't have a already have a meaty compressor then you're looking at a large expense to set up for it. I don't recommend it for many people because of the cost and the risk but if you want to do the job properly its the only way.

In this instance it seems a bit overkill, so I'd probably recommend going down the mylar route instead. I've probably spent the better part of 100 hours practicing the techniques explained in vid1900's guide and the most important lesson I've learnt is you can't take any shortcuts from what he recommends if you want the best results. The very first thing I'd do now when restoring any playfield after stripping everything off it would be a really good clean, quick sand and then a coat of clear to lock in what's there and give a good surface to work off.

@jonathan, If you post up a pic of the area you're trying to repair it will make it easier for people to make suggestions.
 
I hadn't realised but the insert had already come up underneath the Mylar (the whole Playfield was covered in one big grimy piece) the whole thing came off with it. Depending on how thick the new insert is there may be a slight level difference. I don't know whether to:

1 - cut a round piece of clear Mylar to fill the hole and then cover it with the entire new decal or

2 - cut the middle of the new decal out and just stick it on and then cover the whole thing with clear Mylar to protect it
image.jpeg image.jpeg
 
Johnathan,

I would say that the edge of the decal matching the edge of the actual artwork gives a more invisible finish. Trimming the decal to the shape of the insert will leave a more obvious edge between new and existing artwork.

Re-seat the insert and glue so that the face is level with the surface of the playfield. Just use the edge of a steel ruler to get it right. Fill any cracks with something suitable and then sand/pollish that small area until smooth.

Apply entire decal over the top.

Tim
 
Reseat the insert?

Is that an easy job? :confused:
Just means glue it back in place with epoxy so the surface is flush with the playfield :) But if that insert is actually still glued in to the playfield at the moment (I'm assuming from the pic that it is), then removing and reseating it is probably more than you want to do really.
 
How do you unglue it?

Heat it with a hair dryer on full heat, from the top and the bottom sides, and push it out from the underside. The insert will get hot, and you will need something cylindrical to push it out with (a suitably sized socket from a socket set is ideal) applying gentle but firm force. It is unlikely to just pop out straight away, so heat some more if necessary and ease it out. Be prepared for some damage to occur to the surrounding paintwork though, plus there is no guarantee that once you reseat it in epoxy, whatever stresses/strains in the playfield that caused it to raise in the first place won't just squeeze it up again, even if you get it perfectly level whilst the epoxy hardens. It really probably is more **** ache than you probably want to go to.
 
Hmmm, I think I might just whack the decal over it, play it to death and let whoever buys it next give it a full restoration of they want. I got it for a good price knowing it wasn't perfect. It works 100% and the majority of the Playfield is perfectly fine :thumbs:

Thanks for the replies though
 
  • Like
Reactions: JT.
Ok, so I'm now thinking I may as well
do the job properly :rofl:

There seems to be 2 pieces of advice

1 - Build up the empty insert with clear coat/nail varnish so it's level and then apply the decal

2 - reseat the insert so it's level and then apply the decal

Which do people use the most?
 
Which do people use the most?

Those 2 pieces of advice are for 2 different scenarios IMO. If the insert has sunk or risen (if the glue that holds it in has come loose and the whole insert has moved) and the edges of the insert aren't level with the playfield then heat with the hairdryer to fully weaken the glue and tap in level with the playfield again. Then use superglue from underneath to glue it back into place so it stays put.

If the edges of the insert are level with the playfield but there is cupping or a chunk chipped out then use clear/nail varnish to bring that bit of the insert level with the rest of it and the playfield :thumbs:
 
It depends how far the insert has sunk. If its miles away then it would be worth trying to heat and raise it up closer to level. Once its where you want it then feed some superglue in around the edges from the back to hopefully keep in locked in place.

When you've done this they'll probably still be a crack around the outside of the insert that will need filling with clear to bring it level.

If you want to do the job properly you are best to spray the whole playfield with a layer of clear after a thorough clean and light sanding. This will seal in the good art and given you a good surface to work off. At this stage you can sand down with a sanding block which will highlight the low spots on the playfield that require eyedropping with clearcoat, they'll remain shiny while the rest turns matt.

Not gonna lie though the whole process is a major ball ache. Playfield restoration is neither quick or easy! Not impossible though if you are patient and careful. Best of luck.
 
Remember - 'the enemy of good is better'........
That saying helps me not tackle things where I can end up making things worse!!!!!
 
Some people have used these to good effect for fixing ghosted inserts and chips

https://www.ebay.co.uk/ulk/itm/171687455704

You blast it with a uv light afterwards to cure the clear coat
I've tried something similar, wasn't too impressed. I had to break open the 'pen' top so the liquid would flow out then applied using a model-making eye dropper (I think @newdos has used them more effectively though, although I might have dreamt that). You can apply it easily with a dropper, but the UV light I bought didn't dry it in any way - just had to put the playfield in the sun for a couple of days. My experience playing around has been similar to @aaronhicksuk . There are no shortcuts, it's a lot of work, and chances are you will cause more damage than the starting point (e.g., you apply clearcoat from an eye-dropper, which sits proud of the playfield surface, but when you sand that back to flatness with wet-n-dry, you risk sanding off a perfect patch of playfield paint by accident too). I'm restoring a TOTAN playfield just to learn, and have made loads of mistakes along the way, but my starting point was that I would just buy a CPR replacement playfield if I mess it up. The more I do, the closer to that fall back position I get - it's highly skilled stuff and no doubt takes ages to master - I think someone like @chris platt will get it very nice, but if you don't want to pay an experienced specialist, like I said earlier, you risk making it a hell of a lot worse :)
 
I Have used the pens as @JMP said they are ok but not brill, but if it isn't too bad why strip the playfield and clearcoat the whole thing that will self level as well and give a fab finish. Have a look at some of my shop logs on here to see how the clearcoating was done

Cheers Kev
 
@jonathan , I've just brought this thread up in a search as I'm facing a similar issue to the one you discussed. In my case a cupped or slightly sunken insert just above the flippers on Barracora can hold the ball when you are trying to get control. The ball then sits quietly a couple of inches above the flipper! So it's not a cosmetic problem but a gameplay problem. So my question is...what route did you take in the end and is there any other advice you'd now have from your experience? Thanks. John.
 
I'd only suggest this if you know a replacement insert is available if it goes wrong. But... if your insert is cupped, you could dry slowly dribbling in some superglue. It should self level and it dries clear. A friend of mine tried it once on his and it worked well. Just an idea. Obviously open to risks if you blob it on the playfield. If it goes wrong you can pop the old one out and buy a new one. Nothing ventured.....
 
I'd only suggest this if you know a replacement insert is available if it goes wrong. But... if your insert is cupped, you could dry slowly dribbling in some superglue. It should self level and it dries clear. A friend of mine tried it once on his and it worked well. Just an idea. Obviously open to risks if you blob it on the playfield. If it goes wrong you can pop the old one out and buy a new one. Nothing ventured.....


if doing this make sure to level the playfield first obviously
 
Back
Top Bottom