What's new
Pinball info

Register a free account today to become a member! Once signed in, you'll be able to participate on this site by adding your own topics and posts, as well as connect with other members through your own private inbox!

My RFM Super Mod - Development

myPinballs

Site Supporter
Joined
Nov 19, 2011
Messages
5,441
Location
Pudsey UK
Alias
Jim
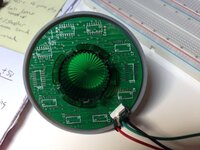
So i've been thinking about an RFM super mod for awhile now and it all came together on the bench last night...

The idea is that the rfm saucers will generate full rgb patterns and then tie in to the correct mode colours during each scene. See below for a quick testing video. It will take lamp inputs to change the colour patterns for the scenes. (I am simulating that in the vid with wire inputs)


I will explain more about it later on, but need to go out shortly. My step son is flying off to Australia today (wife is stressing!! ;))
 
Very nice mod. I have a half built mod for my RFM saucers that's been sat doing nothing for a few months. I thought I'd try something different and installed a ring of leds around the very outer circumference, as well as leds in the pre-drilled holes, all fed by a LED Magician . I had it sort of working for one saucer but the wiring was a PITA and I've left it alone for a while. Now seeing your mod I think I'll discard my plans altogether. If you release it at the right price I'm in.
 
Same here..!!! I was similar to Kev - got the saucers to mod and nothing came of it. Again - Right price and i'm in :)
 
From the video it looks like the leds are shinning through the plastic? I'm surprised how much light gets through, have you skimmed some thickness off it to achieve this? I'm guessing they aren't in the holes because there doesn't seem to be RGB leds in 3mm availalble, I bought some 5mm RGB leds initially but failed to get them to work correctly.
 
Thanks for the positive comments :)

Will upload more info and pics when I get back in. I'm pretty darn happy with the pcb design as it fits into the existing saucer perfectly so no nasty wiring and hot glue knightmares. The board has 8 rgb surface LEDs on it and is a 3 wire system. The saucer plastics are factory. I haven't altered them in any way.
 
I was wondering how you were doing it with just 3 wires, think my design has 12 wires....:rofl:. Think I better leave it to the clever people:D
 
Very effective, interesting to see what it does end up costing
 
I've seen Jim's RFM and it is awesome what he has done to it. This is gonna be a great mod and much better and easier to install than others. Just installed his blackout mod on monster bash and superb.
 
So another little update with some more info about this project.

I have attached a picture of the pcb that fits into the existing saucers with no modifications needed. The kit will contain 2 assembled pcbs for the saucers and a controller board, which is driven from an arduino controller. I am thinking about setting up a github/code source area to release the controller code as open source so that others who buy the system can start to improve and modify the code, add new patterns, take it in new directions etc.

The whole kit will be 'a neat installation affair'. I am passionate about making super mods that look factory. There will be NO crocodile clips, NO loose wires to solder on. It WILL be all professional williams spec connections where it interfaces to the original lamp boards, or driver boards etc. (I am still experimenting with the best place to install the controller board and the cabling designs. More info on that later.)

Regarding the pricing. I am hoping to offer it for under £100 all in. This is not confirmed yet, but i don't want it to be massively expensive. We do live in reality though so i will see how we go. As with my other projects, i think they have been priced affordably.

The cabling coming out from each saucer pcb will be 3 wires. This is a serial design similar to how the afm mothership led lamps worked and the helmet lamps on bop. Recent advances in RGB LED technology (driven by LED TV's and advertising sign developments) have enabled simplification of the designs. Note the pcb in the pic has lots of unpopulated parts as i've managed to simplify it somewhat! I think 3 wires is the least number possible. :)

I will update again once i have it installed in my rfm game and have taken some game play vids.
 

Attachments

  • rfm_pcb.JPG
    rfm_pcb.JPG
    127.5 KB · Views: 35
Last edited:
Where do you get your PCBs made?

Nice work by the way! Very professional. I'd probably buy one if I had an RFM!
 
Quick update, new video of the test system installed in my rfm and the boot up process to game over. Note the system detects when the game enters game over and changes the pattern

 
Its big update time pinside.com_img_smilies_icon_smile.gif

Been working on getting the interaction with the lamp matrix to function nice and smoothly over the last 3 weeks and have finally got it all working well. The controller board is now monitoring all 9 feature mode lamps and setting the saucer patterns accordingly. One of the more tricky things was to get the system to be able to detect a flashing lamp and a solid lit one. The system is now monitoring the lamp matrix every 0.5ms and basing its decisions on 1000 polls. It can determine between lots of different scenarios including the in game lamp shows and main mode features. The saucers are set to the corresponding mode colours. The saucers also react to lamp shows and all the feature lamps being off.

Just adding some in game play videos now, then i'll update again and discuss some pre-ordering options.

Finally just to also mention i've been playing my game a lot today testing various scenarios and it really feels like a factory item. I'm really happy with how it's turned out and i hope everyone here will be to when you get one pinside.com_img_smilies_icon_smile.gif

The source code for the system will be a living thing aswell, updates will be released to purchasers for free adding new patterns, interactions etc as we go forward. This is one of the benefits of having micro controller control built in. Buyers will also have direct contact to me and be able to discuss ideas or 'wants' for added features etc.
 
Here's a quick video of me playing my game. I've taken the video aimed at the lower playfield to show the saucers lamp interaction in most detail. The camera doesn't always show red and yellow that differently, but i hope you can see the interaction ok.

» YouTube videoimg.youtube.com_vi_AjG3xo0__SI_0.jpg

A few good places to watch are at 6.45 and 8.10. You can see the system change to the green colour for the middle modes there. Also look out for the game lamp shows between modes. The saucers will change patterns during those points with random selections so its pretty organic and then back to the correct colour once the mode lamp is enabled again. Also, i have the saucers doing a full colour sweep when all lamps are off, which currently includes the hypnobeam mode.

Regarding pre-ordering. I am offering the full kit at £100 plus shipping. I would like to offer a 50% upfront and 50% once ready to ship payment approach as with the 80b cpu board project. Shipping will be added to the final amount.

I will contact everyone above who expressed an interest and give them first opportunity. If anyone else want to be included now then you can be added to. Once i know how many people are in i will place the first order for the boards. As a recap the full kit will include 2 assembled saucers (including the plastic parts) and the assembled controller board plus cabling and instructions. Plus you will have access to any software updates released after the initial production and i may even get some t-shirts made!
 
Update: I got my first full set of proto boards in to test assembly, cabling and connection from controller board up to the game lamp board.
Some pics attached. I may even have a sample set ready for Play Expo, though that does depend on a lot of factors!

If you are interested in pre-ordering or getting a kit once ready, please get in touch now as the first run will be limited to a set number which i aim to have ready for christmas or before.

IMG_3023.JPG IMG_3024.JPG IMG_3025.JPG IMG_3026.JPG
 
Update:

I have made some updates to the software for the controller board as per the feedback received so far. The saucers now cycle in opposite directions to each other.

» YouTube videoimg.youtube.com_vi_8lpTPLDhugM_0.jpg

I have also added an option using dip switch 1 to enable or disable colour cycle lamp effects when all other lamps are off. This mean you can have total darkness on hypo beam mode or not. 100% user customable. The dip switches are read as the board boots up and operate for that power up time accordingly.

Regarding the pcbs boards, the order for the first batch is now with the manufacturer and i hope to receive the blanks back in a week or so assembly can start. The saucer plastics are still on there way so will update again when i receive them.
 
Update:

Completed some extended game testing recently. Both setups (original williams computer and modern linux replacement nucore/pinbox) are confirmed as fully working.

IMG_3146.jpg IMG_3147.jpg IMG_3148.jpg
 
Update:

A few people helping me test the boards have commented on having clear domes within the saucers with a green glass bulb inside instead of the stock green dome , as it adds extra cool reflections from the rgb leds . The first run of kits will be shipped with original green domes with the saucers, but i thought i'd add an optional extra onto the orders if people would like this option aswell to try out later.

When the boards are ready to ship i will also ask if you'd like this optional extra. I will work out the pricing once I find a large amount of clear domes!

Please contact me now if you would like to be included in the pre-orders. I am still working on getting the first run out to people before christmas
 
Random thought..

Why not open up the design/schematics so others can critique or help you improve etc?

That way you should get an even better product.
 
img_3042-jpg.10831
Love that you've used an Arduino Nano for this project :p Very clever. I bought my son an Arduino Uno Starter Kit for his 11th birthday last week and he loves it! I have to admit I've been having great fun with it too :D
 
Random thought..

Why not open up the design/schematics so others can critique or help you improve etc?

That way you should get an even better product.
Or why not burn the midnight oil and the candle at both ends, and give your hard work away for free so that someone else can get them knocked-off in China and flogged on eBay?

I think @myPinballs is doing great work here. I'm sure he'll get plenty of feedback and suggestions.
 
Or why not burn the midnight oil and the candle at both ends, and give your hard work away for free so that someone else can get them knocked-off in China and flogged on eBay?

I think @myPinballs is doing great work here. I'm sure he'll get plenty of feedback and suggestions.

I don't think the Chinese would knock off a part that'll only sell 100 units at best (guess).

I'm just thinking it would be cool to increase the level of community in things like this.
 
Back
Top Bottom