2 4-October -2016
FIXING EXPANDER SOLENOIDS
So, in my quest to fix the GATE solenoid I discovered I've got coils half firing all over the place! In Solenoid Test Mode I can see that sometimes 2, 3 or even 4 drop-target reset coils are "twitching" when some other coil that is part of the SOLENOID EXPANDER circuit is being activated. To make this crystal clear to myself I got out my virtual colouring pens and coloured the appropriate wires on the coil schematic:
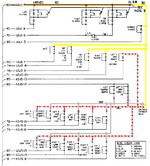
+43VDC comes onto the playfield down the BROWN (60) wire. This feeds the 3 flipper coils directly and onto the 1 Amp Slow Blow fuse for the rest of the coils on the playfield. Out of the fuse the wire changes to YELLOW (30) and feeds 5 more coils directly (OUTHOLE KICKER, GATE, TOP LEFT SAUCER KICK LEFT, TOP LEFT SAUCER KICK RIGHT and RIGHT SAUCER). The yellow wire also feeds the AS-2518-66 SOLENOID EXPANDER BOARD, which is mounted on the underside of the playfield, on Pin 9. By default, that is, when the solenoid expander is OFF the +43VDC exits the expander on Pin 7 down the GREY (90) wire to provide power to the following 7 coils, all of which are required at any moment during gameplay:
- LEFT THUMPER BUMPER
- CENTER THUMPER BUMPER
- LEFT SLINGSHOT
- RIGHT SLINGSHOT
- LEFT 4 DROP TARGET RESET
- RIGHT 4 DROP TARGET RESET
- TOP 3 DROP TARGET RESET
When the solenoid expander is switched ON the +43VDC comes out of Pin 5 instead on the GREY/RED (91) wire providing power to these coils:
- LEFT 4 DROP TARGET #1
- LEFT 4 DROP TARGET #2
- LEFT 4 DROP TARGET #3
- LEFT 4 DROP TARGET #4
- RIGHT 4 DROP TARGET #1
- RIGHT 4 DROP TARGET #2
- RIGHT 4 DROP TARGET #3
- RIGHT 4 DROP TARGET #4
Notice that these coils are not essential during gameplay - in this case they're for the individual drop-targets. It's not possible to fire 2 coils that are driven by the same Q transistor at the same time. There would be a delay to wait for the first trigger signal to complete, switch the expander (more delay, it's a relay after all) and then switch the same Q transistor on again.
Looks closely again at the above schematic and notice that all of the coils powered via the solenoid expander have an additional diode on the input to prevent any power travelling back up the supply wire. This is CRITICAL and something I was not aware of! Coils in these positions are usually of the 3-lug type, not because they have 2 windings like a flipper coil, but because the extra lug is used to affix this extra diode. To use a standard 2-lug coil a diode simply has to be placed on the input first before connecting the wire to it.
Anyway, technical lesson over, on to fix my problem. First fix I did on this game was to replace the burnt STERN coil on the left-hand slingshot. I happened to have an old spare Bally coil and just replaced like-for-like. Also notice int the photo the other slingshot has a replacement coil too:
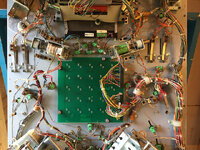
It's obvious these are both standard 2-lug coils and therefore missing the extra diode required by the solenoid expander circuit. To fix this I simply removed the +43VDC wire from the lug next to the banded side of the fitted diode (GREY (90) for both coils) and soldered on a 1N4004 diode with the band closest to the lug. I then reattached the wires to the other side of the new diode:
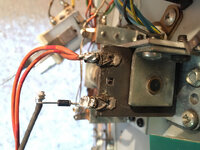
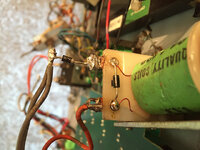
This isn't an ideal permanent solution as the leads on the diode could break off eventually through mechanical fatigue, but for the moment it will do. I put the game back into Solenoid Test Mode and all the solenoids are firing correctly with no cross-talk or random firing of the non-default coils powered via the expander.
WOOHOO!

Well... except the GATE coil still isn't working... but now that one more Gremlin has been liquidated I can move on

