woah, them's some hairy hands
Pinball info
You are using an out of date browser. It may not display this or other websites correctly.
You should upgrade or use an alternative browser.
You should upgrade or use an alternative browser.
In Progress Lord of the rings full restoration
- Thread starter Hiro996
- Start date
I might glue some hair to my Thing hand on TAF.woah, them's some hairy hands
Hair's in this year. Kevin's a trendsetter.
Ha ha excellent, thanks @Monkeyboypaul !
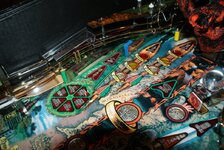
Hi, all, after a bit of a break I'm back - here's a nice new shiny playfield clear coated by Bill Davis and mailed over from the USA:

It's difficult to show the quality of the finish in a photo, here's another image with the light fitting in the room reflecting off the playfield:

It's difficult to show the quality of the finish in a photo, here's another image with the light fitting in the room reflecting off the playfield:

I fitted a new plastic set - notice how the new set is slightly darker than the original ones - it seems they changed the shade of the plastics (just as they did the playfield) over time!

With the loom fitted to the new playfield, it was time to use the fish paper I bought off the group buy (thanks again @Nedreud ) - the very same fish paper I purchased for no reason but thought it would come in handy one day!

With the loom fitted to the new playfield, it was time to use the fish paper I bought off the group buy (thanks again @Nedreud ) - the very same fish paper I purchased for no reason but thought it would come in handy one day!


I had a slight issue with the plastic set, plastic number 51 was damaged and I could not find another plastic set anywhere so I had to make my own replacement. Here's the brand new broken plastic on the right with my newly cut version on the left (still with the protective film over the clear plastic hence the reason it is white!

Next up I spent far too long on the PC achieving the correct shade and printed tests on photo paper (as it seems to give the best representation prior to using the expensive decal paper). When I was happy with the result I inverted the image and printed it on the decal paper:

Here's a clear image to show the print is inverted:

Next up I applied the decal to the underside of my home made plastic - being applied to the underside means the image is now the correct orientation when viewed from above. Finally I sprayed 2 coats of white primer to the underside, the result is (in my biased opinion!) a very good match!

Next up I spent far too long on the PC achieving the correct shade and printed tests on photo paper (as it seems to give the best representation prior to using the expensive decal paper). When I was happy with the result I inverted the image and printed it on the decal paper:
Here's a clear image to show the print is inverted:
Next up I applied the decal to the underside of my home made plastic - being applied to the underside means the image is now the correct orientation when viewed from above. Finally I sprayed 2 coats of white primer to the underside, the result is (in my biased opinion!) a very good match!
After that hurdle, the rest was straight forward - simply re-populating the rest of the playfield, I have hundreds of images if anyone ever needs some advice / visual clues when refurbishing their LOTR so feel free to mail me if you get stuck!
Here's the end result:


Here's the end result:


I have seen this in person and it is truly a thing of beauty
Wonderful job to a wonderful game, nice job lad! 
Incredible work Kev. Looks awesome.
Thx @windoesnot - very kind of you to say.
thx @Gaz Shiells , appreciate the comment!
Where did you get the figures for what looks like Aragorn and Boromir on the sword plastics and how did you affix them?
Thanks
Thanks
Sweeeeeeeeeeeeeeeeeeeeeeeeeet.
Beautiful machine made even more beautiful.
Beautiful machine made even more beautiful.
I'm moist..... I need me a LOTR
To much information.I'm moist..... I need me a LOTR
Playing mine at the moment makes me a bit moist too ")
Nicely done - cracking game and this looks amazing!
Sent from my iPhone using Tapatalk
Sent from my iPhone using Tapatalk
@windoesnot - figures came from ebay - they are official LOTR figures - same scale as the originals. I have attached them using clear silicone - it is very easy to remove from plastics so is easily reversible.
P
pintableuser
If your figures lose their weapons here is a contact to get replacements which you may customize.
http://www.ebay.co.uk/itm/Saracen-K...497?pt=LH_DefaultDomain_3&hash=item5675446ea1
Again, a tiny amount of clear silicon will hold them for a time.
http://www.ebay.co.uk/itm/Saracen-K...497?pt=LH_DefaultDomain_3&hash=item5675446ea1
Again, a tiny amount of clear silicon will hold them for a time.
Hi Kev,Time to fit the old playfield on the rotisserie (thanks for the loan @Nedreud!) and strip the underside:
View attachment 16957
Recognise that rotisserie design - it's a Newdos one, that Pete built after seeing mine haha!!! About time you made your own and further improved the design ;-)
Cracking job as ever mate - wish I had the space and the spare cash and this would be mine!!!!
Cheers
Kev