What's new
Pinball info

Register a free account today to become a member! Once signed in, you'll be able to participate on this site by adding your own topics and posts, as well as connect with other members through your own private inbox!

JJP GNR Pinball

^^^ very clever
This was gonna be one of my questions, but its answered in the install guide:

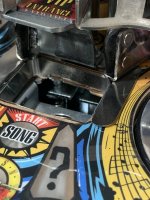
Additional Capacitance The HerculEASE kit includes two 3300 uF capacitors. Each is connected to a separate circuit on the IO board. For each circuit, the HerculEASE design places this additional capacitor in parallel with an existing 3300 uF capacitor. When capacitors are placed in parallel, the total capacitance is the sum, resulting in 6600 uF capacitance.

I've asked the Q to the mod creator:

The solder option gives 6800uf 100v
I wonder how this compares to the 6600uf total capacitance in terms of flipper feel.
Is it likely negligible?
Looks so easy even I could install it.
 
Last edited:
Group buy anyone?
Come on folks. Look at those pictures again and ask yourself, are you happy with the finish and how it will last.
If you are, Paul/me can build you that. I suspect many of us can, the tools and jeopardy is a lot lower that removing caps and 3d printing the base.
 
^^^ wonder what type/fuse rating he is using in that quick solution.
Also classed as experimental, wonder if it will potentially cause issue elsewhere.
 
Looks like there is another option. I won't pretend I understand any of it but may be of interest to JJP owners.


I've pasted selected info below, but the whole content is in the above link.

Introducing HerculEASE, the easy to install, no solder, reversible solution to increasing flipper power and consistency in just a few minutes.

Replace 2 fuses with the HerculEASE fuses
Connect two HerculEASE terminals to a screw on the existing IO board
Attach the HerculEASE capacitors to the backbox for stability

No need to remove the large IO board or remove the almost 20 cables.

...Finally, you can go the HerculEASE approach and leave everything in the backbox and don’t touch the 20-some cables. Instead you replace 2 fuses with the HerculEASE fuses, connect two terminals to a screw, and use a zip tie to hold the HerculEASE capacitors in place. This is great for anyone who wants simplicity as well as the ability to easily back out the modification.

I’m currently running HerculEASE in my Guns’N’Roses pin as well as my Dialed In! And the results are amazing.

Initial price will be $80 a kit plus fixed priority mail shipping ($10) in USA. Outside of USA needs more investigation.

I'm all for homebrew and mods, however I'm not sure why someone with a £6k+ (Dialled in as an example as it's the oldest machine) would prefer this at $85 + $10 US Shipping :

Pinside_forum_8012813_3773496.jpg

To this at probably £100ish....

Pinside_forum_8027600_3.jpg

Is just beyond me.... 🤡 :)
 
If you are, Paul/me can build you that for a fraction of the price
Just fixed that for you there.

Other than the fact i wouldnt because it's a bodge, I recon these could be made for under a tenner cost price (for the parts - 2x Caps at £4 each. 8 pieces of wire. Two fuses of the correct value (same as the priginal). Two eyelets.

Onto interesting things associated, i noticed this today in the thread...

1708294653691.png

Due to Vibrations??!!! :eek:
 
GnR Scoop snubber rubber:
Anywhere sell these in UK?
Or does anywhere do blocks that can maybe be cut to size?
Cheers
E2D33CF0-EAC1-44B2-96D7-F6BDD7D92995.png
 
Snubber blocks, I bought spares direct from JJP. However I noticed recently one of my replacement’s has split so I’ll be needing them!

Buy a few, maybe an I/O board too!
 
Last edited:
I made my own from old motorcycle Cush rubbers They are black and not exactly elegant but they do the job and will never need doing again.
I have had two gnr now and neither of them had those blue rubbers last more than a couple hundred plays. Jersey jack rubber is not great so I wouldn’t replace with genuine rubber specially as it’s a bit of a pain to do.
 
Currently about to work on a standard edition Guns and Roses, so looking through the manual for various parts I notice there impossible to find WTF. Searching via part number yields nothing, searching by description nothing. Marco nothing.

Admittedly I haven't made a parts list yet, just put in some random items, so might have been unlucky, searching for a spring has yielded results.

What do they use for parts is it Williams?

I will update with the progress, at the moment early days if its an actual problem for me or not.
 
Guys,
What Spotlight servos you using?
Had a few die again with not that many plays.
I’m on the upgraded spotlight brackets which are fine
Been using: Corona DS-238MG - failed prematurely
Any recommendations that work out the box without using PTFE tape etc on the splines….
Hear the emax ES-3504 are good but reports they potentially need a bit of modification to fit in the Spotlight brackets.
Cheers
I used the emax 3504. Fitted ok - i put a bit of heat shrink tubing on the gears.
 
Thanks man, I see chaps on Pinside mention 20g ones but I’m not seeing them in UK, only 17g - probably the same … is this what your using:
Yes - that’s the one. Bought from there too. I noticed the 17g/20g thing too but sure they’re the same.
 
Had an awesome game last night - one album away from final wizard mode (yet nowhere near my modest GC score 🤣) Lost track of time but must have gone at least 40mins. Excellent fun. So many pinball moments. So much swearing.
 
So finished chores for the Mrs … decided to give this a whirl…
Rather than jump right in and do the cap replacement on the board I wanted to test with the temp solution first to see difference.
Stuck 2 x 6800uf caps in with couple of ceramic fuses and can report its rockin.
I also have the coils turned up and will need to turn them down as when you get clean shots it’s like a bullet…lol
Ignore my crap soldering…
53289362-27BC-488C-B908-BF9D9E4E1CA3.jpeg
3A2BD8FD-B64E-4F04-9426-17EF2F6D0814.jpeg4E6A431E-4945-4F8C-8DC5-8A90C189C0F8.jpegA86D5964-D16B-4168-BD6A-9D5B46F44FE9.jpeg7C3E92B8-2179-48F9-8B67-A8A3FEDD346E.jpeg
 
for the mini LCD screen Ive used a nintendo switch screen protector, cut it to size works great, better than the bubbly rubbish on it

crap taken off

PXL_20240302_153528336.jpg

fitted no bubbles :)


PXL_20240302_163049692.jpg
 
So finished chores for the Mrs … decided to give this a whirl…
Rather than jump right in and do the cap replacement on the board I wanted to test with the temp solution first to see difference.
Stuck 2 x 6800uf caps in with couple of ceramic fuses and can report its rockin.
I also have the coils turned up and will need to turn them down as when you get clean shots it’s like a bullet…lol
Ignore my crap soldering…
View attachment 245744
View attachment 245745View attachment 245746View attachment 245747View attachment 245748

1709579715966.png
If in series with the existing ones, should be using 3300uf 100v Caps.. making an equivalent of 6600uf..... not 6800uf caps as you have used. The 6800's are for replacements of the existing ones in a single shot.
I get it's a trial - Just didnt want you to break anything!!
 
View attachment 246021
If in series with the existing ones, should be using 3300uf 100v Caps.. making an equivalent of 6600uf..... not 6800uf caps as you have used. The 6800's are for replacements of the existing ones in a single shot.
I get it's a trial - Just didnt want you to break anything!!
Thanks Paul. Yes i was aware...., I believe it will pull more power from the PSU to charge caps and maybe take longer to discharge via the resistor. Other than that, don't think it will cause any issues .... hopefully.
 
Back
Top Bottom