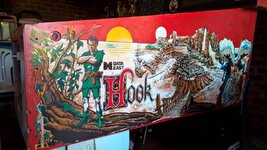
What's new
Pinball info

Register a free account today to become a member! Once signed in, you'll be able to participate on this site by adding your own topics and posts, as well as connect with other members through your own private inbox!

In Progress Hook, line and sinkered...

Removed the side rails last night following wiredworms advice. The rails need repainting.WP_20150528_19_04_25_Pro.jpg


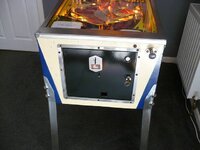
This left side came off leaving most of the tape on the rail which peels off easy - not so lucky the other side its a git to get off the cab. This picture shows how scruffy the inside black painting is - repainting that alone will be a major improvement. The trim above the back mirror is a bit scruffy and stapled on - not sure how to tackle that yet.
WP_20150528_18_52_27_Pro.jpg

This was all new to me the channel trims are left behind and just pull out of a recess in the wood. I will clean the trims up and also when paint the inside overlap the edge as the bare wood shows because the trim doesn't full cover it which looks a bit naff.
WP_20150528_19_30_01_Pro.jpg

Upon re-assembly should I re-tape the side rails or just rely on the bolts? If so what tape? Thanks.
 
If you have any troubles removing that tape, warm it up with a heat gun, and take your time. I actually hate removing side rails for that.

Looks like you're steaming ahead. I gotta play catch up next week and get my Hook done.
 
I think the tape is probably overkill for a home-use machine when reinstating the side rails.

My plan with R&B when I get that far is to try it without tape first and see how well the rails are held in place with the mechanical fittings. It's far easier to add tape later than try prying it off after fitting it and realising it wasn't necessary.

On silkscreened / painted cabinet I would say you could get away without the tape, although they used the cushioned foam tape for a reason, and it will dampen vibrations. No one likes a pin that rattles haha!

If you're re-decalling a cab though I would definitely use it. It helps stop the decals from creasing/wrinkling when they're on tight.
 
My plan with R&B when I get that far is to try it without tape first and see how well the rails are held in place with the mechanical fittings

No one likes a pin that rattles haha!

Thanks for the advice guys, I'm not in a rush to re-tape them, if anything may try a few foam stickers spaced on the inside of the rails to pad them from the cab a tad. That's all a way off though, paint stripping, etch priming, bar-b-q painting to be addressed first :eek:
 
I will be applying decals to mine so the issue with using adhesive foam for me is that if I ever remove the rails again then it could also lift the decal. Unleas I trim the decalas back of course.
 
It was bound to happen as I was hosting the UK GOLD BALL Appreciation Society last eve HOOK decides to play up in protest (lucky it wasn't GOLD BALL)

I've currently got the side rails off for re-furb but put the flipper buttons back on to get it playable for the evening. Following this the left flipper was working very intermittently and then to the point it only flipped but didn't hold if you really bashed the button. I thought this must be related to re-fitting the button but the switch itself was testing fine in Diagnostics so it must be related to the vibration of bashing the button - particularly as this is the flipper PCB side of the cabinet.

Investigating the flipper PCB for 'loose' things I noticed this fuse was sitting springy in its holder - not a good thing for DE fuse holders apparently. As a temporary fix I popped the fuse out, bent the holder in and all is flipping good again (pending a new one fitted as this will be weakened I suspect). Btw, this is the before picture, it surprised me that the fuse didn't work with this much contact with the holder.

upload_2015-6-16_9-5-18.png

@Nedreud I said I'd have this fixed before breakfast :D

ps GOLD BALL volume sorted too was the pot' on the sound board, I woke the neighbours up earlier testing it
 
Last edited:
Nice one! You'd be surprised with fuse clips. They need to be clean and tight. Squeezing them back together is fine unless you can tell they're really knackered but do try and clean the inside surfaces before replacing the fuses. I use a tiny little brass brush. Clean the fuses too! Good electrical contact is critical. After I've put the fuse back in I give it a little twist back and forth a few times to really bed in the contact surfaces.

I've got some spare miniature pots for the sound board. I replaced mine, they're always knackered! Cheap and nasty to start with let alone 30+ years of neglect...
 
I have some of those fuse clips Astyy if you want me to drop a few in the post ?

Andy at pinballmania does them also, worth replacing as they are only pennies (25p each)
 
I have some of those fuse clips Astyy if you want me to drop a few in the post ?
I don't have an order o/s for Andy - so would appreciate that if you have a few spare, thanks BigIan
 
I've noticed one of the Slingshot brackets appears wrong and it doesn't have a coil stop attached like the others, just a bit kind of wedged between the coil and the hole where it should be attached (I guess) so the coil is just wedged in by the retaining bracket. Is there anyway to attach a stop or is this a replacement bracket job? Thanks

Wrong bracket
WP_20150806_17_01_15_Pro.jpg

Right bracket
WP_20150806_17_02_05_Pro.jpg

Close up of the bit wedged into the coil
WP_20150806_17_05_01_Pro.jpg
 
@Wiredworm log spiked my interest as to why Hook has two fuses mounted on the AC cover so I removed for investigation. Both fuses are in circuit on each side of the mains line coming in. (Also Wiredworm notice that the power switch plate is only secured at the back and the front flap of the AC cover is overlapping it and bent out to do so - may help explain how the cover is mounted so far back to meet the frame - not neat.)

WP_20150823_16_14_54_Pro.jpg

Here's the relevant part of the schematic from the user guide. The Service Outlet isn't present and the White (Blue on UK) has a fuse too both of which should be 5A Slo Blo according to sticker on cover or 4A Slo Blo according to User Guide notes!
upload_2015-8-23_16-52-20.png
 

Attachments

  • upload_2015-8-23_16-49-39.png
    upload_2015-8-23_16-49-39.png
    10.6 KB · Views: 4
NLP is motivating me to crack on with this shop. I need to get the metalwork painted and am practising on a piece of trim off my Videomaster Arcade Cab (pins > video games imho ;))

This metal is far rustier than what I'm taking off HOOK and after stripping is more pitted too but similar. Here's a photo mid strip.
WP_20150918_12_45_23_Pro__highres.jpg

My plan is to clean it off with IPA then use @Paul Etch Primer followed by @PeteB Bar-B-Q paint and hot gun to get a smooth satin finish.

Am I missing anything? Does the surface need more prep? Is it too pitted? Do I need to sand between coats? etc.

The coin door is now fully stripped here's a pic of work-in-progress. I'm not sure how I can recreate the mottled effect so may do smooth as above.

WP_20150918_13_26_59_Pro__highres.jpg

That's enough for today I've literally worn out my Poly abrasive wheel.

Thanks for any advice.
 
I used a special effects paint from B&Q on one of my very rusty coin doors.

I had to use a "special metal" primer too, because although the original door was painted, underneath it had been (I think) zinc plated. In any case my first try with regular primer didn't stick.

The effect isn't quite Data East dimple but maybe it's closer than satin black. Either way I was quite pleased with it:

13889202160_4b2d3a6a6e_z.jpg

Off hand I cannot remember the name of the paints but I could probably find them again.
 

Attachments

  • 13889202160_4b2d3a6a6e_z.jpg
    13889202160_4b2d3a6a6e_z.jpg
    36.7 KB · Views: 7
For the coin door, you want "hammer effect" or "hammered" which will give you the dimples these coin doors typically have. You can go over them with black gloss for a nice, original finish.

For the other metal work the abrasive wheel should prep the surface enough, and no need to sand between coats.
 
Before, looks like something dug up

WP_20150919_17_00_12_Pro.jpg

After some Poly Abrasive wheel love

WP_20150920_11_05_38_Pro.jpg
 
Here's an update to demonstrate how useful the experienced guys shop logs are particularly if you're shopping the exact same machine.:)

Casting back in time the HOOK cab was water damaged when I got it

WP_20150318_18_23_35_Pro.jpg WP_20150318_18_25_30_Pro.jpg WP_20150318_18_24_16_Pro.jpg

The back of the cabinet is ply and it occurred to me to scrape off the top painted layer which was lifting around the edge. The wood underneath seemed pretty good but I painted some hardener on for good measure.
WP_20150602_19_05_00_Pro.jpg WP_20150602_19_49_25_Pro.jpgWP_20150920_08_57_19_Pro.jpg

Then I got a piece of board cut to size and similar thickness to the ply removed and fasted it overlapping the sides as per the original. Then slapped plenty of Ronseal wood filler and now I had a good edge to sand u[against.
WP_20150920_12_50_45_Pro.jpg WP_20150920_14_57_00_Pro.jpgWP_20150921_18_30_12_Pro.jpg

Then got busy with the Rose Madder acrylic that is an ace red. Rollered on with foam roller/tray (available at all good pound shops). Oh made some skids with floor sliders too (I can't remember where that idea came from)
WP_20150923_09_36_10_Pro.jpg
I started painting down the side (to cover the filler) note new red above Hooks head then old faded red.
WP_20150923_10_07_17_Pro.jpg

I'll continue the cabinet paint after NLP as I want to concentrate on the metalwork but I now have some sharp corners that I've heard about.

Not perfect but I'm pretty happy with it.

Thank you @PeteB
 
Forgot to show a before and after of the worst corner

20800-568fa22732acd10af20707870e62897f.jpg
WP_20150923_09_35_29_Pro.jpg
 
That's coming along great. We're gonna have 2 very good looking Hook's when all is done :)
 
Much progress this weekend in my attempt to get this nice for NLP... HOOK sounds nice, should look nice too :)

Ironmongery, previously stripped. Etch primed then next day hammer sprayed. @J.C.Rox having now done this imho worth seeking a local powder coater and outsourcing.

WP_20150926_11_09_07_Pro.jpg WP_20150926_12_03_29_Pro.jpg WP_20150927_17_50_03_Pro.jpg

Inside of the cab bugging me so couple of coats of mars black acrylic foam rollered whilst the metal is off. (note originality painting midway down cabinet!)

WP_20150926_12_22_26_Pro.jpg WP_20150926_12_38_54_Pro.jpg WP_20150926_17_30_50_Pro.jpg

On to the cabinet, @PeteB style. Out with the artist paintbrushes and over-paint all of the red with Rose Madder acrylic

.WP_20150927_13_55_01_Pro.jpgWP_20150927_13_53_11_Pro.jpgWP_20150927_13_53_30_Pro.jpg WP_20150927_13_53_11_Pro.jpgWP_20150927_17_49_40_Pro.jpg

It's starting to look sweet
WP_20150927_17_51_00_Pro__highres.jpg
 

Attachments

  • WP_20150927_15_40_28_Pro.jpg
    WP_20150927_15_40_28_Pro.jpg
    163.9 KB · Views: 35
Hi astty! Hadn't seen your build thread so thanks for the link! I've found a guy in Spain who has produced full vinyl decals for the whole cabinet but I was under the impression the original cab was painted red and then the artwork screen printed on? Don't know how replacing the whole lot with vinyl would look?
 
Hi astty! Hadn't seen your build thread so thanks for the link! I've found a guy in Spain who has produced full vinyl decals for the whole cabinet but I was under the impression the original cab was painted red and then the artwork screen printed on? Don't know how replacing the whole lot with vinyl would look?

Yes the original is screen printed. When I started hand painting mine decals weren't available - if you check out @PeteB HOOK thread he said today that he's going to make some decals so worth checking out.

Btw, which HOOK did you buy - Chris has sold two recently.
 
Yes the original is screen printed. When I started hand painting mine decals weren't available - if you check out @PeteB HOOK thread he said today that he's going to make some decals so worth checking out.

Btw, which HOOK did you buy - Chris has sold two recently.

I bought the £700 one that needs some work.

This is the link to the Spain guy who has created the decals. They are around 200 euros delivered.
 
Don't get too het up early doors on shopping it out, particularly the cab art, Give the playfield a nice wipe-over and play the b*gger (can't believe I'm saying that). I looked at the photos of that machine and it looked complete (even the knocker intact) and playable - enjoy it first.

Re. the decals defo see what peteb comes up with first before deciding.
 
You're right, I'd already bought a new replacement LED display and the decals in my head but best to play the thing first!
 
Back
Top Bottom