What's new
Pinball info

Register a free account today to become a member! Once signed in, you'll be able to participate on this site by adding your own topics and posts, as well as connect with other members through your own private inbox!

Complete Grand Prix VP Build

Andy B

Site Supporter
Joined
Oct 6, 2014
Messages
1,350
Location
Hull. England.
If you read my earlier shop log on the Stern Grand Prix you will know I had to abandon that because the playfield was so badly water damaged and all under playfield hardware so badly rusted I damaged the playfield during the playfield strip down beyond reasonable repair so...

I have started to build a Virtual Pinball Machine based on what, it turns out to have been, a very expensive donour cabinet.

I have taken some much appreciated and very patient guidance from @tyke (who, along with @Pick Holder, seem to be the Yodas of the VP world) and have purchased most of the hardware to complete the build.

I will post details of specification later in log but for my first post will just cover what I’ve done thus far, over the course of the last few weeks, now I am at the point were the empty cab is in a state where my wife has allowed it back in the house without rolling her eyes and reminding me how lucky I am that she’s happy to indulge my very expensive hobby.

So everything has been totally stripped out of the cabinet and backbox. All of the boards were in surprisingly good working condition given the state of the rest of the machine and I managed to recoup about 60% of the purchase price of the machine selling them and a few other parts on here and EBay.

I spent about half a day sanding down the cabinet and back box to bare wood and then another half day spraying them both with primer and satin black spray paint. This is not going to be a minter so I did no wood filling or repairing as I did with the Star Wars refurb, which was my first, and only, thus far.

I took all the major cabinet metalwork (9 pieces) to a local powder coater. He charged me £75 to sand blast all the originally black metalwork and powder coat them in red.

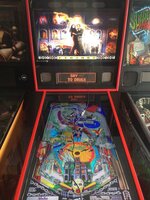
I am keeping the original Grand Prix theme purely because every time I look at it it will remind me not to be an idiot and to listen to my head and not my heart if I ever see a water damaged project pin and am tempted to buy it again so I bought some Stern Grand Prix cabinet decals from an Italian guy on EBay. I would have bought from Retro Refurbs but the EBay guy had them in stock so there was no lead time and they arrived in days.

So, decals and powder coated legs in hand I brought the sanded and painted cab in the house and spent 4 hours and half a bucketful of sweat applying the decals.

I‘ve done two pinball cabinet re-decals now and I have to say it’s the most stressful part. Having said that I have found both of them to be more successful than any of the applications of screen protectors I’ve done on my phones over the years!

Anyways. Cabinet re-recalled and set up in house.

Hope to do a little bit more work on it during week and then spend full weekend on it next weekend so next update will, hopefully be next Sunday.

In the meantime, some photos.
 
Well, after 3 months of lockdown mayhem that saw my son moving out (finally!) and me jumping in his grave and claiming his old room as my new gamesroom, I've managed to make progress on my VPin.

Will post some more photos across the weekend but basically over the course of the last 3 days have:

- Sprayed the playfield board black (3 coats of gloss plus a coat of sealer)
- Mounted the 4K TV to the playfield board using a tilt and swivel TV bracket
- Mounted the backglass monitor in the backbox
- Installed the Pin2DMD board
- De-cased the PC I bought so I could install the graphics card
- Built a wooden box to mount all the PC components in
- Installed PC in the cabinet (with wires to Pin2DMD board (didn't have one long enough so have longer one on order) and keyboard and mouse outside of cabinet)
- Installed Visual Pinball, Pin2DMD software, Backglass software, PinballX front end
- Started the long an laborious task of installing tables, backglasses and associated artwork

I've managed to get 4 and up running so far.

Anyone that's done it will know that the software side of things and getting everything to play nice together is the worst part of any MAME or VPinMAME set up but after plenty of teething problems getting these first 4 up and running I think I'm getting in to a slow and methodical routine.

My biggest and best achievement so far, install wise, is to get Stern Grand Prix up and running. I know, with all those wonderful games available out there, why Grand Prix? Well, as many will remember, the thing that started this whole thing off was me getting stung by buying a Stern Grand Prix pig of a machine from Italy which was so badly water damaged that just about every piece of metal on the thing was rusted and when I started to remove some under-playfield parts I took a big chunk of playfield out with one of them so sold what I could to recoup some of the money I paid out for it and scrapped the rest, keeping just the empty cabinet for this project. Can't tell you how good it felt to get that game running in it, knowing that I can play that and many, many more on at least some of the original hardware (though VPin is obviously nothing compared to real pin :)).
 
You need to go into your b2s settings on each table by right clicking the back glass and get rid of the speaker panel. That way it will look better (ie the back glass will fill the top screen).
 
Better :)

have you done the coloured roms yet?

No, just working on getting a good few tables up and running and working with PinballX and keyboard then will move on to installing some cabinet buttons and then start tweaking software and individual tables.

Tables look great on 4K TV!
 
Progress continues apace!

Last few days I have:

- Installed and configured more games - up to 55 now
- Installed and configured 5 function buttons, 2 flipper buttons, 2 magna save buttons, launch ball button, start button, button to switch PC on/off from outside cab
- Installed the original tilt bob and configured it to work with the input controller and software
- Resprayed the coin door

Doesn't sound like a lot I know but the setting up of the tables is the most time consuming part. With just about all of them you can't just load them up and play away - you usually have to change at least one setting in the table script to make it work with the backglass monitor and that's before you start playing the game and realize the factory settings are not to your liking (who's dumb idea was it to have a setting that gives you zero tilt warnings!).

Final jobs to do, all cosmetic:

  1. Make a bezel to go around the backglass monitor to hide the space above and beneath (it fits perfect side to side - the "measure twice, cut once" (or in this case "order once") adage definitely worked for me when ordering the monitor for the backglass (and the TV for that matter which is also a snug fit side to side))
  2. Create some kind of apron to go at the bottom where the side of the TV (as it's rotated) falls short of the lockdown bar
  3. Install 5v power supply and connect up the LEDs in the illuminated buttons
  4. Configure the LEDs in the pushbuttons to function as they would in a proper machine (e.g. so start button flashes when enough coins have been inserted to start a game)
  5. Respray the old plunger housing and reinstall

I don't intend to connect the plunger up to the PC - you can buy a special piece of kit to do that but the thing is always going to be a virtual pin, not a real pin and is never going to feel exactly the same so I'm not going to waste a bucket of cash and an ocean of time trying to make it so. For this same reason I am also not going to go down the route of installing real solenoids and force feedback and all that. Lot of time and lot of money wasted on an unachievable goal in my opinion.

Having said it does not feel like a real pin it is certainly close. Like many, I'm sure, my VPin experiences in the past have been bad ones, particularly with the problem of lagging/delays - where you press the flipper button and the actual flipping is delayed a bit so you miss the shot. When I've played on machines at shows I've usually played a couple of games, missed lots of shots due to lagging (at least that's my excuse) been disappointed and walked away. Not so (at least thus far) with this home build. This can only be down to the specification of the PC, graphics card and 4K TV I bought after lots of sage advice from @tyke and @Pick Holder on this group - thanks guys, literally couldn't have done it without you! I've had quite a few of the real versions of the virtual machines I'm playing on it over the years and they really are the same in terms of the way the game plays. The VP Elvis plays just the same as the real Elvis that stands 2 machines down (though the real one will never be sold of course). TZ, ToM, SS, Checkpoint (what is the abbreviation for that!), LW3, FH (which, when I played, reminded me how much I didn't like the one I used to have! (I know that statement is sacrilege to many but each to their own right?) Dr. Dude all feel right in terms of gameplay.

I know there is a bit of "it ain't real pinball snobbery" about - even amongst my friends and family. They're right, it isn't, but it's still, with the right set up, a different kind of pinball and I like it!

The 5v power supply I ordered for the buttons is not going to arrive until the middle of the week and I also need to order some wires for the LEDs in the buttons (when I ordered the buttons I didn't think I was going to actually wire the LEDS up but now they're in I realise they would be better lit up) so I might take a break for a week and target for completion next weekend but in the meantime have attached a few photos of progress.
 
For the bezel I got a sheet of 3mm clear persepx cut to size, masked off the area that should be left clear with frogtape and painted the rear black (took a few coats) and then just mounted it the way you would a normal translite with the standard trim.
You need some Playfield vids generated for PinballX too, looking a bit bare! (I think that facility may be built in now, but I still use the standalone generator personally)

You can get the plunger working with the Pinscape board as I recall, I don't have a plunger on mine though.

Not sure thats the latest and greatest SW you have there, looks like an old one based on the playfield and ramp quality - that the time consuming bit of owning one of these - keeping it up to date!
Edit: Yep, this is what the version of SW I have looks like and it's not even one of the prettiest tables IMO.
20201010_101044.jpg
 
Thanks.

I've bought a large sheet of black card for the bezel which I was going to cut an aperture in the centre of and attach to the backglass monitor using double sides sticky tape. Any chance of a photo of your bezel in-situ please bud?

I've been downloading the VP9 full screen tables. Is yours VPX?

I've also started displaying the backgalsses in the front end menu so not so bare now though I've found that if you're a bit trigger happy and move from one game to another in the menu and select the new game before the backglass has updated, you end up with the backglass from the previous game in the new game - can be funny but also annoying to have to quit and start game again!

How did you get the apron and playfield to fit fully in the screen? All the bottoms of my aprons seem to be getting chopped off. I presume it's some kind of resolution thing but I have it set up on the optimum 4K resolution for my TV so maybe it's because I'm using the full screen tables.
 
Here you go, it's actually easier to see the painted bits with the game off, I just did the top/bottom as it's pretty much spot on on the sides, especially with the trim in place.
It works pretty well, and I'm about to do exactly the same to make a bezel for my latest project - the scratch built Sega Rally you can see in the refection :)
You want to use a water based paint or it will eat the plastic, and frogtape is the only way I've ever managed to get a dead-straight line

20201010_140804.jpg

I wouldn't bother with anything other than VPX these days, I ditched all the VP9 tables a couple of years ago - pretty much everything you want will be in available in VPX, and it will look better and have much better physics
In VPX some lots of things changed - there aren't full-screen or desktop tables each can do both, and you simply change the checkbox to get the style you need, you don't need to change things like DB2S in the script either - they're all auto-sensing.
Your comment about the tilt settings got me thinking too - in VPX there are several pre-defined scripts for the nudge/tilt - the default one is for digital, you need to swap it for one that handles analog if you have pinscape and a tilt bob, it's just a re-name of a file and done.

TBH most things are actually easier in VPX than they were in VP9!

The settings for the scale are in the editor, click backglass, and make sure you've got the options shown and you'll see X,Y position and X,Y scale settings which you can adjust.
You may find you need to shrink the x scale slightly and then shift the position a little to account for it
There is a way of doing this on the fly too - one of the function keys as I recall, but I'm old-school and do it with numbers in the editor.

If you have the coindoor switches they're pretty handy even in VP for changing settings/volume, and if you want you can get the coin door interlock switch working too (but only on WPC era games) :)
 
Last edited:
You definitely should be using VPX if your PC can handle it!

Launch the table with F6 for on the fly changes (EDIT: This only works in VPX from memory). I always set it to 15, 30, 40, launch with F6, adjust Z first then X and Y. Just my personal preference.

I get my tables from here - https://vpinball.com/VPBdownloads/categories/vpx-tables/

If you want anything dumping onto a USB stick let me know.
 
Last edited:
You have to be a bit careful with Z (or one of the Z axis options) as I recall as it can screw up some tables, especially the ones with subways under the playfield I think- the details are a bit hazey though!
You can change the layback which feels like a Z axis, but is different so it might be that you're adjusting on the fly......
Yeh it's hard to say in words what I'm actually doing, I do it with muscle memory now with any new table I put on.

@Andy B Don't forget you can also run Pinball FX3 on a cabinet!

This is what Addams Family looks like on mine including colour DMD, lovely!

20190307_210806.jpg
 
Will have a proper read of all the posts tomorrow as just off out for the night but one thing struck me immediately - the recommendation to switch to VpinX so I quickly downloaded a VpinX FS version of Star Wars. Loaded it up. Graphics do look better but they are in desktop mode. I selected the "always use cabinet/rotated" (see photo) but no good. Any ideas?
 
Where did you download it from? Try https://vpinball.com/VPBdownloads/star-wars-data-east-1992-vpx/

If you picked the FSS version then that is the wrong one for a cabinet
Where did you download it from? Try https://vpinball.com/VPBdownloads/star-wars-data-east-1992-vpx/

If you picked the FSS version then that is the wrong one for a cabinet.


Thanks!

Loads up - looks great - fullscreen...but VBS error - will have to look at the script tomorrow.
 
You will most likey get overloaded with information on VPX as there is some initial config work required, but if you take it in bitesize chunks it starts to make sense, then future tables are a lot easier to get up and running as the basics are all in place. There are a few on here who can offer advice.

One thing to think about is backups, you don't want to lose all that config work.
 
Back
Top Bottom