What's new
Pinball info

Register a free account today to become a member! Once signed in, you'll be able to participate on this site by adding your own topics and posts, as well as connect with other members through your own private inbox!

Complete Funhouse

DRD

Registered
Joined
Oct 26, 2014
Messages
5,434
Location
Newark
Having done quite a bit to my Paragon, Vector and Fathom, I am a bit Bally'd out. So Fathom will have to wait a while

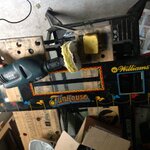
Bought a funhouse off gumtree from a nice guy in North Manchester. Basically works. Faulty left sling which is switches not the solenoid. One broken plastic I have spotted so far, broken main ramp which can probably be salvaged with a home made cliffy. Bashed up cabinet but very little decal damage so I have bought some paints and a brush courtesy of advice received from Chester pete. I want to use salvaged parts where I can on this one to keep the cost down as it will never be a minter.

Currently remaining in the van in disgrace as its legs are so utterly disgusting. First job is to clean the legs before it emerges.

image.jpg

image.jpg

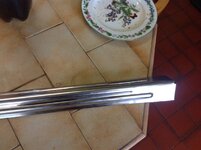
Some genius in the past thought that the best thing to do with the rusting legs was to paint them silver. So it came with 4 horribly rusty and pitted legs. Three of which received the silver paint. The top half is the before, the bottom the after

image.jpg

the trusty drill, sisal mop and black polishing compound did this job. I am not going to progress through the 4 mops on the legs as the legs are quite a crude pressing, they are pitted etc etc. But the black sisal mop, followed by IPA and solvol autosol has brought them up a treat. Great tips on the forum about using aluminium foil and diet coke to remove light surface rust, this works particularly well on the inside of the legs. But more horsepower was needed on some legs on the inside so the red sanding wheel was brought in. This leaves too many scratches, but a buff with the sisal and black compound removed these adequately

The after shots image.jpg
image.jpg

Miserable job, but it makes sense to do it before shifting the game to its berth alongside fathom in the workshop
 

Attachments

  • image.jpg
    image.jpg
    99.6 KB · Views: 28
Last edited:
Cab shows relatively little fade. Nasty bashes on the head, but this is all round the edges so it should be a relatively easy touch up after some filling and sanding ...

image.jpg

image.jpg

Looks like a child had a go at retouching the front "funhouse", hopefully some abrasive or solvent will get rid of this ....image.jpg

Tranny has a minor scratch which is barely discernible and like everything else could do with a good clean

image.jpg

There is a hacked black wire into the switch matrix that then goes to the left rollover. The switch on the adjacent slingshot does not work so this will require some digging. Dead battery had been in 20 years. Mercifully no leakage

image.jpg
 
Last edited:
Hi mate
My FH has a full new plastics set so I have all the old ones if you need any let me know. Alas the slings are broken!! Sorry mate :rolleyes:
 
  • Like
Reactions: DRD
Thank you for that, as I dig into it I will see what's what in terms of damage.

Playfield Mylar bubbling over a number of inserts. It looks very well stuck down elsewhere though. Leaves a tricky decision to be made. On my vector the Mylar came off beautifully, but it was lifting everywhere.

Thank god this is clock and not the disaster zone that it is in twilight zone. I read somewhere that clock used in tz was originally developed for funhouse but they dumped the mechanism.

image.jpg

Bubblng Mylar aside, the playfield is pretty good and should clean up well

image.jpg
 
Looks pretty good mate. I can highly recommend the pf protector as per my shop log should you go the removal route. If it lifts the inserts you can put the decals on and not worry about the bumpiness
 
It was mylared yes. The previous owner lifted it. In doing so it removed some of the black insert outlines and lifted most of the inserts a good millimetre proud of the pf. I levelled them all and then installed the pf protector. If yours isn't bubbling too bad I'd leave it. Looks good on the clock face.
 
Aha, now I understand what you were doing with your playfield ! I am hoping mine will play ok, in which case I will try to leave the Mylar well alone as removal could be the start of expensive chaos
 
Checked out the fuses. Two were wrong, but not massively so. Replaced with correct ones

Turned my attention to the non working left sling. Simple enough, wires had de soldered and fallen off the switch

The rt outside flipper return lane was also dead. Same story, just loose wires. Then the chaos began

Then the game slam tilted me when I went down the rt outside flipper return lane. Guided by Phil at pinball heaven I got involved with the switch matrix

OMG what a mess emerged. Connecting these two switches opened a world of chaos. I also noted that the lower hot dog switch was similarly disconnected, so I resoldered this. A clear pattern was emerging. Now several more switches began malfunctioning and producing ghost switches when in test mode

This was the culprit .....image.jpg
Some past idiot was having trouble with the switch matrix, I spotted this black wire when I tested the game but the game was functioning so I thought I would put it aside for now. To cure it he removed a few switches from operation by de soldering them. Then he will have found that the game would not work if the ball trough switch did not work. The solution ? Put the long black flyer in direct to the ball trough!!!!

I think the real problem was that nr fixit originally has a loose wire on the ball trough switch, soldered it back to the wrong terminal. Then the chaos, de soldering and fly wiring began.

Anyway re soldering the wires to the ball trough and removing the fly wire made the world a better place and eliminated multiple switch problems. The game seems to do what it should now, but I am not counting chickens. Time to level it and try a few games
 
Re. the red Ni-Cd battery fitted - is the Cpu board modified to charge it? Some ops used to use a set-up like that, and changed the diode which prevents the 5v power reaching the battery for a suitable resistor. The 3.6v of that battery is well down on the nominal 4.5v of the 'proper' battery, even allowing for the 0.6v lost across the diode.
 
Last edited:
  • Like
Reactions: DRD
Hi Jay. Thanks for the tip off. Will investigate as installing a remove battery is high up my ever increasing lists of jobs to do on this game

Note to self: DO NOT BUY GAMES FROM GUMTREE OR EBAY
Second note to self: BUY GAMES FROM PEOPLE YOU KNOW, OR KNOW OF
 
Lol. Amen to that. The guy I brought my FH off said it was 100% working. I could of literally gone for a sh1t and made a brew while the error messages scrolled. Luckily it was cosmetically ok so I knew it would look ok once fixed.
 
These pinballs are tricky blighters. Whoever masterminded the botching of my funhouse pulled a masterstroke. The flat battery meant that I was not alerted to the cluster fook of switch errors as the game had no time to identify and remember non working switches. So when you turned it on you just got the time and date error.

Genius

Third note to self: Should I ever want to shaft someone on eBay or gumtree with a bad game, flatten the batteries first
 
I think the "mug" tattoo in the middle of my forehead has something to do with it. Perhaps I should get it changed to "thug" to see if this helps

I am itching to pull the Mylar, but resisting for now
 
The back of the tranny was quite filthy .....

image.jpg

I carefully tried water, then washing up liquid and then isopropyl alcohol but found that novus 2 was by far the best cleaner for it, this is part way through the clean ...
image.jpg

Backbox was all incandescent and generated a surprising amount of heat.

image.jpg

I found that frosted cool white LEDs together with the original incandescent flashers worked well in it once clean. The flashing LEDs tended to "spot" too much for me. And whilst the incandescent flashers are more yellow in colour, they are surrounded by cool white GI, which really masked this. I may now try the same mix in my TAF and TZ as the spotting had always put me off the LEDs
image.jpg

The frosted cool whites do still "spot" a bit but I think this is ok when playing with daylight or the lights on ...
image.jpg

I do not play in the dark, but the "spotting" is very evident now ...

image.jpg

I find it surprising how the bulbs are arranged in this backbox, top left and bottom right get very little illumination

I know it is from another era, but this backbox illumination puts funhouse to shame ...

image.jpg
 
Last edited:
Have ordered a load of parts for the game, awaiting their arrival

Decided to attack the speaker panel. Never done one before. New ones are available, but i thought I should be able to salvage the original. A previous owner had bizarrely tried to clean the inside and outside of the display panel with harsh abrasive :hmm: So the upper screen was quite milky, as per the photo. You can also see the usual light swirl marks ....

image.jpg

This was ok during play, but looked shabby when the display was turned off.

@chris b very kindly gave me a very rough speaker panel to experiment on. So i got to work with various polishing tools.

WHATEVER YOU DO, DO NOT USE A DREMEL to do this. It will generate far too much heat and ruin the panel.

I tried sponge foam and cotton mops on the drill (used for chrome on motorbikes), but i thought these were too harsh. These are the lower three wheels in the photo below. I tried using novus 2 and novus 3

I then tried buffing wheels, the same ones as i use on metal. These work beautifully. They do leave tiny scratches, but your panel will already be covered in much worse ones. If you ever touch the panel with any cloth, this will scratch it worse than the correct buffing wheel will.

I have four buffing wheels that I use use on the drill. Each wheel has a different polishing compound. I used unstitched cotton ones for this with the finest yellow compound i have. Going left to right, the least aggressive wheel and compound is on the left, soft cotton. Then harder cotton, then stitched cotton, then sisal.

image.jpg


I found the panel to be surprisingly resiluent and was confident to buff both sides of it. You could push down on it hard without burning the plastic provided you moved the polishing wheel around. If you pushed very hard on the inside, it would take the art off, but you had to be abusive to achieve this. My drill had speed settings, i started slowly but ended up on the maximum speed. When doing the inside, i used light pressure and avoided the artwork but knowing that if i slipped i would still be ok

The results were truly excellent. The whole panel is transformed and better than any panel on any of my other games. The upper screen still has some residual waviness from the deep gouges in it. I am sure i could sand these out, then polish all of the remaining damage out. But I see no point risking it as the surface is now polished and perfectly clear

You have to be careful when removing the final traces of cleaning compound as even a cotton handkerchief scratches this plastic. So i used isopropyl alcohol and soft car polishing cloth to remove the residue.

End result, achieved without having to remove the plastic from its mdf backing. Notice how even the original light swirls, that every game has, are now buffed out

image.jpg
 

Attachments

  • image.jpg
    image.jpg
    126.7 KB · Views: 11
Nice work, and thanks for the detailed research and write-up!

Interesting that your metal polishing compounds are different colours to mine, just a little FYI for anyone out there about to buy some: select by grade not by colour! I don't have an equivalent for the yellow, but mine would run WHITE > GREEN > BLACK from left to right for the LOOSE FOLD > STITCHED > SISAL mops.

Some aren't keen but I've had excellent results with Novus #3 > #2 > #1 when polishing badly scratched plastic. You have to be careful with #3, it's a mild abrasive but will eventually remove those stubborn scratches. Then #2 and #1 for the win.

On the subject of soft clothes that still scratch plastic, like those minuscule hairline swirls in your first photo, Novus sell some paper-type cloths called POLISH MATES that don't do this: https://www.novuspolish.com/other.html (available from Pinball Heaven via Amazon: http://www.amazon.co.uk/Novus-Polish-Mates-7068-pk/dp/B006R8HQFG). I've got some and they work well.
 
Thanks for the kind words.

Whilst many new parts are available for pinballs, a number of them simply aren't as good as the originals. So restoring the originals often gives a far better result in my opinion

I have ordered some new eyeballs for rudy, so fingers crossed
 
Whilst many new parts are available for pinballs, a number of them simply aren't as good as the originals. So restoring the originals often gives a far better result in my opinion
Quite agree. I'm not one for refusing new parts just because they're new, but unless utterly f****d or broken I always have a go at restoring original parts. Or trying to get hold of an original part in better condition. I did this recently on GOLD BALL. The distinctive Bally diamond-shaped shooter-rod housing was really badly speckled with rust spots and whilst it would have polished off it would have remaining looking badly pitted. As luck would have @myPinballs was having a parts clear-out and had a one in better condition. Still a little worn and in desperate need of a polish but looks a treat after 15-20 minutes with the Dremel. It still has that look and feel, that patina, of an original part but looking good.

There's also mileage to be had making your own parts. So far for GOLD BALL I've had a friend cut a new cover plate out of mirror-polished sheet steel on his CNC machine and I made some "buttons" out of Nylon-6,6 rod that are part of the Bally "linear" flipper design. The 6" square of steel was 99p posted and 2-foot of rod about £2, both from eBay. Bargain considering the cover plate is unobtanium and the "buttons" are about $10 plus postage from the US!
 
stripped and cleaned rudy's filthy head with a dremel and solvol autosol for the metal bits. Novus 2 for the plastic, and ipa for the solenoid sleeves. I also buffed out the worst of the scratches in rudy's chin with my polishing wheel. He was not looking to the left properly. But this was not mechanical


image.jpg

I got the occasional bounce back when the solenoid fired the ball out of his mouth, so i reduced the height of the exit piece (thing with two springs hanging off), this did the trick. Possibly saving rudy from a broken top jaw too

Bought new parts for the eye mechanism as these were all showing wear as per the pictures.
image.jpg

These are connected together by two metal links. Both had corroded and this was doubtless contributing tho the wear in the holes. The metal grommets are a good idea to stop this wear, but the original links do not accommodate the eyes! So old eyes back in for now with the new plastic arm. Repainted his bottom lip with adequate valspar paint colour matched at b and q. Tester pots are £1 with a voucher they give you at the paint counter. It is not as glossy. But miles better than before

As he was not looking left i removed the solenoid board. Two connectors pretty fried

image.jpg

image.jpg

The board is actually hack free, save a repair to a fuseholder which is adequate and a replacement bridge rectifier soldered onto the original one's legs.

image.jpg

I reflowed solder on all pins, cleaned off the flux with maplin spray cleaner. Cleaned the pins with 400 grit wet and dry paper. Spotted two nasty solder splats which might have been troublesome.

Did a temp repair on the fried connector whilst i wait for new parts. This has greatly reduced the connector's running temperature. Thanks for the advice received from forum members here @Paul @ronsplooter @mark9 @lukewells @Moonraker @replicas and fellow member of the funhouse brethren @Spandangler

Everything now works, save a few bulbs. Rudy finally moves his eyes both ways, so i imagine that the problem was a bad pin on the solenoid board that has now been sorted.

Been experimenting with different paints in an attempt to match the cab colour, this is proving very difficult. As it is not just the colour it is also the sheen. Tried b and q's valspar paint matching service which supposedly offers 2.2 million colours, but that failed and it was better going by eye. Still haven't found a match so the quest goes on. I was told that Peugeot royal blue was close, but it is not close enough for a touch up job

About to start stripping the playfield now, as my new main ramp has arrived. I am getting on well with the game so have treated it to the newramp as i suspect it will be a keeper.
 

Attachments

  • image.jpg
    image.jpg
    108.4 KB · Views: 8
Last edited:
Nice job there mate. I've still not posted that plastic!! Sorry mate been working 16 hours days so haven't had a chance to post. I'll post it next week promise!
 
Hi. No probs at all. This will take me ages.

In what is already a hotly contested competition. I think there is an early odds on favourite in the "most disgusting" category ...

Before, i actually thought this was smoked plastic ...
image.jpg

After ...
image.jpg

I am hoping this will speed up the languid ball times in the troughs
 
That subway plastic isn't too bad ;) I have seen far, far worse :D One I had before looked like it was made of black plastic....it was supposed to be clear :eek:
 
@Spandangler

I am dismantling the ramps now and discovered this loose, broken red plastic. Might i be able to beg one of these too if you have one in stock ? Just the red bit

image.jpg
 
The more i dig, the more i find. The ball eject from lock took a couple of attempts sometimes, this worn part is the cause. At least funhouse is a good machine for spare parts availability so another part is required, this game is putting up a fight

image.jpg

Shearing bolts and captive nut problems!!!!. I am pretty sure white threadlock was used. You can see this in the captive nut at the bottom right. Forum advice is to try spraying with isopropyl alcohol, then to tighten a bit, release, alternate between tightening and releasing to slowly remove them. About half still snapping though.

image.jpg

This game is going to require a lot more new parts than i had imagined and a more comprehensive strip down and clean than i had hoped for. Funhouse has multiple layers of clear plastics, so really shows the dirt ....

image.jpg

I am putting so much work into this that i am going the whole hog now, 2 new ramps. Gameplay should be massively improved by a good clean and wax
 
My ball lock contraption thing is also mashed. Quite often a well struck clean shot in the lock somehow gets round the lock and back out the other side. You can buy these new.

And top tip. Remove that tall post as pictured in your bottom pic, before removing the ramp. Comes out soooooo much easier.

Oh and I have that plastic so I'll stick it in the post as soon as I have a brief respite from the 16 hr shifts!!!
 
Back
Top Bottom