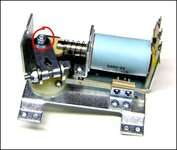
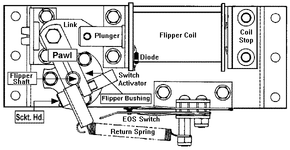
Hi, I have a sticky flipper on my Williams Barracora. At first cursory inspection it seems the piston is getting slightly stuck in the coil and doesn't move in and out freely. No sign of overheating. My first thought is to replace the coil sleeve. My question is: are all coil sleeves the same size or do I need to source one specifically for the coil on my machine? Thanks. John.
Pinball info
You are using an out of date browser. It may not display this or other websites correctly.
You should upgrade or use an alternative browser.
You should upgrade or use an alternative browser.
Best advice talk to Andy @pinballmania he'll know what your on about and sort you out
Tolerances are very fine. I have found that some coils and some coil sleeves can have slightly different dimensions to others unfortunately. They can vary according to who you buy them from (mania, heaven, 1 stop, the germans, the dutch ...)
When i renovated my banzai run I found that the cores of new repro coils i bought were slightly too narrow for some new repro coil sleeves. But i just kept trying with others I had in stock until i found matches
The flipper rebuild kits you buy also vary in quality. The original plungers had a finer chrome finish than the modern repros imho
My advice would be to avoid brass coil sleeves. I found that the Williams modular flipper didn't suit them (or they it). I had a call-out once for 'weak upper flipper' on a High Speed - I was dreading an end-of-stroke switch change on this (the upper flipper was tight against the cabinet wall, and didn't show above the top edge with the playfield up) but I simply discarded the brass coil sleeve that was fitted in favour of a nylon one and all was well.
Take a good look at the plunger and end stop too. Almost certain to be some 'mushrooming' where the metal has been hitting against metal. This is a big cause of flippers sticking.
You can remove both parts from the game and file away the damage (make sure that no iron filings go anywhere near the game) but probably better to replace the plunger, end stop and sleeve.
You can remove both parts from the game and file away the damage (make sure that no iron filings go anywhere near the game) but probably better to replace the plunger, end stop and sleeve.
Thanks for all the very helpful advice. I have nylon sleeves on the way from @pinballmania . In the meantime I'm dismantling the flipper (having taken lots of photos) and will look for mushrooming etc as suggested. I'll post an update when I've made some progress. Cheers!
Besides mushrooming, also look at the wear on the pivot points. This can make a big difference to how they perform and how "snappy" they feel
I do have to keep reminding myself that these huge, heavy, unreliable, prima donna machines once made a living in the wild
I do have to keep reminding myself that these huge, heavy, unreliable, prima donna machines once made a living in the wild
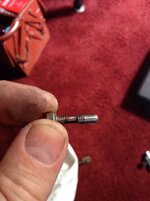
Indeed David. I think it is time to post the picture once again of the pivot screw I took out of my Spider-Man.Besides mushrooming, also look at the wear on the pivot points. This can make a big difference to how they perform and how "snappy" they feel
I do have to keep reminding myself that these huge, heavy, unreliable, prima donna machines once made a living in the wild

@Andrew Stockdale and @DRD , thanks for those comments about pivot screws. Is this the thing that links the plunger to the fibre link piece? On mine it looks like some sort of roller pin not a threaded screw like your photo?
Andrew's piccie is of a modern stern flipper mech. Even stern bolts are rubbish, so they do this. My wpt did this too.
Not sure what system a barracora has, but any visible wear in the link or pins that go into it will reduce the snappiness of the flippers, and reduce flipper angle. You quite often get enlarged holes in the link piece.
One of my games had different flipper angles. Transpired that the plungers were different lengths.
If in doubt, treat yourself full rebuild kits. Then everything should match and be symmetrical
It links the plunger to the pawl and has a nut on the other end. If you separate@Andrew Stockdale and @DRD , thanks for those comments about pivot screws. Is this the thing that links the plunger to the fibre link piece? On mine it looks like some sort of roller pin not a threaded screw like your photo?
the plunger and pawl by removing the screw make sure you don't lose the little hardened bush which is inside.

Thank you @Andrew Stockdale , @DRD and @Jay Walker , @Tony . After all your collective wisdom and advice Barracora is up and running again. I removed the flipper mech from the playfield and dismantled and cleaned it. The sleeve looked fine but the plunger, although looking OK, when you rubbed a finger along the bevelled edge, had very slight roughness that I guess would have been enough to create drag. Following Andrew's advice I carefully filed the bevel and then used very fine emery paper to get a smooth finish. Everything then moved freely and easily. I've just re-fitted the mech and re-soldered the connections and it now plays fine. I will though, I think, get a couple of re-build kits as I can see there are old part in there that would benefit from renewal. The EOS switch in particular shows lots of wear on the contacts. @Andrew Stockdale , I looked at the joint between the pawl and the plunger and it has a different connector on Barracora. It is a sort of 'roller pin ', if that's a word, rather than a removable nut and bolt. Thank you again everyone. Best wishes, John
PS Just looked properly at @Andrew Stockdale 's photo and I've been looking at the wrong link. So ignore my last comment!
Thank you @Andrew Stockdale , @DRD and @Jay Walker , @Tony . After all your collective wisdom and advice Barracora is up and running again. The EOS switch in particular shows lots of wear on the contacts. I looked at the joint between the pawl and the plunger and it has a different connector on Barracora. It is a sort of 'roller pin ', if that's a word, rather than a removable nut and bolt. Thank you again everyone. Best wishes, John
The earlier version of Williams' flipper unit, which was introduced on FirePower, did have 'roll pins' holding the link (thin, and made from a brown fibre material similar to that used on the older e/m type) into both the plunger and the flipper pawl. It was made hardier and more service friendly by increasing the size of the pin into the plunger and changing to a bolt/washers/bush/nut/ connection to the linkage.


