Pinball info
You are using an out of date browser. It may not display this or other websites correctly.
You should upgrade or use an alternative browser.
You should upgrade or use an alternative browser.
Complete Earthshaker project
- Thread starter russdx1
- Start date


Question about screws/bolts 
Do I have to buy the exact Williams part number when replacing screws? Can i buy just a similar uk one from boltbase etc... or do they all use American standard thread or something?
Ultrasonic cleans them pretty well but some are either stripped/wrong/to far corroded or missing so do need replacing.
Also any tips when cleaning in ultrasonic cleaner, some come out great and dry great but some when drying just go white and corroded again, do I need to soak in some other type of solution? How do you guys clean your screws/bolts?
Regards
Russell
I use a dash of traffic film remover then dry em out and whack in the tumbler.
If buying new get the correct spec American ones
If buying new get the correct spec American ones
Question - I have enough Walnut media, however have never tried corn Cob media - Anyone advise where they got theirs from please?
Seeing the above it looks like it needs to be tried!
Seeing the above it looks like it needs to be tried!
TFR in the Ultrasonic?I use a dash of traffic film remover then dry em out and whack in the tumbler.
If buying new get the correct spec American ones
this is what i used
https://www.ebay.co.uk/itm/SAND-BLASTING-SHOT-BLASTING-TUMBLING-POLISHING-CORN-COB-GRIT-MEDIA-10-14-5kg-BAG/302194106274?ssPageName=STRK:MEBIDX:IT&_trksid=p2057872.m2749.l2649
also try throwing some dryer sheets in lol (sounds weird) but they seem to soak up the dirty and keep the media a bit cleaner (don't need to switch out as often) found the advice on a pinside thread lol
iv now got loads of smaller pf mech parts in there on a 2 day run (wallnut) then will run 1 day corn cob again, will post results on sat night.
i dint tighten down the bowl last night and woke up to a proper racket in the garage LOL (always tighten that down firm! lol)
Regards
Russell
TFR in the Ultrasonic?
Yup
Question about screws/bolts
Do I have to buy the exact Williams part number when replacing screws? Can i buy just a similar uk one from boltbase etc... or do they all use American standard thread "
It is worth trying @pinballmania
It is worth trying @pinballmania
yeah got an order queued up for some weird rare ones
")
Found RS components do big bags of 100 of the correct american unc 6-32/8-32 (various lengths) so could be a good source of bolts in large quantities
https://uk.rs-online.com/web/c/fast...9,4293337861,4294475783,4294806851,4294475446
(love rs for there free delivery)
Regards
Russell
Yep RS is a good cheap source for bulk buying. Molex connector stuff, screws, nuts. Once you have pinpointed the correct item! I love em, free shipping, super fast usually next day.yeah got an order queued up for some weird rare ones
Found RS components do big bags of 100 of the correct american unc 6-32/8-32 (various lengths) so could be a good source of bolts in large quantities
https://uk.rs-online.com/web/c/fast...9,4293337861,4294475783,4294806851,4294475446
(love rs for there free delivery)
Regards
Russell
Sent from my D5833 using Tapatalk
also try throwing some dryer sheets in lol (sounds weird) but they seem to soak up the dirty and keep the media a bit cleaner (don't need to switch out as often) found the advice on a pinside thread lol
That is unusual, but i bet they smell good afterwards

Yup love RS use them alot on other projects.
Yeah its a weird one but does appear to be working as they are really dirty so must be picking up something
Not having much luck with ultrasonic cleaner though, did pretty good job on some screws and a pcb, but random metal parts never notice much difference. Will try few more solutions.
Regards
Russell
What sonic cleaner are u using? Some really cheap ones are ****e
Not a cheap one then how long are u running it?
And are I putting anything in the water?
And are I putting anything in the water?
Yeah been using this with hot water. tried 5min / 10min (afterwards the water is never really that dirty)
Iv also bought this and will give it a go.
And try that TFR as mentioned above.
Regards
Russell
Iv also bought this and will give it a go.
And try that TFR as mentioned above.
Regards
Russell
Last edited:
Maybe not long enough I normally do it for about 30+ mins

 Installed the t-nuts and x6 of the pop screws (only ordered 6 DOH)
Question: does any one know where to buy the screws used to hold on the fasher covers to plastic ramps. As they screw into the flasher lamp holder pcb they have a weird shape thread at the end (I'll grab a photo)

is this it?

Regards
Russell
Last edited:
started to rebuild some mechs after been tumbled and cleaned.


next will drill pilot holes on all the cpr dimples the start to install the mechs i have ready / gi lamp holders (screw mount instead of stapled)
Regards
Russell
next will drill pilot holes on all the cpr dimples the start to install the mechs i have ready / gi lamp holders (screw mount instead of stapled)
Regards
Russell
started to attach a few mechs i had rebuilt after tumbling. Also added a few wire guides and GI lamp holders, decided to go down the route of replacing the braided GI with wired version due to its far easier to swap out a blown lamp!

next ill finish off the wire guides / GI lamp holders and get em wired together. Still need to clean the switch loom but been putting it off as gotra remove all the micro switches which I'm not looking to forward to!
Progress is very slow, but slowly getting it back together
I vastly underestimated how much work was involved in full restoration lol! it's all the cleaning involved its insane!
Regards
Russell
I vastly underestimated how much work was involved in full restoration lol! it's all the cleaning involved its insane!
I did the same.... Wh20 PF swap took me 3 months of on-off. TAF took me around 10 years and two house moves!
hehe, yeah its annoying as i could do it very quickly if i had like a solid run at it and a week off work but two young kids and other little projects only gives me the odd hour here and there 
I really enjoy it though so all good fun
Regards
Russell
but two young kids and other little projects only gives me the odd hour here and there I really enjoy it though so all good fun
Regards
Russell

Bit the bullet and de soldered every microswitch for hand cleaning and will dish washer the loom. Hopefully can remember what goes where when soldering back together lol. Also chucked all the metal switch brackets into the tumbler

Once brackets out tumbler ill reattach micro switches and screw into pf. Then place loom on top and solder to switches.
Tomorrow I'll be picking up some parts i had zinc plated be interesting to see how they came out / drop some other bits off.
Regards
Russell
Last edited:
(can't seem to upload images tonight??)
Interesting - you arent the first to say that. I'm off to have a check...
Edit - Issue found - Hosts on the case
Last edited:
Every microswitch now hand cleaned and brackets tumbled so shiny shiny. Will start to mount them onto the new pf.
Replaced all stand up targets with new and have them soldered on

i chucked an old target in tumbler see if it would clean up. Not a good idea lol gets completely clogged with media.... (note to self don't do that again haha)
Regards
Russell
Replaced all stand up targets with new and have them soldered on
i chucked an old target in tumbler see if it would clean up. Not a good idea lol gets completely clogged with media.... (note to self don't do that again haha)
Regards
Russell
added a few more switches and the subway test fit (metal parts in tumbler, will add soon)
next ill wire up the new gi sockets then probably add the switch loom. Still waiting for the drop target, top vuk and fault line mechs from zinc plater(will install once back and polished up)

Regards
Russell
next ill wire up the new gi sockets then probably add the switch loom. Still waiting for the drop target, top vuk and fault line mechs from zinc plater(will install once back and polished up)
Regards
Russell
Attachments
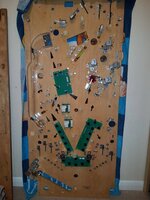
bit more progress
Installed and resoldered the switch loom.

Installed and resoldered the lamp loom.
Installed coil loom (waiting for few mechs to come back from zinc plater before i can install them) still need to wire up flasher sockets

So the back is pretty much done apart from the few mechs but shouldn't take long to build / install (flippers,fault line,VUK,drop targets)
Started to populate the top a bit with any components that did not require drilling. Will now need to open up the pilots holes and drill some larger post holes to fit other stuff.

made a few mistakes some how missed a t-nut and put a 6-32 where a 8-32 should be but luckily they are quite near the edge so using a large g-clamp should be able to press fit them in (as can't hammer now) biggest mistake is i did not realise the pop bumper mech screws are flush with the pf and you need to counter sink those holes before installing those 3 fin screws. It does not seem to effect the pop operation at all but is not cosmetically right so a bit annoying. As they are now all wired up and cant really lay pf flat any more id do more damage trying to remove and redo it. So will leave it.
One question! all the new standup targets slightly lean inwards is this correct? or should they be perfectly straight up ie 90degrees from pf?
Really need to start the wood work which i have been putting off as have zero experience with wood/sanding/filler/painting so will be quite hard for me and plenty of mistakes no doubt! but gonna need a cab pretty soon to stick the pf in
Regards
Russell
Installed and resoldered the switch loom.
Installed and resoldered the lamp loom.
Installed coil loom (waiting for few mechs to come back from zinc plater before i can install them) still need to wire up flasher sockets
So the back is pretty much done apart from the few mechs but shouldn't take long to build / install (flippers,fault line,VUK,drop targets)
Started to populate the top a bit with any components that did not require drilling. Will now need to open up the pilots holes and drill some larger post holes to fit other stuff.
made a few mistakes
some how missed a t-nut and put a 6-32 where a 8-32 should be but luckily they are quite near the edge so using a large g-clamp should be able to press fit them in (as can't hammer now) biggest mistake is i did not realise the pop bumper mech screws are flush with the pf and you need to counter sink those holes before installing those 3 fin screws. It does not seem to effect the pop operation at all but is not cosmetically right so a bit annoying. As they are now all wired up and cant really lay pf flat any more id do more damage trying to remove and redo it. So will leave it.One question! all the new standup targets slightly lean inwards is this correct? or should they be perfectly straight up ie 90degrees from pf?
Really need to start the wood work which i have been putting off as have zero experience with wood/sanding/filler/painting so will be quite hard for me and plenty of mistakes no doubt! but gonna need a cab pretty soon to stick the pf in
Regards
Russell