What's new

Data East Chase lights ST25 Hook LED conversion

ronnie63

Site Supporter
Joined
Jun 8, 2015
Messages
2,217
Location
Scotland
Over the last few weeks I have been refurbishing my ST25 after it had been in storage for 15+ years I'm almost finished and intend to start a thread about it soon. One of the finishing touches are the ramp chase lights these seem to always be shot! anyway I stripped down the tube containing the lamp strings and thought this is a mess! both tubes had shorts which had taken out the TIP devices on the driver board! So I'm going to attempt a SMD LED conversion and am awaiting parts to be delivered, will log with pictures my progress or failings however it works out lol. watch this space! of course if anyone else would like to chip in with what they have done or would do please feel free

Thanks Ronnie
 
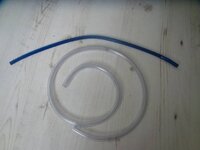
First part to arrive clear tube to house blue SMD Led's, slightly thicker but hope it will blend in with the ramps being clear?
 

Attachments

  • DSC04532.JPG
    DSC04532.JPG
    32.7 KB · Views: 21
Have made one side but nobody seems to be interested? if not I won't bother updating the thread

Thanks Ronnie
 
I'm following your work here. Got a problem with my Hook chase lights and I'm not sure what to do about it.

I can have any two of the three threads connected and it all works OK, but if I connect all three then after the chase-lights have been activated for a while they fail and take out the music with them.

Er... weird or what?

I've replaced a few bits on the driver board but that hasn't changed anything. I also picked up a spare rope on ebay but it behaves exactly the same way.

There's an outfit in Germany that does a repro driver board for about 24 euros (not sure on the postage) and I might just buy one when I get back from my hols.

But if that doesn't work I'm stuck. Maybe a brand new rope would help me.

Keep going please!
 
Sounds cool I would like to know if this could be used in a stargate back box light rope, bloody annoying when one bulb goes out!
 
Cheers guys, can tell you I have one side done the only snag was I had to do them in sets of 3 so 3 lleds light at once but there is 3 times as many LEDs so I think it's looks cool and they chase in 3's. Will post a video of the one side running probably tomorrow and take pictures of what I done, it's a bit fiddly but I think much easier than trying to fix the rope that was there.

If your sound is going and your driver board is burning then your ropes are shorted internally I had the same with mine.

Cheers Ronnie
 
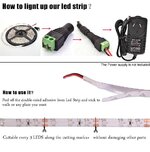
This is what I'm using but it needs modified, it works on 12 volts but the +ve to every set of 3 LEDs has a dropping resistor hence why I had to have 3 chasing rather than 1 , so the plus is left as is but every set of 3 negatives need separated as the driver board switches negative to the lights, hope that makes sense? Pictures might be better. And this is a cheap,option at under a tenner.

Ronnie
 

Attachments

  • image.jpg
    image.jpg
    90 KB · Views: 20
Sorry for the delay, it's all done and I'm happy with the end result but will not be able to upload the video until midweek as will not have access to my desktop etc but all will be revealed

Thanks Ronnie
 
Hi good stuff am looking forward to the video as I have a HOOK so interested in anything related.
 
Cool I'm keen to get some feedback from you guys as I never seen the old ones working only seen videos on YouTube and they look quite dim but these are uber bright!

Cheers Ronnie
 
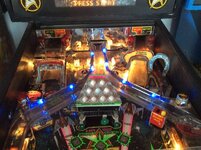
Right manged to get the video uploaded, it's not great but hopefully will show what you need to see. They are CPU controlled same as the original and look great in transporter mode when they reverse and speed up that bit not on the video sorry, all feedback welcome good or bad

Cheers Ronnie

 
They look great, I like that both sides are matched. Are they colour changing so you can set them how you want? When you consider that probably 2/3 of ST25's have the rope lights not working what's not to like!
 
They look great, I like that both sides are matched. Are they colour changing so you can set them how you want? When you consider that probably 2/3 of ST25's have the rope lights not working what's not to like!

Thanks Matt, I like them too, these are just standard blue leds it was £3.41 posted for a 5 meter roll, I guess you could use any colour you like, and at a push depending on how neat the wiring is done they may fit in the old blue tube. I will do a how to on making these the set on the left are done better as the wiring is behind the strip, on the right I wired on top so might redo it.

Cheers Ronnie
 
Thank you, I'm now looking at trying to have them chase on one led instead of three, it means cutting each led of three that has the resistor and soldering back together again, will see how it goes?

Ronnie
 
Nice conversion ! I wish I had read your post before I had to rebuild the original blue chasers !!
If anyone is interested here's how I did it (unfortunately I didn't take any photos along the way sorry !!)

You will need :- a sharp knife, a pen, small cable ties soldering iron, side cutters or pliers, hot air tip or gun, 2 packs of led's eBay item no 121076185729, some heat shrink tube (maplin selection pack) some thin stranded wire, thick cardboard or sheet of ply, black insulating tape, 9volt battery & a packet of long drawing pins !!

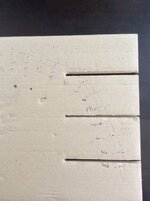
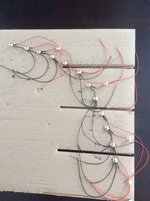
Remove the blue strips, turn them upside down, using a sharp knife cut a slot from end to end & remove the inside leaving just the tube (sounds a bit like blue peter!) lay the blue strip onto the cardboard & draw round it. Take the old lighting strip & lay it inside the drawing. Mark the positions of the lights with a line. At the left side starting from the first bulb nearest the connector mark it with no 1, the next with no 2, the next with no 3, then no 1 then 2 then 3 repeating until all bulbs are numbered ! Tale the new led's, starting at the bottom (no1) stick a pin Between the 2 legs & attach it to each position of the old lights already marked. The red wire to the outside, black to inside. (It is helpful to add extra pins on the outside to loop red cables out of the way) starting with the furthest away led take the red wires from as many as you can to one point, twist them together (you will have to strip them back a little) solder a longer bit of cable to them then shrink a little tubing into it ! Repeat all the way down until you have a cable coming out of the bottom of the template. The black leads are done the same way connecting all the no 3 led's together then the no 2s then the no 1s. You should now have 4 wires coming out of the bottom ! Time to test them ! Get the battery & connect the wire going to the red side of the led's to + touch one of the other wires to - & the corresponding 4 led's should light (yee haa happy days !) if they are all working pop a piece of heat shrink over them all at the end of the template then cut off the 4 coloured leads from the old light assembly pop some heat shrink tube over each cable & solder & shrink them onto the corresponding wires white to the led's red wire(common to all) black to lamps 1,4,7,10, brown to lamps 2,5,8,11 & green to lamps 3,6,9,12. Push the lights & cable back into the slit & run some tape around the cables & end of tube ! Test them once more then re install with cable ties :)) to do the other side turn the drawing round & repeat everything again ( you are probably better re drawing it as it can get confusing !) I will take a couple of photos of the template etc & it might explain the layout a bit better !

Don't know if anyone's thought of this I found it by accident as I was taking photos ! If you put your iPad / I phone into camera mode & rest it on top of the glass you can magnify / inspect the play field etc so for us half blind oldies you don't need to do your Sherlock Holmes impression with a magnifying glass !
 

Attachments

  • image.jpg
    image.jpg
    69.4 KB · Views: 20
  • image.jpg
    image.jpg
    91.2 KB · Views: 19
  • image.jpg
    image.jpg
    169.3 KB · Views: 21
That's a good solution too nice work.

I'm doing a new set in the old blue tube but this time one led will flash instead of three, much more work and had to buy a small voltage dropper as with one led the 12v is too much but this way the led's can be dimmed if needs be. Might take a while but will get it done when I'm in the mood

Ronnie
 
Back
Top Bottom