What's new
Pinball info

Register a free account today to become a member! Once signed in, you'll be able to participate on this site by adding your own topics and posts, as well as connect with other members through your own private inbox!

Complete Banzai Run

DRD

Registered
Joined
Oct 26, 2014
Messages
5,434
Location
Newark
Always fancied one of these since first playing in France in August 1988, so was probably a very new game back then. I had vowed to avoid projects until my funhouse is done, but these games do not come up for sale that often - especially with cabs and playfields in good order

This was a routed game. Put in the games room of an owner who literally played it at christmas, knew nothing about pinball, and had it maintained by an operator. So it was like buying from an operator ....

Has aftermarket alarm, additional cam lock on the door panel operates the alarm via a microswitch. A second microswitch on the coin door triggers it. Also a 10 amp fuse in the mains plug

image.jpg

The operator had butchered the cab putting a larger Coin door in with coin counter. So i will need to let about 1cm of wood in, fill, paint, then put a proper williams door back in. Thinking of a decal job as a fallback, but the rest of the paint is really good. The simple art on the front means. I may well be able to save the original paint with careful use of frisket

image.jpg

Poor game had not had the freestyle mini pinball in if for years. I stole this from the rolling tilt mech in my Fathom, the correct 15/16 " one.

image.jpg

When you lower the upper playfield there is a risk this could fall out and break the main glass. So operators were wise to remove it.

Main and upper playfields were both saved by mylar ...
image.jpg

Unique cab design, rest of paint much better than the door panel ...

image.jpg


You must do things in order. Main glass out. Then lift the head unit up 90 degrees ....
image.jpg

Then backglass out.

This has an inner layer of lexan. It is very neatly cut, so i think it might be factory. The lexan probably makes sense given that otherwise you would have a steel ball hitting tempered glass. I will give this a good polish with the buffer in the future. Backglass dirty but in very good order ...
image.jpg

Then upper playfield down ...

image.jpg

Batteries were dead, but luckily no nasty corrosion, so new ones installed to stop the factory resets every tine i power it up. ...

image.jpg

Game pretty dirty, but plays. Filth fest at the back


image.jpg


Reason for the filth was that this piece of trim had not been installed on the base of the upper glass to keep dirt out. I was delighted to find it in the cabinet. It is a big lump of metal to just leave lying on the cabinet floor...

image.jpg


Most worrying thing was this dead player two display ..


image.jpg

Accessing it is a pig of a job, and uniquely banzai. Head up 90 degrees, undo the locking washer and slide out the small printed top backglass which is also in nice shapeimage.jpg

The light panel is unique to banzai, but luckily the driver board is shared with grand lizard, pinbot, high speed, road kings ....

image.jpg

Then you unscrew the light panel from the front. I would like to sort this as an early job so that i can use the diagnostics, menus etc. this is my first system 11 so I really need this display

By removing the boards, swapping over ribbon cables, reseating cables, swapping over player 1 and player 2 ribbon cables etc, i have established that the driver board is ok. Next step is to install a replacement 7 digit alphanumeric display. Worst case, upgrade to led technology, the led boards are produced in the usa and germany. Now on the hunt for an original though

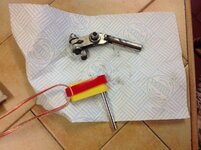
This really annoyed me, so was the first fix, this was behind the main saucer leading to the upper playfield lift. Now straightened, filed square, cleaned and replaced

image.jpg


Spent the time scoping an initial parts buy, and addressing obvious problems. Parts orders going in tonight, including ....

New ramp, i will make cliffys for this as it takes a real pounding
New plastics, some are available
flipper rebuild kits and playfield bushings
Full rubber kit for upper and lower playfields
Superbands
5x williams logo yellow flippers, at least the mini one is ok
red single star posts
yellow single star posts
loads of these these clear double star posts with extended tops, they keep the lexan pressed against the main backglass on the upper playfield. Nearly all are cracked
image.jpg
double star posts - clear
Flipper coil - fl11753-50v as the main side flipper has the wrong one
New set of system 11 legs
translucent red flipper buttons
 
The light panel is unique to banzai, but luckily the driver board is shared with grand lizard, pinbot, high speed, road kings ....

The original alpha-numeric driver pcb (which I think was designed for up to 6 player displays) would've been a blast from the past - those early System 11 games used four separate player displays, with each glass envelope on its own dedicated 'slave' pcb, much like System 7 & 9. Williams had put all the envelopes and the driver circuitry together on one pcb from Millionaire onwards. But that looks like a unique pcb on Banzai, using the normal display panels.
 
Last edited:
A positive start, this did not look too bad ...

image.jpg

Essential kit for the attack ...

image.jpg

This bit was so gunked, the spring barely had the power to reset the solenoid ..

image.jpg

Top cleaned up quite nicely, no nasty surprises ...
image.jpg

I have wasted time before on the polisher. This was all done with the above and rags. The dremel was used to remove ball damage/ flatten out certain parts.

Then the bad news. I immediately ordered 2 more bottles of ipa....

image.jpg

Sub playfield pivots had been lubricated with axle grease, this had got into all the plunger sleeves. At least there were no rusty solenoids.

Had to tighten up two rivets ... Just light hammering with a pin punch did the job on my vice

image.jpg

Slingshots greased too

image.jpg
image.jpg

I did not replace any components, just a good clean. The ball trough, shooter lane kicker, autosave, slingshots now all noticeably snappier.

Plunger needs replacing, wrong shooter spring-far too powerful

image.jpg

Shooter tip has mushroomed so will need the grinder to remove it from the plunger mech

Scored my first king of the hill after reassembly
 
A sharp file will do the job on the plunger ,its takes more time but it's less dangerous than a grinder:thumbs:
 
Love it, Banzai Run is awesome! Had to play a few games on my one after seeing your recent posts. I had to tighten the eject mech rivets up on my one when it turned up too, so its probably a common trait.

BR is such a well designed game and built to a quality that most manufacturers can only dream of these days imo. Although it is a unique design, clearly a lot of thought went in to making it pleasant to work on. Once you've worked it over it should be rock solid for ages. A proper piece of commercial quality equipment!

It will be interesting to see how modern machines fair when they're 28 years old, even though many are only in home use.
 
  • Like
Reactions: DRD
Great game. Miss mine. :(

Make sure the ball lift mechanism is half way up before you lower the vertical playfield. If it is in the down position you WILL snap the lift it clean off when lowering that playfield.
There is actually a setting that gets the game to park the lift at the half way point instead of in the lower position. It slows down the gameplay a little as the lift has to drop further before it picks up the ball but it is well worth it.
 
A file Carl ? No way. Remove the whole shooter mech. Black and decker workmate. Grinder. Mlet the sparks fly. I know it is all very new labour, tony blair, politically correct - but I do use ear protectors with a polycarbonate face guard

One of the joys of life is using massively powerful tools to overwhelm the task in hand
 
I leave the mec in with a rag at he bottom to cach the iron filings !!

But that's just me , i prefer using hand tools over electric :cuckoo:
 
Well this thing is just a series of bodges. Wires grafted on from the bogus coin door. Wires grafted on to the upper playfield for some daft reason - someone could not fix a loose wire in a connector.

Bought six new flipper rebuild kits. What a mess the flippers were. Played horribly. Every sort of bodge, missing capacitors, snapped wires, wrong coils, wrong sleeves ...

This one had a novel metal link

image.jpg

After the flipper filth fest I discovered that I needed two new coils, which are on their way.

Treated it to new bats and superbands. ...

image.jpg


Removed and cleaned the stand up targets, new foam too.

Cleaned out various additional filthed and greased solenoids. Spotted that the curly cable on the motorbike ball lifter is shot. It has lost elasticity so needs replacing as it can get tangled up in the ball lifter.

@Garry Sp8 kindly sold me some bits from his spare banzai, so I was able to replace the bodges to return to factory spec.....

Correct spinner and ramp guard post

image.jpg

Correct stand up target...
image.jpg

Correct gate and wire for the upper playfield ...

image.jpg

Also bought the unique catch that the quarter turn lock uses in the head, some plastics, posts and bolts

Will be a greatly improved game in a couple of weeks

Also received deliveries from pinball mania, one stop. More on the way

Money pit
 

Attachments

  • image.jpg
    image.jpg
    133.6 KB · Views: 4
Great stuff mate. 6 flipper rebuild kits ain't cheap either!! Still it'll play like a dream when it's done
 
It has realły livened up the 4 flippers that I could do, waiting for the coils before i can do the others
 
If you have to ask the price, you can't afford it !!!!!

Cost will be frightening dan. You enter a time v money paradigm. I could have saved £20 by cleaning up the 5 main flippers for example. Similarly with flipper rebuilds. On mŷ funhouse flipper rebuilds i was economical, but did a lot of messing around. With 6 to do this time, I just did not have bits lying around to mix and match refurb them, so I bought full kíts

I noticed more play than normal in the flipper bearings, so bought 6 new ones ........

Discovered another horror today. Threadlock. Bad memories of funhouse and threadlock returning. So it will be like the somme in terms of fallen bolts and t nuts
 
Banzai has an auto kicker next to the outlanes ...

image.jpg

You aim it at a captive bàll target using this mech ..

image.jpg

These captive t-nuts are everywhère, with threadlock. They are an absolute nightmare, as they simply spin when you try to undo them, even on plastic star posts...

image.jpg

To install the replacements I use a nylon mallet and a fat pin punch

These damned things were so difficult to remove i had to use the dremel with a cutting disc on two of them. It is bloody ridiculous using threadlock on posts like this

image.jpg

Quite a filth fest ...

image.jpg

Found two of the gi lights in this area had defective soldered joints below the playfield. All gi working now

All the plastics were filthy, even ipa would not remove it. But the buffing wheel did the job. The grimy before ...

image.jpg

This was probably the saddest part of the whole game ...

image.jpg

After a clean, buffing the plastics, picture from @aaronhicksuk to show me what should be here, the afterimage.jpg

Old coin door ...

image.jpg


Proper Coin door installed. I need to do something about the lockdown holes, correct bolts, filling the alarm keyhole,touching up the paint. This will have to wait as my funhouse decals arrived today, so that is my next job. But it looks better than before

image.jpg

New right slingshot from marco. These are normally hammered on unshopped banzais ...

image.jpg
 
great game, waiting for cpr or somewhere to do a plastic set or one to turn up then i can start restoring mine.
 
great game, waiting for cpr or somewhere to do a plastic set or one to turn up then i can start restoring mine.
Steady on Andy, you just said you were going to restore one of your machines.
Are you still hung over from the festive season ??? :rofl:
 
great game, waiting for cpr or somewhere to do a plastic set or one to turn up then i can start restoring mine.
Is this the same one that was at both the UKPP and NLP this year by chance?
 
@arakissun spotted my wanted advert for a 7 digit alphanumeric display and kindly sold me a driver board, ribbon cables and light board that he had from a Banzai ...

image.jpg image.jpg

I only needed one alphanumeric display, but the replacement led light boards are so expensive that I am going to keep my setup original, so a few spares might come in handy.

The two used 7 digit numerical displays worked. Only one of the 7 digit alphanumerics worked, which is a shame as these are the hard ones to obtain.

The donor board had been brutally, but effectively, hacked. Banzai has a rubbish system where the four 7 digit displays are soldered directly into the light panel with their long legs soldered to the board and help in place by 3x pcb standoff pegs, with the relevant ribbon connectors located at the bottom of the light board. This means the light board has maybe 30x zero ohm resistors acting as jumpers over a myriad of tracks taking the signals from the driver board via 4 ribbon cables.

The alphanumeric display has 34 soldered connections making desoldering difficult and risky. The donor setup had a board mounted alphanumeric display (with the ribbon cable connection mounted to the left hand side of its little board) screwed into the light panel and a rectangular hole had been cut in it to pass the ribbon cable through. This has destroyed numerous tracks, but only those associated with display one, as the hack had the ribbon cable attached directly to the little board (top left display in the first photo) it worked. This was actually a better concept than the one williams had employed as it would have made individual display replacement massively easier.

My donor display was originally from another game so its legs were too short. I had tested it by plugging into the player two ribbon cable, so I was optimistic. I just cut it off its little board. I similarly cut the dead display off my original light panel. I then carefully joined the 34 sets of broken legs. Even doing this required me to pull up the player 4 display away from the light panel by unclipping the standoff pegs and have it hanging on its soldered legs which felt risky, but there was no other way. Whilst i am left with 34 joined legs, my light panel remains original and unhacked

Anyway, it worked first time and I now have four fully working displays and can finally use the menus.

image.jpg
 
Last edited:
Been into the upper playfield. There is a mass of engineering in this, so banzai must have been expensive to produce and justified a premium price when new.

The back of the upper playfield actually has wiring diagrams printed on the back, possibly to help with assembly as it was a unique design. The main playfield is not similarly printed ...

image.jpg

The support bracket for the head IS THE MOST IMPORTANT THING IN THIS WHOLE GAME. MAKE SURE IT IS LOCKED IN PLACE. This does not always happen on my game as the sprung locking pin can stick, and the top panel dropping could take our both backglasses if you are unlucky.

image.jpg

There is a mass of ball guides in the top, all stripped out for cleaning ...image.jpg

There are numerous t nuts in the top for the ball guides, plastic posts, gates etc. every one is thread locked. So i now tap the t nut firmly into the rear of the playfield prior to removing the bolt so that i reduce the chances if the t nut spinning ...

image.jpg

Even so, i still needed to remove three bolts using my grips above, but i got away without destroying any t nuts

My upper playfield had numerous incorrect bolts, plastic posts etc. thanks to @aaronhicksuk for the snaps so I know how to set it up properly
image.jpg

Literally every one of these plastic posts was knackered, the game has 20 or more of the things. A variety of stuff had been used to "replace" them...
image.jpg

Playfield has been cleaned with isopropyl alcohol, and is now absorbing the first of three coats of gerlitz no. 1 carnuba wax guitar polish. The inserts are so much brighter now. I may well keep this game all incandescent
image.jpg

Whilst this is drying i removed all the bulbs and cleaned them with ipa. Given the general state of this game i was surprised at how few dead bulbs there were

Also installed new shooter, barrel spring, liner, rubber tip and treated the external plate to some solvol autosol

My ferociously expensive and nausea inducing main ramp and subway are due tomorrow ( usd 366 as it required oversized shipping plus £60 uk duty), so it feels like the home straight on this one now
 
Last edited:
I'm pleased that you sourced a display envelope, after my saying I had one, but finding it was just a 7-segment panel.

Re. the wiring directions under the vertical playfield; the two Cyclones at my old works had similar screened assistance, but they may well have been early ones - the subway chutes had to be replaced, as they didn't have metal plates for re-inforcement where the ball dropped into the chute (behind the 'Dummy' target).
 
You can buy these displays new from the USA, but that is obviously an expensive way to go about it

The bottom of the subway is absolutely mashed and trashed in my Banzai, all manner of repairs to it. I have received my new one today. Separately, I bought a Cliffy style protector for the bottom of it from Marco so I will install this. The base of the subway in Banzai is simply waiting to fail. The middle of the main ramp is also destined to fail where the ball falls from the upper to the lower playing field.

My banzai ramp was so expensive that I am going to build cliffys myself to protect the entrance and will also have a think about how to protect the impact point from the upper playfield
 
The reproduction ramps are made from much thicker plastic then the originals so don't think you'll have a problem like before. I've have the thicker subway installed on mine and its been fine so far. Even over time I think a pinball will have a pretty tough job breaking through it.


Cliffys at the entrance to the main ramp would be cool though. I have a repro main ramp too but haven't fitted it yet, probably going to save that for when I get round to doing a full shop of the machine.
 
Great log so far, cheers for sharing all the photos! I love a good Banzai Run, great music and theme as well as a nicely challenging game design. Also who can resist that crazy vertical pf!
 
thank you for the kind words. the occasional bit of feedback does help when you are putting time and money into these old girls, and are trying to build up enthusiasm to roll your sleeves up and "invest" more of both in them as you encounter repeated "bumps in the road"
 
Installed the subway ramp today. Total filthfest, but it got worse ...

image.jpg

image.jpg

New one installed after cleaning the rear of the playfield with ipa and pledge. Given the high cost of the subway (about usd 110 plus postage and import duty) i very nearly did not buy one as I had just imagined that the existing one would suffice after a clean.
image.jpg

I then cleaned up the old one prior to putting it away. Then the real horror emerged. The subway is a shocking piece of design. The filth had disguised that every bend had cracked, so am now pleased that i had bought the new one ...

image.jpg image.jpg image.jpg image.jpg

Treated it to some apron cards printed on photo paper, courtesy of pinballcards.com. Had to scale up to 107 per cent to get the size right.

image.jpg image.jpg

The apron on williams games is far superior to that on stern games, it is indented so that the cards sit flat. With Stern the design is much more basic so the apron cards bow out
 
Back
Top Bottom