What's new
Pinball info

Register a free account today to become a member! Once signed in, you'll be able to participate on this site by adding your own topics and posts, as well as connect with other members through your own private inbox!

In Progress 8 Ball Deluxe Limited Edition

myPinballs

Site Supporter
Joined
Nov 19, 2011
Messages
5,441
Location
Pudsey UK
Alias
Jim
Found an 8 Ball Deluxe Limited Edition recently which will be arriving to me in a couple of weeks. I thought i would start my 'journey' thread now so you can all follow along with the progress.

Its a non worker and in need of some tlc including the usual full playfield restoration. Will be fun to get this up and running.

I have been looking for one of these for awhile now and wanted the limited edition version, as it has a lot of memories for me, as opposed to the earlier release with the bigger back glass. This was one of the games we had at our family home when i was growing up and we played it to death!! Its still awesome even today.

Stay tuned for pics and progress when it arrives and i get it set up :)
 
New roms programmed and waiting. First job will be to access the condition and get the cpu board booted up. I have 2 os chips waiting. i original code and 1 with the free play upgrade

IMG_5263.JPG
 
2 days to go before arrival. I have started an online order for spares ready for when it arrives on Friday. The plan will be to replace all the top playfield parts including all star posts, pop bumper parts, lane guides, plastics, targets etc First job though is to get it booted up and fix any electronics issues :)
 
Hi Jim,
We rebuilt an eight ball deluxe first edition (cream back box and apron), the great thing is absolutely every part is available .......unlike speakeasy!!.... We prefer the standard to the l.e. But that's life!
Hope all goes to plan. Keith.

The LE is my favourite as mentioned above for many reasons. I don't actually like the standard back glass.
 
Some updates.

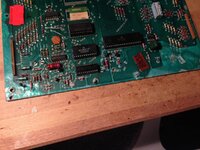
Game arrived here on Friday. Big thanks to Neil and Craig for delivering it for me. Great chat to. Set up on its legs Friday ready for an inspection later on Saturday after returning from 8 bit flip

IMG_5294.JPG

After getting back from 8 bit flip started the checking process of a non working game, starting with the rectifier board and checking all voltages. Rectifier tested good on all fronts, though had had some old work done on the bridge rectifiers being substituted for external ones on flying leads. Decided to cut all this out now even though working and properly repair the board as i have a good few bridge rectifiers at the moment form my recent sourcing of wpc rectifier parts. (http://www.pinballinfo.com/communit...solidated-and-updated-list.32898/#post-156590 ) These are a replacement here to :)

IMG_5299.jpg IMG_5300.JPG

So installed one of my spare rectifier boards to allow me to continue the power on checks.

Power driver board check out good, though there is some old transistor burn by the looks of it that will need investigating. Also it is a stern version board so will most likely swap out for a proper ball gone later.

On to the cpu, lamp and sound board. Cpu was tested and found to be dead, no surprise really. No led lamp lit, so board was taken out and moved to the bench.

IMG_5295.jpg

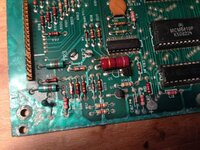
First job was to replace the led so i could see what was really going on. Replaced and led stuck on as expected. Board condition itself was not too bad. Old battery acid damage was low and mainly in centre around led not on the left like normal. The ground planes green solder mask was also flaky.

IMG_5297.jpg

Board then bareboned and U6 and U11 chips sockets replaced. Both had broken pins. U6 socket was in particularly bad shape. Old game and os roms were binned as burned new ones and board was rejumpered. Status led driver transistor was also changed for peace of mind.

IMG_5301.jpg

Cpu then retested and booted to second flash. Nice :) Both ram sockets then replaced to after inspection as more broken/corroded pins found. Status led resistor also replaced after finding that this was intermittent and confusing test results.

IMG_5303.jpg

CPU board now booted to 7 flashes and was ready to reinstall into game

End of Saturday

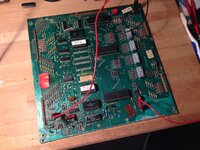
Sunday morning arrived and installed a remote battery holder and lead on the cpu board then reinstalled into the game.

Game woke up and went into attract :)

IMG_5305.jpg

Tested lamp driver board and sound board. Lamp driver seemed ok and was working, though some sets of lamps were missing. S&T sound board was missing final flash (dead speech rom) and was producing a serious amount of hum. S&T Board was replaced with one of my new replacements (http://www.pinballinfo.com/communit...-board-gordons-alive.15923/page-3#post-154724) and that cured that :)

Crisp and clear '8 ball deluxe, 5 ball' was heard on reboot :)
 

Attachments

  • IMG_5296.jpg
    IMG_5296.jpg
    154 KB · Views: 13
  • IMG_5298.jpg
    IMG_5298.jpg
    175.8 KB · Views: 14
  • IMG_5302.jpg
    IMG_5302.jpg
    168.7 KB · Views: 13
Last edited:
You are good Jim, very good :) it was a pleasure and I will look forward to following this progress. Will definitely have to venture up and play it one day. Good chat indeed,

Cheers Craig
 
Interesting stuff. I totally agree with you on the backglass. That yank in a cowboy hat always ruined the look of this great game, so the smaller that image is, the better.
 
Played my first games on it tuesday evening. Here's how i got there.

After the first boot up it was time to check the playfield operation. It quickly became apparent that half the playfield lamps and the solenoid expander switched coils were not working. After checking the solenoid expander board itself under the playfield, i noticed that the lamp voltage feeding some of the lamp boards and the solenoid expander drive lamp was missing. A further inspection found a 3 bank fuse holder with corroded/intermittent connections

IMG_5306.JPG

This was changed for a new set of fuse holders and fuses. Problem sorted. All lamp boards and the missing coils sprang to life.

IMG_5307.jpg IMG_5308.jpg

Shortly after this was fixed another problem surfaced where the game would no longer boot when all displays were plugged in! Very strange. After lots of adidditonal testing it was also worked out the disconnecting the solenoid driver connector J4 would also allow booting. On checking the driver board it was noticed that the coil lockout driver parts were missing and that a screw had been added to the mech to keep it always enabled. There had also been some major burn out related to this coil as the pcb trace for it had burned off!

IMG_5318.JPG

After checking various things, repopulating the missing driver parts and quite a few fuses, a bad diode on the lockout coil was found to be the cause of a lot of different issues.

IMG_5319.JPG

The diode was damaged and intermittently shorting out, therefore meaning that when the coin lockout was enabled 43v and gnd were shorted. The diode itself broke in half as i was checking it. Time for a new one!

After replacing the diode and reinstalling the coin lockout mech the faults were solved and the game booted to attract once more.

2 other transistors were replaced and a new pop bumper coil fitted to solve other non working coils. Interestingly the transistors themselves did not report differently to working ones, but were indeed dead.

IMG_5316.JPG IMG_5335.JPG

Finally rebuilt the driver boards 5v smoothing section and fitted a new 20mm fuse holder for the high voltage fuse. This is a good thing to do if the fuse is blown or missing as the fuse here is non standard size.

IMG_5336.jpg IMG_5337.jpg

Also cleaned the display panel. (Fibre board really doesn't survive well, so may look to get a new plywood panel made.) All the displays are in good condition and not gassing or blown which was nice to see. I need a source for those white plastic light shields though.

IMG_5314.JPG IMG_5315.JPG

Time for a few games

IMG_5321.jpg
 
what, you add that grease stuff before soldering? how, by dipping the iron in a tub? and then clean it off after with something?
i thought having flux-core 60/40 solder was sufficient?

sorry for all the Qs
 
No, its just the residue from standard 40/60 lead solder when pre tinning the terminals before connecting up
 
More Updates. After a quick play test earlier in the week i gave the playfield a quick clean up. New rubbers, new ball, cleaned all plastics, targets, star posts, replaced all burnt out bulbs etc. Nothing major just enough to get it playing a little better. Had to adjust the flippers a little to. Amazing that the mechs still play pretty good considering the age. Say what you will about linear, but they certainly last and still are accurate.

The big plan is to get a new playfield and do a full playfield swap with all new plastic parts, targets, etc but that's for the future, so for now i cleaned it up to enjoy it for awhile. I'll still be rebuilding the flippers and replacing pop bumper caps and surrounds straight off. Need to see those lovely hot pressed orange caps with the ebd logo on them!

Some before pics

IMG_5322.JPGIMG_5323.JPG IMG_5324.JPGIMG_5325.JPG IMG_5326.JPGIMG_5327.JPG IMG_5328.JPG IMG_5329.JPGIMG_5330.JPG

And after

IMG_5341.JPGIMG_5342.JPG IMG_5343.JPGIMG_5344.JPG IMG_5345.JPGIMG_5346.JPG IMG_5332.JPGIMG_5331.jpg
 
Next up was to fix the remaining dead lamps on the lamp driver board. 3 transistors replaced and a couple of wires re-pinned on the output connectors and all lamps working.

IMG_5338.jpg IMG_5339.JPG IMG_5340.JPG
 
All electronics that I have used above so far to get my project 8 ball deluxe working are available for you to. If you want anything for your project then drop me a message. :)
 
Jim, I'm really enjoying this log and the frenetic pace. The EBD pop bumper covers are ace, one snuck on my GOLD BALL

WP_20150616_20_35_18_Pro__highres.jpg
 
Yes I set myself a small challenge to see how fast I could get a dead bally up and running. Kind of egged on by Neil and Craig after our chat last Friday evening after delivery. Boot up in ~24 hours and playing a game in ~72!

Time to order those Pop parts and other bits. Was handy that I had enough spare rubbers laying about to do a full change to :)
 
Amazing Jim, truly jealous of your skills. It looks like a completely different machine in less than a week!!
 
Great work. You can't beat that feeling when a dead game first boots up after some initial tinkering.

I'd like an EBD, but I want the full cowboy version. Those non standard back boxes are just damn ugly. Sorry Jim.
 
Time to tidy up some internals. New Line filter to fit once my next lot of orders turns up and new power cabling and plug. Never liked the flat 3 wire cable on these early 80s ballys. I recommend changing all this on any early bally game. The power cabling, plug and line filter is unlikely to still be in good condition after +30 years
 
Game moved down to games room this weekend and took the opportunity whilst disassembled to clean the inside of the cabinet out and scrub all cabling. Amazing what a difference just vacuuming out your cabinet and cleaning all looms does.

IMG_5369.jpg IMG_5372.JPG IMG_5373.JPG
 
Did you get any of the light shields Jim ?
If you know someone with a 3D printer I can do you with a 3D model of the part.
 
Rebuild log for the cabinet rectifier board.

As mentioned before I wanted to change all the rectifiers on the board, as even though they were working the parts were 35 years old and so unlikely to be in top shape

Board removed and new parts gathered

IMG_5375.JPG

IMG_5378.jpg

Old parts removed

IMG_5379.jpg

New parts installed

IMG_5380.JPG IMG_5381.jpg


Board reinstalled into game and powered back on. A noticeable improvement in feature lamp brightness, coil power, flipper power and display crispness. Well worth changing these parts if you are doing a restoration.

I can supply kits as i used above for £7.50 inc vat plus £1.20 postage. Contact me if interested. Probably the best £7.50 you'll ever spend!
 
Back
Top Bottom