What's new
Pinball info

Register a free account today to become a member! Once signed in, you'll be able to participate on this site by adding your own topics and posts, as well as connect with other members through your own private inbox!

Complete 8 Ball Deluxe LE

You can't use a belt sander it will scar the wood and create groves.
The only sander you need is a good quality random orbital.
 
  • Like
Reactions: DRD
You can't use a belt sander it will scar the wood and create groves.
The only sander you need is a good quality random orbital.
Yeah, that's the problem I created. Scratches too deep, so had to run through the different grits to get them out. Will go orbital instead on the rest of the cab.
 
Have you considered, ditching the le backbox and turning back in to a regular ebd? The blackglass is gone anyway and you've got to pretty much rebuild the whole cab anyway

I've never seen anyone get those horrible extra rear sides off before, bravo!

Also shame the playfield wasn't the pcb lamp board version instead of the single holders one, that would've saved you some headaches
 
I have done a couple of cabs with a makita orbital sander and ronseal 2 part filler.

I would suggest that buy a range of sanding discs as you will get a "feel" for the right balance of speed v abrasion. I have maybe 8 different grits between 40 and 400 or so.

If you can, fit a vacuum cleaner to it too. I do not have the correct adaptor for my George vacuum (the wet and dry version of a Henry) so I just bodged one up with gaffer tape and plastic tubing. It dramatically reduces the amount of sawdust thrown about.
 
Have you considered, ditching the le backbox and turning back in to a regular ebd? The blackglass is gone anyway and you've got to pretty much rebuild the whole cab anyway

I've never seen anyone get those horrible extra rear sides off before, bravo!

Also shame the playfield wasn't the pcb lamp board version instead of the single holders one, that would've saved you some headaches
The thought crossed my mind as its more desirable, but then I decided I like the colour of the LE cab and when I had the other one, it looked really cool in the line up with the other ballys. (I should never have sold the first one, hence why I bought this 2nd one).

Yes, all those lamp holders are probably ruined by rust, assuming I'll have to replace the whole lot.
 
I do not know the price differential between the two games, but I actually like the idea of conserving the oddball cabinet of the LE version. Also, I always thought that the regular EBD backglass art was one of the worst of any of the Classic Bally SS games - think Spares and Strikes, Paragon, Nitro Groundshaker, Fathom, Centaur, Fireball II, Medusa, Vector, Space Invaders...... The 8 Ball LE actually looks better IMHO
 
I have a mate who is looking for the non LE version - it's his grail machine, but I still cant bring myself to convert it. Unless, someone had an 8 Ball Deluxe head complete lying around.................
 
made a long sealed tube to soak the longer metal items in evapo-rust

View attachment 138311
a bit of soil pipe with an end cap.

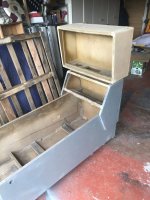
Sanding and repairing the cab continues slowly. too much rain at the moment grrrr
Indeed, the amount of rain up here in the north at the mo is rediculous. Been working on, or trying to on my car for 2 weeks!
 
A triple garage for car renovation and Pinball work is a dream of mine!! ‘Ground floor access for everything’ , what madness is this!!
Mine is a 6 car garage (50’x25’) with height for a lorry to come in but the pinroom I built in there took up quite a bit of space but still enough room for a couple of vans.
Was my dream too but lived here over 20 years now so normal but if I want to downsize one day what a nightmare to lose the garage😫
Its great, I can just wheel pins into the room as it’s flat all the way in😎
Just sold my little fast car so looking a bit sad and empty😔
 
D433B830-0CF8-43C4-954A-8F4C3F5D45E1.jpeg
re-assembly of the lower back box, this is glued and bolted to the main cab. I’ve cleaned out all the joints from broken mdf and old glue. re-glued and the-assembled and clamped. Once dry I’ll fill in all the cracks. final sand and prime the unprimed areas.
 

Attachments

  • 160E05D9-E084-4A0F-A05B-E1637EAF5FED.jpeg
    160E05D9-E084-4A0F-A05B-E1637EAF5FED.jpeg
    96.1 KB · Views: 12
Slow slow progress at the moment on this. rain is preventing me doing much sanding or painting. And i’ve lost the metal cleaning mojo, plus a dozen other projects on the go!
 
Managed an hour or so of sanding today before the rain came, so decided to switch to the rusty coin door

55C0199D-7ED8-4D21-B753-1A7D49483B2F.jpeg45903F68-A907-42F4-899A-9EFBE46D7109.jpeg68CDAD62-8B47-4B25-8423-6EC6FDCA5F76.jpeg689E21CF-03D4-4C42-9300-4BBE63EE15F3.jpeg
No option but to fully strip this down and give it an evaporust bath
8C843DAC-3156-43D0-BA83-A9609ACFB7BF.jpeg
9C92AA87-5D70-4265-86B0-7CF8D55ACE98.jpeg

rusty lamp holders need replacing
B9E410E0-B075-447C-B12C-876CFDD8B312.jpeg
107567C6-425F-4A43-8F50-E0E80E1A2FAE.jpeg
4AC04048-5E21-4EB3-8938-007F0B2402F5.jpeg
While the rust remover does its rust removing thing, i think i’ll order a bench polisher and some polishing compounds. and more evaporust- split about 2l - an expensive mistake!!

Dreading the next job. a close look at the playfield 😂
 

Attachments

  • C5EDC6FC-A3A2-40FC-93B2-3EC9EE26ED1A.jpeg
    C5EDC6FC-A3A2-40FC-93B2-3EC9EE26ED1A.jpeg
    85.7 KB · Views: 19
What a state!
Major respect to you for taking this project on. I love threads like this!
 
^ Yep thats the one I bought and the guy I bought it from. The mechs need more than "lubrication" - they are rusted solid - all 4 of the drop target coil plungers an links are rusted in a fixed position. Currently dismantling the whole lot. Gonna nickname this pin "Rusty".
 
After seeing that listing, I've always looked at the smoke effect on the right side of the playfield, and that one looked like actual cigarette smoke damaged to me. It matches the pictures of yours, so I knew it was the same one.
 
decided to test out the drop target coils. then i noticed some wiring issues:
1FA7F59A-B26A-4CAC-AA56-EAB36E853683.jpeg
2C24C502-DAC0-402D-AEFB-420255018EB3.jpeg
The common live feed comes into the coil on the right, it then loops to the one next to it, then it goes off somewhere else! So there is no connection to the 5 coils on the left! So will never work!!!

The two coils on the right are replacements and have three lugs and two diodes, the 5 originals on the left are two lug, single diode. The two to the right will work, but may as well wire them in correctly and omit the second diode :

B430A11C-0EB9-4A3B-9054-D41C007ED9AE.jpeg
All wired in properly now.
 
Back
Top Bottom