What's new
Pinball info

Register a free account today to become a member! Once signed in, you'll be able to participate on this site by adding your own topics and posts, as well as connect with other members through your own private inbox!

Complete 8 Ball Deluxe LE

AlanJ

Site Supporter
Joined
Dec 27, 2017
Messages
7,761
Location
Leeds, West Yorkshire
Alias
Alan
Picked this up today.

To get it in my car, I needed to remove the top back box, the bolts were very rusty. got one out but the other just turning it’s socket, it was so rusted. Tried to prise it off, and luckily the whole top of the score display back box came away.

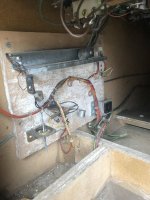
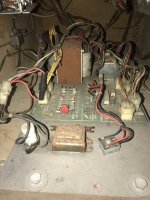
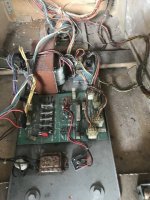
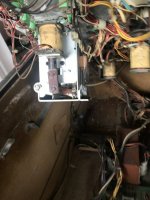
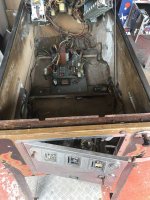
Lots of white powder mildew/mold everywhere, tons of rust, and a good smattering of woodworm.

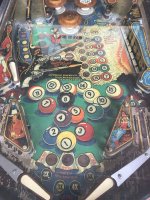
Playfield worn out at top and side lanes, backglass is unusable, lost whole centre of its artwork.

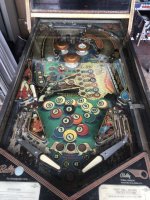
Looks to be complete. A few repair hacks. Drop target mechs and flipper mechs are rusted badly and don’t move, will need a full strip down.

First job is woodworm treatment on the cab.
Ordered a hard top playfield overlay from @new forest pinball - thank you Keith.
BF1AA651-6D2F-485B-B8B6-DA6CF4831ABF.jpeg319F856A-DF51-4FF2-BF3B-5101F4C7A323.jpegB44AC7AE-3EA8-4B7B-A649-D73F420D4087.jpeg1721775A-A6E8-4500-8DC3-AD2E928D5C26.jpeg7F5CFF71-486F-48EB-AB8F-389473C20B7B.jpeg967AEACD-0EBC-44FF-9010-34D3B22E6F26.jpeg2FA45B04-9DAC-432D-B64C-6DC6FD0C3B43.jpeg76AACEED-16E6-49E3-9D61-5EE7FF75CFC0.jpeg9FBC8AEC-79BD-4292-B747-24EE1D6E75E8.jpeg
 

Attachments

  • 1B5E2BD3-824D-4CAD-B8F7-732C8E1E1EC3.jpeg
    1B5E2BD3-824D-4CAD-B8F7-732C8E1E1EC3.jpeg
    160.2 KB · Views: 26
  • 2847F5BE-E7C5-49C5-A757-4A6F2BA77996.jpeg
    2847F5BE-E7C5-49C5-A757-4A6F2BA77996.jpeg
    130.6 KB · Views: 27
  • EAF502CF-B2D7-4EAE-9891-2B98DC8EA9BC.jpeg
    EAF502CF-B2D7-4EAE-9891-2B98DC8EA9BC.jpeg
    110.8 KB · Views: 25
  • 008A0E6D-B284-49EB-A256-610977F3782D.jpeg
    008A0E6D-B284-49EB-A256-610977F3782D.jpeg
    110.2 KB · Views: 25
  • 14473B5D-0D29-41CE-9392-F820F1388EC9.jpeg
    14473B5D-0D29-41CE-9392-F820F1388EC9.jpeg
    111 KB · Views: 24
  • BBDBD8CF-B420-4844-B473-00C4D8D76271.jpeg
    BBDBD8CF-B420-4844-B473-00C4D8D76271.jpeg
    87.3 KB · Views: 24
  • BB647C59-7951-470D-B07E-CE500B3F40B1.jpeg
    BB647C59-7951-470D-B07E-CE500B3F40B1.jpeg
    130.7 KB · Views: 28
I just knew it was going to be that exact one when I opened this thread!
 
full day onthis today.

the white mold is everywhere. inside cab, down rhs of outside cab. all over underneath of playfield. there is more woodworm than i first noticed. so it’s a full strip down of the cab.

Clean off the white stuff from underside of playfield. a long boring job

tooklower head off the cab, it dropped apart, but is fixable.

took off side rails and flipper buttons. cab now ready for repair, sanding and prep for the new paint job.

The insert panels need stripping down and prepping too but that’s a job for another day.

rust galore. i have ever seen it so bad.

37BD5CB4-2D31-4EC4-B931-A08F53468333.jpeg66ECFBB6-4A18-4FB4-AF7B-59162FB46F4D.jpegB0275C8A-E258-42CD-8C1C-006C2364F3B7.jpeg32F34B3B-8496-4638-95EF-A731A9DBA1B7.jpegC2935B07-8F4F-43CD-BFF8-147B9EE260A1.jpegC228FFF5-EBFC-4A70-BBE8-0B9FFE0B47CF.jpeg05B1E6D6-7CA9-4DFF-88D0-F87F6F3D9479.jpeg0DC8E298-BBA2-4916-9420-26261202E992.jpeg58206216-145D-4B35-9483-5A1566ED5A5C.jpegF5D70F5D-D137-4624-8798-116FA4BF102C.jpeg3E3D7A06-7D1C-4F7D-A890-BE1151F22F01.jpegB532EDCD-7611-4C1A-9755-02F094CC6BF5.jpeg0035AD12-A475-4FCB-B964-2954C78B97BE.jpegA2895514-8AEC-45B9-873F-3C9AF008A76A.jpegB8475120-8CA9-461F-B2E3-FBD719D16A80.jpeg
 
Is it bonfire time then?? That's a great way to get rid of woodworm!!
White mould comes off easily, but I hate woodworm! Is it on the playfield? You could sand it off (as you are fitting a hardtop) and treat the woodworm as the paint stops it soaking in to the wood.
I use Evapo-rust to take care of the rusty parts, even those bulb holders, maybe some can be saved.
 
Today it’s paint removal day. (weather permitting), just got rained off, but managed to do quite a lot
A15DD698-3A00-4475-94F3-B0F69B636FBF.jpeg
67E4206B-12BE-472E-B902-9D21E21D5050.jpeg
The head is mdf so had to take it nice n easy. The rear panels of the top head, middle head and the main cab are all really rough for some reason. looks like a rougher mdf was used. it doesn’t sand very well.

Onto the side panels:
E6DC1C5D-4197-433B-9F88-162ADA732AB5.jpeg
E24F5023-D70B-42D3-85E8-23BC48845EED.jpeg
EE6A480D-813B-4CDF-9DB4-1815CC927A9C.jpeg
Before the rain came I managed to get a side of the main cab done :
EAA352B3-88F5-44A1-BD19-8B2C33DB52D8.jpeg
A25F67C4-B5B5-4849-A8D5-B001CF05A55B.jpeg
Woodworm and a few missing pieces will need filling.
70A646D9-A694-4F27-AC82-253EE827EC21.jpeg
 
Your not hanging around :D have you considered sealing the troublesome MDF with a fibreglass resin/p38 mix?
 
I’ve not. one across that product? Ive got some ronseal 2 part wood filler though. Also got a liquid wood hardener that seals flaky wood pretty well.
 
Its something Arcade Jason goes over one of his vids on YT, the yanks call it rondo, resin and bondo, he probably explains it better than me. But basically makes a very runny filler that can be skimmed over the surface and dries rock hard, I only discovered the "recipe" after finishing my pin. Have used it on smaller areas with sucess since though on another project.
 
A mate used to use a mix of fibreglass and "bodge" (the nickname for regular body filler) when doing car body repairs. Called it fodge :)
 
what did you use to treat the woodworm before you filled it?,I know someone on pinside used a powder filler but mixed it with woodworm treatment,not water,not sure if this is of any benefit though
 
Filling, sanding, filling sanding filling sanding .............
7FF052FB-79A3-484A-A7A0-F4CCA062B140.jpeg
EE67B786-F394-4F29-A0D0-C34828ED2708.jpeg


Added a wooden batten to the bottom of the rear cabinet panel. It is mdf and lots broken off. very weetabix like. so filled in the gaps. Ill shape the wood so the legs still fit and it’s not visible from the side with the legs on.
ECA8E905-00BC-4718-AA8A-DCA995DBAB40.jpeg
 
Rain has stopped filling and sanding today, so:

IMG_8843.JPG
Measured up for some new backbox silver foil lined cardboard. This is ok, but a bit corroded and gnarly, so needs replacing. There are 2 pieces in this machine, because it has 2 backboxes! Thanks to Keith @new forest pinball for telling me what I need to order, found some on-line.

Also sanded and re-painted the top backbox insert:
IMG_8842.JPG
I dont like the single fluorescent light, so will probably eventually replace with a nice colourful WS2812B Led display system. But for now I've left the original wiring connections there. (I tried to unscrew them to sand and paint, but the screws in the back are so rusty, they would not budge, so had to leave them there and mask them off.

Next job - legs. They are ok - not bent, just rusty, so will have a go at removing the rust. I'm going to make a rust bath out of a piece of plastic pipe, seal up one end and then I can immerse long thin metal pieces fully.
 
I’m going to have to try that. in the meantime. used my tried and tested ronseal but it is a bit stiff for the wood worm holes.
View attachment 137856
Today it’s paint removal day. (weather permitting), just got rained off, but managed to do quite a lot
View attachment 137820
View attachment 137821
The head is mdf so had to take it nice n easy. The rear panels of the top head, middle head and the main cab are all really rough for some reason. looks like a rougher mdf was used. it doesn’t sand very well.

Onto the side panels:
View attachment 137822
View attachment 137823
View attachment 137824
Before the rain came I managed to get a side of the main cab done :
View attachment 137825
View attachment 137826
Woodworm and a few missing pieces will need filling.
View attachment 137827
I’ve had good results using ISOPROPANOL on the mould and Dolphin glaze
Today it’s paint removal day. (weather permitting), just got rained off, but managed to do quite a lot
View attachment 137820
View attachment 137821
The head is mdf so had to take it nice n easy. The rear panels of the top head, middle head and the main cab are all really rough for some reason. looks like a rougher mdf was used. it doesn’t sand very well.

Onto the side panels:
View attachment 137822
View attachment 137823
View attachment 137824
Before the rain came I managed to get a side of the main cab done :
View attachment 137825
View attachment 137826
Woodworm and a few missing pieces will need filling.
View attachment 137827
I’ve had good results by using Isopropanol sprayed onto the white mould. Gets into those ‘hard to reach’ places, and U-Pol Dolphin glaze 2 part filler for worm/repairs. Comes in a large ‘sachet’ type container so you can squeeze out as much as you want and then add a small piece of hardener, also in a sachet. Dries very quickly and very hard but easily sanded. Available all over the place in the U.K.
 
I’m going to have to try that. in the meantime. used my tried and tested ronseal but it is a bit stiff for the wood worm holes.
View attachment 137856
I’ve not. one across that product? Ive got some ronseal 2 part wood filler though. Also got a liquid wood hardener that seals flaky wood pretty well.

I’m going to have to try that. in the meantime. used my tried and tested ronseal but it is a bit stiff for the wood worm holes.
View attachment 137856

I swear by the Ronseal stuff. Dries hard enough to sand in no time at all.
 
tough day. got the leg levellers off eventually.

did a test primer on the cab.

not happy with the finish so gonna sand it all off and do it again

C3F2EFA4-34C4-4B27-9FE0-E838C2147F6F.jpeg
 
E4AC5CBA-A634-4D79-B9BB-F01E337CF483.jpeg
Taking it back to bare wood. sanding through the grit grades. had to use the belt sander to get the primer off. it also rips out the filler, so that needed redoing once i’d got to a pretty smooth finish
6B6261D9-3CB6-4C07-A311-DF02D12DCE76.jpeg

Rain stopped play again
 
Back
Top Bottom