What's new

The inevitable '1,000,000' questions thread as the R&B rebuild commences

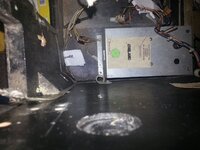
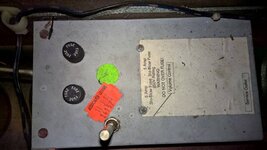
Can anyone tell me conclusively what fuse I should be fitting in the AC box on Rocky & Bullwinkle?

The original label shows 8A but it's not specifically mentioned in the manual.

Interestingly the repro labels from Inkochnitos site show the USA version with 8A fuse and EU version with 4A?
 
Can anyone tell me conclusively what fuse I should be fitting in the AC box on Rocky & Bullwinkle?

The original label shows 8A but it's not specifically mentioned in the manual.

Interestingly the repro labels from Inkochnitos site show the USA version with 8A fuse and EU version with 4A?
 
4A slow blow for 240v as shown on the wiring diagram on page 44 of the manual (page 48/106 of the pdf).
 
Thanks for that @Moonraker, and apologies for the multiple posts. Our internet at work was on a go-slow and I managed to inadvertently post the same message 4 times.

So my original label on the AC box was wrong then. Who knew?

2014-07-22 23.19.29.jpg

I'll replace it with one printed from Inkochnitos site instead then.
 
I suspect there's an awful lot of incorrectly labelled ones out there... :eek:

Here's another example from Hook. I can't see any difference in the power supply schematics but this one has two fuses, 4A Slo blo per manual, 5A Slo blo per sticker! Is one of the fuses a spare?

WP_20150818_18_43_46_Pro.jpg
 
Nope, both are used and according to the manual both should be 4A... unless they uprated the fuses and didn't update the manual... :confused:
 
That explains why there's two fuse holder holes in my AC box but only one holder actually fitted. I presume a lot of parts like this would have commonly been shared between Pins.

But - why two fuses in Hook?
 
But - why two fuses in Hook?
Hook is a very popular and valued game in the pinball community hence needs double protection ;)

I'd be interested too, I can't see any difference in the R&B and Hook schematics but I do notice that R&B has a later revision power supply 520-5047-01
 
Page 44 of Hook manual (page 48/95 of the pdf) shows one fuse is used for lamps (game lighting) and one for solenoids. I'd say they are used to protect the transformer from shorts eg blown bulb or coil.

It could be argued that one fuse is a cost saving measure but when it blows you have no game whereas if the lighting fuse goes on hook you can still play the game. Handy if you are an operator with a game on route as the game will still take money.
 
Page 44 of Hook manual (page 48/95 of the pdf) shows one fuse is used for lamps (game lighting) and one for solenoids

Thanks I can see those on both Hook and R&B power wiring schematics (to keep it thread related!) I thought those fuses were mounted in the backbox next to the BRs.
 
Thanks I can see those on both Hook and R&B power wiring schematics (to keep it thread related!) I thought those fuses were mounted in the backbox next to the BRs.

D'oh, you're right. 1F1 is the fuse and is only showing one of them on that page in the manual.... :oops:
 
Are there any UK suppliers who stock any of the speaker upgrade systems for Data East tables?

I can see Pinball Pro on eBay at around the £100 mark but it's shipping from the USA. I'd much rather buy locally if at all possible.
 
I've had a delivery from Pinball Heaven which included some nice yellow flipper buttons.

I'm just about ready now to get the side rails back on and having looked at the fittings i'm mulling things over. The side rails have been powder-coated in red but the coach bolts and screw are both black. I'm thinking it'd look nicer if I colour matched the fittings and sprayed the heads red.

Views? Opinions?

Would love to hear what people think.
 
I sprayed the bolts red in the end. Looks lovely.

More questions now.

First Question

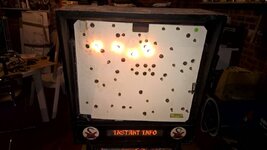
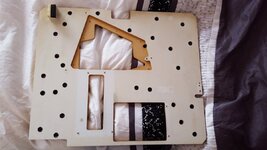
I've stripped the light board from the backbox and that will be the next thing to get some TLC before it's reinstated. Here's the lightboard with everything stripped down.
LightBoard.jpg

At the top left there's a block of wood with a piece of foam stuck to it. Is this factory original or a hack? Closer inspection would suggest it's original as it's actually stapled in place from the back. If it's original can anyone explain what it's for?

The plan here is to put some sacrificial bulbs in place and then spray the whole thing with some satin white paint. It's the same method that @PeteB has used to restore the lightboard on his hook.

Second Question

I'd like to do some test power-up's as things progress to make sure things are going back together correctly. What's the minimum cables that i'll need hooking up to the main board in order to get it to boot correctly? Right now i've got most of the cabling for the PSU back in place but when I tried switching on earlier today I didn't get any pulses of light on the PIA LED which makes me believe it's not booting.

That said it could well be expected as neither the sound board nor the DMD is hooked up yet. Advice on the above would be appreciated because i'd rather head off any board faults so I can get those sorted in parallel with the playfield rebuild.

As always a big thanks to all those who offer advice. It's hugely appreciated.
 
I think its a stop so the back board doesnt swing on out and break the lamps down that side when they hit of the backbox.

It also helps align the translight with the top slot when reinstalling it after a fuse replacemnet or whatever
 
Cheers. I masked it off for the respray but will leave it in place.

If it wasn't factory original i'd have probably removed it ;-)

Edit: Looks like the foam block has been added but i'll leave that in place as it does make refitting the backglass a little less precarious.
 
Ok, next question.

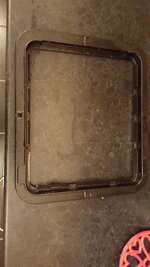
Is it possible to buy replacement DMD plastics for Data East machines? I'm talking about the perspex/plastic bit which sits in front of the DMD.

Mine is pretty scratched up. I was tempted to have a crack at polishing it up using Novus but my experiences with Novus so far haven't been so great. If it's possible to buy new i'd rather go that route.

I think this is what I need (http://www.pinbits.com/index.php?main_page=product_info&products_id=452) but i'd ideally prefer a UK supplier.
 
Haha, maybe.

It's got some cutouts which are meant to sit around the DMD mounting posts. I guess I could just do a plain old boring square but my OCD makes me want to get it as perfect as possible. I'm not sure my cutting skills are sufficient to get it close to an original
 
There is a place called Selectaplas in the middle of grimsby that will cut the plastic to shape (square/rectangle). Price is Pro Rata'd from a full sheet so you only pay for what you buy. then its just a case of taking it home to drill the holes you need. I use these guys for the plastic on my RFM scoop that i made
 
I checked and actually it's not so bad. Simply need a diagonal cut at each corner and then two notches in the middle to go around the posts.

To be fair the notches could just be replaced with a decent sized hole that I could drill; just so it sits neatly over the posts.

Might well look into it. As they're local I could take it in and see how much of the cutting they could take care of.
 
Thanks for the heads up on Selectaplas @Davey D. I got a replacement piece of 2mm acrylic cut to size for the princely sum of £1.60.

Just need to use the dremel to trim the corners off and put a hole in it for sitting over the center DMD support post. Then I can get it taped back in place and start rebuilding the DMD/speaker panel.
 
So, I want to remake the earthing straps which run from the DMD panel to the backbox.

The ones that were fitted had some sort of plastic tubing over them to protect them but it's gone all horrible and yellow. Anyone replaced these before and have some suggestions as to what tubing to use and where to get it from? Most stuff i've found so far is too thick walled I suspect.
 
Well the cabinet rebuild is almost done now. The knocker is reinstated so all that's really left to do is to sort out the coin door and then get the lockdown bar in place.

I took a look at the coin door surround and noticed something not quite right with it.

2015-11-11 17.34.15.jpg

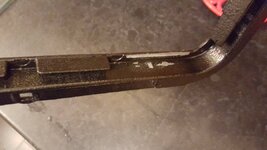
At the bottom right corner one of the metal flaps appears to have been broken off. I presume this just a protective measure to stop people breaking in so my guess is that in this case it's not really a problem.

2015-11-11 17.34.31.jpg

But there is some 'silver' on display so i'm thinking at the very least I need to paint it.

What's the best way to go about this? Does it need stripping back? Or can I just spray over the top of it?

And what sort of paint to use?

Thanks in advance for any suggestions.
 
Pete,

I can swap it for one of mine that is complete (assuming there is one) if you like as i'm sure you want to have yours as peachy as possible ?

I can check tonight and let you know if any of mine are complete ?
Cheers
Ian
 
Back
Top Bottom