What's new

The inevitable '1,000,000' questions thread as the R&B rebuild commences

Wiredworm

Registered
Joined
Apr 7, 2013
Messages
2,373
Location
Grimsby
Well, the R&B is now fully stripped and the inevitable rebuild will be commencing soon.

The test cabinet has been sprayed and i'll be going to see it later to determine if the colour match is going to work alongside the decals.

Gearing up to this i've got the first of what will no doubt be a whole host of questions.

So here goes.

Question 1.
The PCB screws in mine appear to be regular 7mm pan head screws with no crinkle washer. Is this correct or should there be crinkle washers on each of them?

I'm presuming a crinkle washer isn't needed as there isn't that much vibration nor movement in the back box where the PCB's are located but just want to be entirely sure :)
 
My Hook is only a couple of years older and had this type - a load were missing and I replaced with such. I think its a good idea as the whole machine is being shaken around and these points provide the grounding for the PCBs also I read that loose boards can cause DE speaker hum too.

nutsboltsandthings.co.uk_image_cache_data_external_shakeproof_washer_bzp_4838_80x80.jpg
 
Nice find on floating the sound card - I'm not keen on isolating it from earth unnecessarily though.

I can get you those washers if you like from my local 'tool and bolt' shop should cost pennies.
 
Do you meant the crinkle washers or the nylon ones @astyy

I'm with you on the whole 'isolating from earth' point. My plan is to fit crinkle washers throughout and i'll see how bad the hum is once it's all up and running. From memory mine didn't seem too bad so it might be a pointless (and potentially risky) mod for me to use nylon washers.
 
Do you meant the crinkle washers or the nylon ones @astyy

The crinkle ones and the screws if you need some - its one of these trade counter places where you go in with something obscure, the bloke rummages around the back a bit and then comes back with what you want!
 
Those shops are the best - used to have one in the local village where I lived. Unfortunately they seem to have disappeared from most towns now.

I could well be interested in having you grab some for me if possible please?

In fact I suspect i'm going to need a variety of screws and other bits so perhaps I could drop you a PM with what I might be on the lookout for?

Thanks for your kind offer.
 
In fact I suspect i'm going to need a variety of screws and other bits so perhaps I could drop you a PM with what I might be on the lookout for?

Not a problem at all - PM me whenever you're ready.
 
The pinball cabinet has now been sent for painting.

Next question - any advice on the best way to clean up the plastic cable mounts that were in the main cabinet?

Sling the lot in the dish washer or just bung them in the sink with a load of hot soapy water and give them a good scrub?
 
the wee drawstring net bag you get with aerial or daz or whatever.

Pop all your cable mounts in one of them and throw them in the dish washer or even the washing machine possibly ?
 
Dishwasher is looking favourite.

Ours gets bloody hot so I was a little worried if they'd warp or not - but i've got some spares from the donor cab so I guess I can take the risk ;-)

The tilt bob has been in the tumbler for 3 days now and is already super-shiny. Think I need to take the dremel to the transformer mounts to get the lacquer off them though.
 
Yup they were Ian. But to be fair my originals were equally mankey.

Should polish up nice with a bit of elbow grease. Now that the cabinet is out of the house I need to start getting the bits ready to refit once it comes back.
 
I thought the whole point of the crinkle-washers on PCB mounts was to ensure a good earth rather than vibration protection? Thinking about it though, that's probably wrong...
 
I've decided that before sticking it back in the newly painted cabinet i'm going to give the transformer a bit of TLC to make it look a little nicer.

So far i've masked off the windings and used the dremel to remove any surface rust and debris from the large heavy metal bit (not sure what the technical name is).

I'd like to ideally respray it but does anyone have any experience on doing this?

I've been told that a high-heat paint should be used and although this feels a little OTT to me i'd rather err on the side of caution. Would some black BBQ/Stove paint be suitable for the job maybe? I had a little look at a can in a local store and it said it has to be cured to fully dry. I don't really fancy the idea of taking a heat gun to the transformer to cure the paint though - is this really necessary in this usage or could I get away with just applying a few light coats of this paint? Or would I be better just using a primer and a regular spray paint?

Comments welcomed as always. Once it's fully dried i'll refit the nice shiny brackets and the whole lot will be ready to go back into the cab.
 
The other option is I could use some grey primer and satin black spray paint. I've got stacks left from when I was going to paint the cabinet using rattle cans. The black spray was used to do the bolt heads so grey primer with black satin might also work.

Decisions, decisions.
 
The build has finally started.

Ok, so here's a question.

My boards are in relatively good shape - no hacks and no major problems with them. Before I stick then back in the machine is there anything I should consider doing to keep them nice and minty?
 
Check all your pin headers, if any are looking tarnished, replace them. Any you are not replacing, reflow the solder joints on them.

Remove the battery holder from the board and fit one of my NVRAM's instead ;)

Replace all the caps on the power supply. Data East PSU's are prone to leaky caps at this age, which can cause corrosion and other problems
 
Thanks Luke. I have to admit i'm something of a novice at this m'larkey, but I did pluck up the courage a year or so ago to replace on of the transistors on the CPU board.

Reflowing looks like something I can do and it looks like by far the most important thing is to take care and don't apply too much solder. Also to double check once done that everything is neat with no bridged connections.

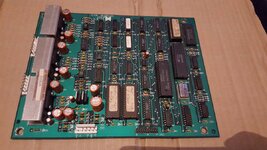
I've dug the audio board out tonight and took a few photos.

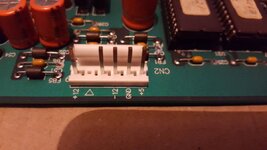
The connectors on the top side actually look to be in pretty good shape.

2015-07-27 22.09.30.jpg

2015-07-27 22.10.28.jpg

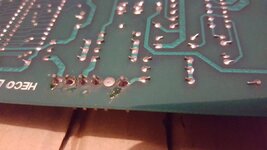
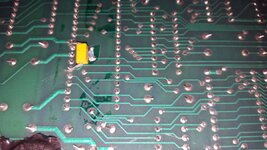
I flipped the board over and took a nice close up shot of the solder joints from CN2. The manual macro mode on the new Galaxy S6 did a pretty nice job. I think the joints themselves are pretty tidy but what the hell is the crap around them? Is that flux?

2015-07-27 22.11.29.jpg

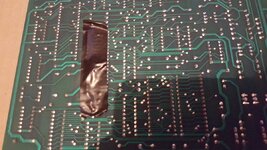
Also whilst I had the board flipped over I noticed a bit of tape. Bit strange I thought.

2015-07-27 22.11.41.jpg

So like any nosey bugger I decided to lift it up and I found this.

2015-07-27 22.12.00.jpg

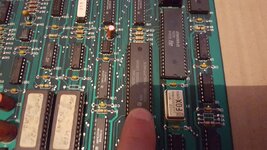
I have no idea what that is or why it's there. Any ideas @lukewells? Just for good measure I took a photo of the socketed chip that it's apparently fixed to.

2015-07-27 22.12.42.jpg
 
Thats flux on the back of the connectors. Remove it with flux cleaner (get from farnell etc) or isopropyl alcohol and a brush will work, but take more effort.

Looks like a capacitor on that back of that chip, not sure why, it might be a known fix for an issue, but none of mine have that mod
 
Thanks Luke. Will grab some flux cleaner; there's absolutely loads of sticky patches over the back so I presume I can use the flux cleaner to get it all nice and clean.

Something like this I presume?

http://uk.farnell.com/electrolube/flu400db/fluxclene-can-aero-brush-400ml/dp/725663

Just spray it on and then give a liberal brush to remove the discolouration. I presume it then evaporates so you'll left with a nice clean surace?

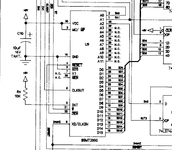
As for the capacitor - it's intriguing me now. If I remember correctly the pins on the chip are numbered anti-clockwise when the notched end of the chip is at the top. In that case the capacitor is bridging pins 6 and 10 on the chip. But beyond that I struggle to interpret the diagram. I presume this is the correct section.

BSMT.png

Edit: 6 to 10? So that's CLKOUT to ground then?
 
Last edited:
Ok, so the boards are slowly getting cleaned and reinstated into the backbox.

In the meantime i've also finally finished applying the new custom decals.

I'm not planning on fitting the legs yet because I remember reading that it's well worth leaving them off as long as possible to prevent the decals from wrinkling at the corners. But planning ahead does anyone on here have any opinions as to which leg protectors are the best?

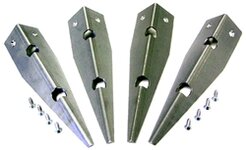
I'd previously got some of the felt ones and trimmed them to size but with a nice newly decalled cabinet I was thinking these might be better:

www.pinballheaven.co.uk_shop_images_535_0599_00_med.jpg

From what I recall these actually screw through the decal and then the leg is fitted on top. Because they're seperately screwed into the cabinet it should help with preventing decal wrinkling? Correct? Or is there something else I should go for?
 
But planning ahead does anyone on here have any opinions as to which leg protectors are the best?

The metal Stern ones you've pictured above are what I would use. I've heard that a good trick is to offer them up and then score the decal round the edge of them to prevent any wrinkling however I've not tried this. @replicas is your man for advice on re-decalled cabinets :thumbs:
 
This one is for anyone else out there who has a Rocky & Bullwinkle.

On my original machine there was this white piece of plastic at the corner near the Boris Button (here seen affixed with 1 screw).

2014-07-21 20.42.47.jpg

And you can see it from another angle here.

2014-07-21 20.42.54.jpg

I'm just curious if this is factory original or something that someone has added later. The donor cab I got doesn't have screw holes to fit the part so it's set me wondering.
 
Can anyone tell me conclusively what fuse I should be fitting in the AC box on Rocky & Bullwinkle?

The original label shows 8A but it's not specifically mentioned in the manual.

Interestingly the repro labels from Inkochnitos site show the USA version with 8A fuse and EU version with 4A?
 
Back
Top Bottom